
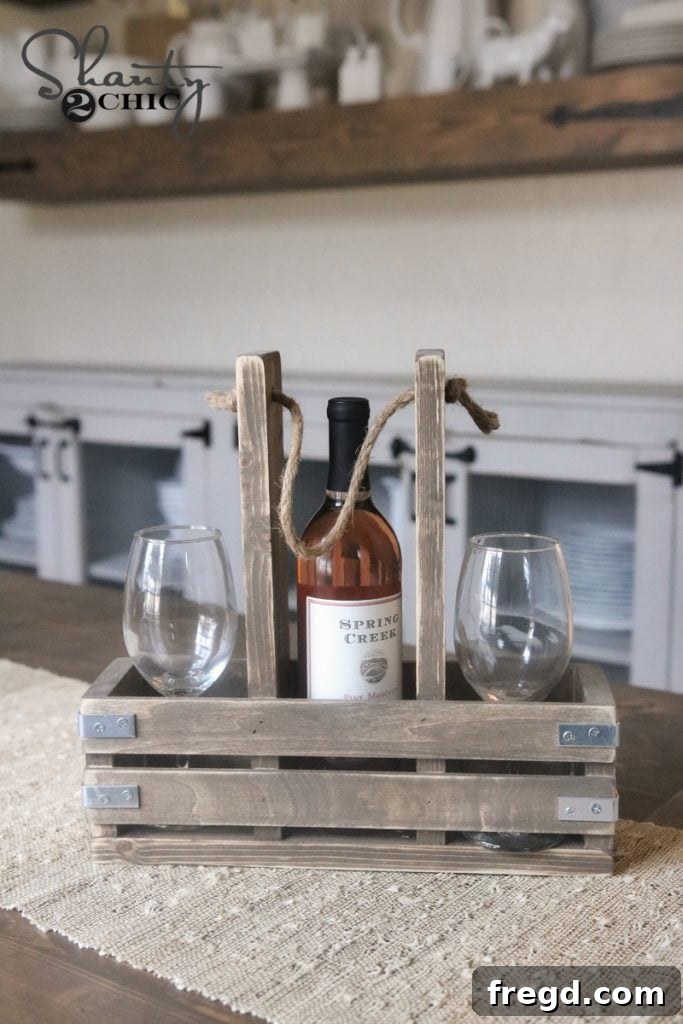
Welcome, fellow DIY enthusiasts and wine lovers! As the festive season approaches or simply when you’re looking for a delightful new project, we have something truly special for you. Today, we’re thrilled to present a comprehensive guide to crafting your very own elegant and functional DIY Wine Caddy. This isn’t just a simple holder; it’s a stylish statement piece, perfect for effortlessly toting your favorite vintages to any gathering, serving as a charming home décor accent, or making a unique, handcrafted gift. Get ready to transform ordinary wood into an extraordinary wine carrier!
Craft Your Own DIY Wine Caddy: An Easy & Rewarding Woodworking Project
To ensure every step of your building journey is clear and straightforward, we’ve prepared an in-depth video tutorial alongside these written instructions. This visual guide walks you through the entire process, demonstrating each cut, drill, and assembly technique. It’s an invaluable resource, offering visual clarity that complements our detailed instructions, ensuring even novice woodworkers can achieve professional-looking results. Grab your tools and let’s get started on your custom wine caddy!
Discover the Rustic Charm of Your Handmade Wine Carrier
Imagine the convenience and style of arriving at a dinner party with your bottles securely nestled in a handmade wooden caddy, or the elegant display it creates on your kitchen counter. Our DIY Wine Caddy combines rustic aesthetics with practical functionality, making it an instant conversation starter. It’s designed not only to transport wine safely but also to showcase it beautifully. Take a moment to appreciate the finished project – a testament to simple design and the rewarding nature of woodworking.
Kickstart Your Project with Free, Detailed Woodworking Plans
We believe that great projects should be accessible to everyone. That’s why we’re providing meticulously crafted, absolutely FREE downloadable plans for this DIY Wine Caddy. These plans are your essential blueprint, featuring precise measurements, a comprehensive cut list, and clear diagrams that eliminate any guesswork. Whether you’re a seasoned woodworker seeking a quick project or a beginner taking your first steps, these plans will guide you with confidence, ensuring accuracy and a stress-free building experience. Don’t delay – download your free plans today and embark on creating a stunning, personalized wooden wine holder!
Download Your FREE DIY Wine Caddy Plans HERE!
Essential Materials & Tools for Your Custom Wine Carrier Project
Before you begin cutting and assembling, it’s crucial to gather all your materials and prepare your workspace with the necessary tools. This thoughtful preparation ensures a smooth, safe, and enjoyable build, ultimately contributing to the high-quality finish of your DIY wine caddy. Here’s a comprehensive list of what you’ll need:
Materials List for Your Wooden Wine Caddy:
- Wood Boards: You’ll primarily need 1×4 lumber for the main structure. The exact lengths and quantities for the base, side dividers, and long side panels are detailed in the free plans. Common woods like pine or poplar are excellent choices due to their affordability and ease of working.
- Wood Glue: A high-quality wood adhesive is indispensable for creating strong, lasting joints. It works in conjunction with nails to provide maximum durability.
- Brad Nails: Approximately 1.25-inch brad nails are ideal. They offer strong fastening without causing excessive splitting, especially in thinner wood pieces.
- Rope: Select a sturdy yet aesthetically pleasing rope for the handle. Options like sisal, cotton, or hemp rope can lend a rustic or nautical touch, depending on your preference. Ensure it’s comfortable to grip.
- Wood Stain or Paint: To finish and protect your caddy. The original project utilized Varathane Briarsmoke stain, offering a beautiful, rich, smoky brown finish. However, you can choose any color or finish that complements your style.
- Protective Topcoat (Optional but Recommended): A clear finish such as polyurethane, lacquer, or spar varnish will protect the wood from moisture, scratches, and wear, ensuring your caddy lasts for years.
- Corner Braces (Hardware): Small metal corner pieces (e.g., 1-1/2 inch zinc-plated corner braces) add both decorative flair and structural reinforcement, preventing joints from racking or separating over time.
- Sandpaper: Various grits (e.g., 120-grit for initial smoothing, 220-grit for final prep before finishing) for preparing the wood.
- Rags or Brushes: For applying stain and protective topcoats.
Recommended Tools for Building Your DIY Wine Caddy:
- Miter Saw: Essential for making precise and perfectly square crosscuts. This tool ensures your pieces fit together snugly, resulting in a professional-looking project. (Alternatives: circular saw with a guide, or even a hand saw with a miter box for smaller projects, though less efficient).
- Drill/Driver: An 18V cordless drill is highly recommended for drilling clean pilot holes for the rope handle and securely attaching hardware.
- Brad Nailer: An 18V brad nailer (such as a Ryobi model) significantly streamlines the assembly process, making quick work of securing joints while leaving minimal marks. (Alternative: traditional hammer and finishing nails, requiring more care to avoid splitting).
- Woodworking Clamps: Indispensable for holding pieces firmly in place while drilling, gluing, or nailing, ensuring accuracy and stability during assembly.
- Measuring Tape & Pencil: For accurate marking and measurement of all cuts and drill points.
- Safety Glasses & Hearing Protection: Non-negotiable safety gear when operating power tools. Always prioritize personal safety.
- Orbital Sander or Sanding Blocks: For efficient and thorough sanding of all wood surfaces before applying finishes, creating a smooth and appealing texture.
Step-by-Step Guide to Constructing Your DIY Wine Caddy
Step 1: Achieving Precise Wood Cuts for All Components
The success of your DIY wine caddy hinges on accurate cutting. Begin by carefully cutting all your 1×4 lumber pieces according to the specific dimensions outlined in your free plans. Use your miter saw to achieve clean, square cuts. Always double-check your measurements before making a cut – precision at this stage will save you headaches later on. Remember to wear your safety glasses and hearing protection. Ensure your workspace is clear, and keep your hands safely away from the saw blade. If you’re new to using a miter saw, it’s always a good idea to practice on scrap pieces of wood until you feel comfortable and confident with the operation.
Step 2: Preparing the Handle – Drilling Holes for the Rope
Once your lumber is cut, it’s time to prepare the two longest side pieces that will eventually form the top edges of your caddy and hold the rope handle. To ensure perfect alignment for your handle, securely clamp these two boards together. Align their ends and edges meticulously so that they act as one piece. Using your drill, create a hole at the top of these clamped boards, following the placement indicated in your plans. The drill bit’s diameter should comfortably accommodate the thickness of your chosen rope. Drilling both boards simultaneously while clamped ensures that the holes are perfectly mirrored, which is crucial for a balanced and comfortable handle. This also helps prevent any unsightly splintering around the drill points.
Step 3: Constructing the Base with Small Side Dividers
Now we begin the assembly of the wine caddy’s foundational structure. Take your main base piece and the smaller, short divider pieces. Apply a thin, even bead of wood glue to one end of each small divider. This glue is crucial for creating a robust bond that nails alone cannot achieve. Carefully position these glued ends onto the base piece, ensuring they are perfectly perpendicular and spaced according to your plans. Once positioned, use your 1.25-inch brad nails and brad nailer to secure them. Drive the nails through the underside of the base piece and into the glued edge of the small dividers. This method creates a strong, clean joint. Promptly wipe away any excess glue that squeezes out with a damp cloth to maintain a tidy finish, as dried glue can prevent stain absorption.
Step 4: Observing the Inner Structure of Your Emerging Caddy
With the small side dividers firmly attached to the base, you’ll now start to truly visualize the functional compartments of your DIY wine caddy. This stage is exciting as the internal framework for securely holding individual wine bottles becomes apparent. It’s a moment to appreciate the precision of your cuts and the strength of your initial joints. The project begins to take on its recognizable form, a clear indicator of your progress in creating this custom wooden wine carrier.
Step 5: Integrating the Longer Divider Boards with Handle Holes
Next, incorporate the longer boards that you previously drilled holes into. These pieces will serve as the top structural elements and the attachment points for your rope handle. Apply wood glue along the bottom edges of these long boards. Carefully align them atop the small side dividers you just installed, ensuring they are perfectly flush and evenly spaced across the base. Even spacing is crucial for the wine bottles to fit securely within their compartments without excessive movement. Use your brad nailer to fasten these longer boards, driving nails from the outside edges into the ends of the short dividers. As before, promptly wipe away any glue squeeze-out for a clean finish.
Step 6: Attaching the Protective Long Side Panels
With the internal structure now robust, it’s time to add the long side panels. These pieces are vital; they enclose the wine bottles, preventing them from shifting or falling out during transport, and significantly enhance the overall structural integrity of the caddy. While often referred to as “craft boards,” using 1x4s for consistency with the rest of the build can also be effective. Apply wood glue along all mating edges where these long side panels will meet the base and the ends of the short dividers. Then, firmly secure them in place using your brad nailer. Ensure these panels are flush with the top edges of the drilled long boards, creating a seamless and incredibly strong outer frame. This step brings your homemade wine carrier to its complete structural form, ready for finishing.
Step 7: The Finishing Touches – Stain, Rope Handle, and Hardware
With the construction phase complete, it’s time to infuse your DIY wine caddy with personality and protect it for years of enjoyment. This final stage allows for incredible customization and brings your project to life.
Sanding and Staining for a Flawless Finish:
Before any stain or paint, thorough sanding is paramount. Start with 120-grit sandpaper to smooth out any rough patches, glue residue, or imperfections, then progress to 220-grit for a wonderfully smooth, ready-to-finish surface. After sanding, meticulously remove all dust using a tack cloth or vacuum. For this project, a beautiful deep shade like Varathane’s Briarsmoke stain was chosen, which enhances the wood’s natural grain with a rich, inviting tone. Apply the stain evenly with a brush or rag, allowing it to penetrate as per the manufacturer’s instructions before wiping off any excess. Always work in a well-ventilated area. Once the stain is completely dry, apply at least two coats of a clear protective topcoat, such as polyurethane or lacquer. This not only adds a layer of durability against spills and wear but also gives your custom wine carrier a lasting, professional sheen.
Installing the Elegant Rope Handle:
Now, thread your chosen rope through the pre-drilled holes in the longer top boards. Ensure the rope is cut to a comfortable length, allowing for a good, balanced grip when the caddy is loaded with bottles. Secure the ends of the rope with strong, reliable knots on the inside of the caddy. You can opt for decorative knots for added visual interest or simple overhand knots for functionality. For extra security and to prevent fraying, a small dab of super glue or hot glue on the knots can be highly effective. This handle transforms your sturdy wooden wine holder into a truly portable and user-friendly accessory.
Attaching Decorative and Reinforcing Hardware:
For an extra touch of rustic charm and robust structural reinforcement, consider adding corner braces. The example utilized 1-1/2 inch Zinc Plated Corner Braces, commonly available at hardware stores like Home Depot. These can be spray-painted a contrasting color (like matte black for a modern industrial look) or a matching tone to seamlessly blend with your chosen stain. Using your drill, carefully attach these hardware pieces to the corners of your caddy. These small details not only enhance the visual appeal but also add significant strength and durability, ensuring your DIY wine caddy remains both beautiful and incredibly sturdy for years of use.
Explore Corner Braces for Your Project at Home Depot
Unleash Your Creativity: Customization Ideas for Your Unique Wine Caddy
The beauty of a DIY project lies in the endless possibilities for personalization. Your newly built wine caddy is a perfect canvas for expressing your individual style or tailoring it for a specific recipient. Here are some inspiring ideas to make your creation truly one-of-a-kind:
- Diverse Finishes: Beyond stain, consider painting your caddy. A vibrant solid color can create a modern look, while distressing techniques can achieve a charming vintage or shabby-chic aesthetic.
- Stenciling and Decals: Add a personal touch with stenciled initials, a family monogram, a witty wine-related quote, or even a silhouette of a wine bottle or glass. Vinyl decals offer another easy way to customize.
- Alternative Handles: Experiment with different types of rope—think colored, braided, or twisted varieties. For a more sophisticated look, you could use leather straps or even a sturdy metal handle.
- Engravings or Pyrography: If you have access to a laser engraver, you can add intricate patterns, custom logos, or deeply personal messages. Alternatively, pyrography (wood burning) offers a rustic, handcrafted feel.
- Internal Liners: For extra protection and a touch of luxury, consider lining the bottle compartments with felt, cork, or even a soft faux leather.
- Integrated Accessories: Attach a small, decorative bottle opener to the side of the caddy for ultimate convenience. Small hooks could also hold wine charms.
- Decorative Feet: Add small rubber or wooden feet to the bottom of the caddy to protect surfaces and elevate its appearance.
Why Invest in a DIY Wine Caddy? The Many Benefits!
Beyond the satisfaction of creating something beautiful with your own hands, a homemade wine carrier offers a multitude of practical and aesthetic advantages that make it an incredibly worthwhile project:
- The Perfect Personalized Gift: A custom-built wine caddy, perhaps pre-filled with a couple of exquisite bottles, makes an exceptionally thoughtful and personal gift for weddings, housewarmings, birthdays, anniversaries, or holiday celebrations. It shows genuine care and effort.
- Exceptional Portability & Protection: Safely transport your cherished wine bottles to parties, picnics, barbecues, or any social gathering. The sturdy wooden construction ensures bottles remain secure, preventing clinking, rolling, and potential breakage during transit.
- Elegant Home Presentation: Elevate your wine storage and display at home. Instead of bottles cluttering your countertop or pantry, showcase them neatly and stylishly in your beautiful, handcrafted caddy, adding a touch of rustic sophistication to any room.
- Cost-Effective Crafting: Building your own wine caddy is often significantly more economical than purchasing a high-quality, handcrafted wooden wine carrier from a specialty store or boutique, saving you money without compromising on style or quality.
- Complete Customization: As highlighted, you have full creative control over every aspect of the caddy, from the type of wood and the color of the stain or paint to the style of the handle and hardware. This allows you to perfectly match it to your existing decor or the specific tastes of a gift recipient.
- Skill Development & Therapeutic Hobby: This project is an excellent opportunity to hone fundamental woodworking skills, including precise measuring, accurate cutting, strong joinery techniques, and careful finishing. It’s a therapeutic and engaging hobby that builds confidence with every successful step.
- Eco-Friendly Option: By building your own, you can choose sustainable wood sources and eco-friendly finishes, contributing to a more environmentally conscious lifestyle.
Maintenance Tips to Preserve Your Wooden Wine Caddy
To ensure your handcrafted DIY wine caddy remains a beautiful and functional piece for many years to come, a little care and maintenance go a long way. Follow these simple tips to preserve its charm and durability:
- Gentle Cleaning: For everyday cleaning, simply wipe down your caddy with a soft, slightly damp cloth. Avoid using harsh chemical cleaners, as these can strip or damage the wood’s finish over time.
- Protect from Moisture: While a protective finish offers some resistance, prolonged exposure to excessive moisture can still lead to warping, staining, or damage to the wood. Always wipe up spills immediately and avoid placing your caddy in damp environments.
- Reapply Finish Periodically: Over time, with regular use, the wood finish may begin to show signs of wear or dullness. You can easily revive its appearance by lightly sanding the affected areas (with a fine-grit sandpaper like 220 or 320) and reapplying a fresh coat of stain or protective sealant.
- Check Hardware Security: Periodically inspect all screws, nails, and hardware components (like the corner braces) to ensure they remain tightly secured. Tighten any loose screws to maintain the caddy’s structural integrity.
- Handle Care: If using a rope handle, check for any fraying or wear. Replace the rope if it shows significant signs of damage to ensure safe carrying.
Conclusion: Your Masterpiece Awaits!
And there you have it – a wonderfully straightforward yet incredibly rewarding DIY project that culminates in a beautiful, highly functional, and undeniably charming wine caddy! We sincerely hope this detailed guide, complemented by our free downloadable plans and helpful video tutorial, has provided you with all the confidence and inspiration needed to tackle this woodworking endeavor. This project stands as a fantastic testament to the idea that with a few basic tools, a bit of patience, and clear instructions, anyone can create something truly special and “shanty-chic.”
Whether you’re crafting this custom wine carrier for your own enjoyment, as a deeply thoughtful gift for a loved one, or to add a touch of handcrafted elegance to your next gathering, your homemade wooden wine holder will undoubtedly be cherished. So, gather your materials, confidently fire up your tools, and get ready to experience the immense satisfaction of building something both practical and aesthetically pleasing. Don’t forget to share photos of your finished DIY wine caddy with us – we absolutely love seeing your unique creations and the personal touches you add!