
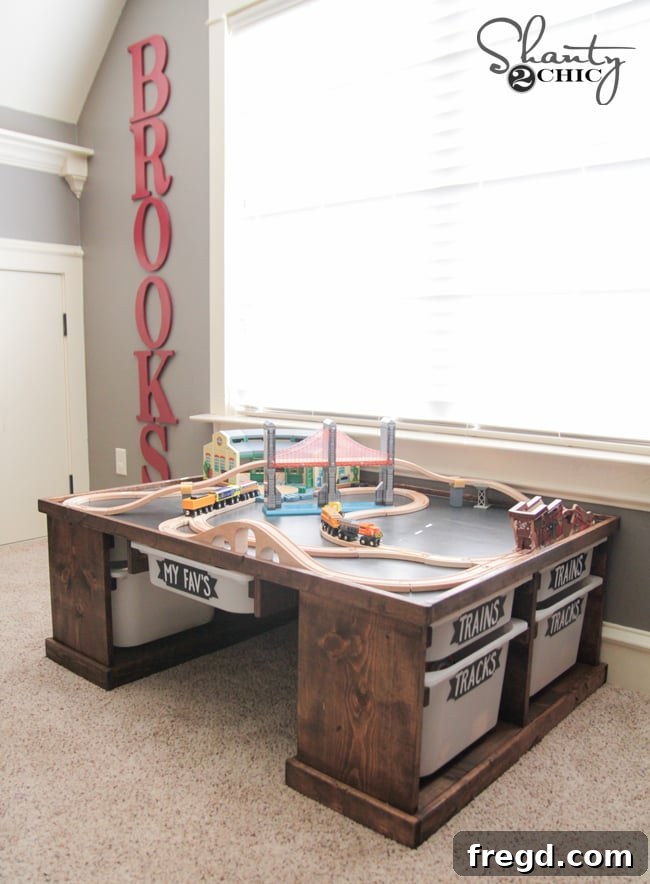
Build the Ultimate DIY Train or LEGO Table with Integrated IKEA Trofast Storage
Hello fellow DIY enthusiasts and parents! A few months ago, I embarked on a personal mission to craft the perfect play surface for my then four-year-old son, driven by his absolute obsession with trains and LEGOs. I’m thrilled to report that this project has been a monumental success! Since his birthday in October, this custom-built table has become the centerpiece of his play, and he absolutely adores it. If you’re looking to create a versatile and organized play space, you’ve come to the right place. Get ready to discover how to build your very own DIY Train or LEGO Table – a fantastic project that brings joy and organization to any child’s room.
Designing for Play and Practicality: The IKEA Trofast Advantage
Isn’t it incredible? This isn’t just any play table; it’s meticulously designed to integrate seamlessly with IKEA’s Trofast Storage boxes. I’ve utilized these robust and affordable storage solutions in my son’s toy storage unit before, and I can’t recommend them enough. They are incredibly durable, stand up well to enthusiastic child’s play, and provide an amazing amount of storage without breaking the bank. Plus, they come in a range of colors, offering a nice touch of customization to match your existing decor or your child’s preferences.
The beauty of this project lies in its simplicity. While it creates a sophisticated and highly functional piece of furniture, the construction process is surprisingly straightforward, making it an ideal endeavor for beginners. With the assistance of a quality Kreg Jig, you’ll be amazed at how quickly you can bring this design to life. As always, I’m here to guide you through every step of the build process below. To make it even easier, you can download and print the comprehensive, free plans by clicking HERE or by using the button provided further down. These plans detail all the cuts, measurements, and materials you’ll need, ensuring a smooth and successful build.
Getting Started: Essential Tools and Materials
Before diving into construction, gather your tools and materials. This project primarily uses common woodworking tools, but a Kreg Jig is truly a game-changer for creating strong, concealed joints.
Key Tools:
- Miter Saw: Essential for precise, straight cuts on your lumber.
- Kreg Jig (specifically the K5 model is highly recommended): For making strong and discreet pocket holes. If you don’t have one, consider putting this fantastic tool on your wish list – it truly elevates your woodworking game!
- Drill/Driver: To drive pocket hole screws and other fasteners.
- Brad Nailer (e.g., Ryobi Airstrike 18g): For attaching trim pieces with ease and precision.
- Measuring Tape and Pencil: For accurate marking.
- Safety Glasses and Hearing Protection: Always prioritize safety in your workshop!
- Clamps: Extremely useful for holding pieces together during assembly.
Materials List:
- 1×12 Lumber: Used for the main structural bases, sides, and middle dividers.
- 1×2 Lumber: For cleats that support the storage bins.
- 1/2″ MDF or Hardwood Plywood: For the tabletop surface. MDF offers a super smooth finish ideal for play, while plywood provides extra durability.
- 1.25″ Pocket Hole Screws: For joining 1×12 pieces.
- 1″ Pocket Hole Screws: Specifically for attaching the 1/2″ tabletop to the base.
- Wood Glue: For extra strength and stability in all joints.
- 1.25″ Brad Nails: For attaching trim and cleats.
- Rust-Oleum Chalked Paint (Charcoal): Or your preferred color for the tabletop. Available at Home Depot.
- Varathane Triple Thick Polyurethane: To protect the painted tabletop from scratches and wear.
- Varathane Dark Walnut Stain: Or a stain of your choice to match your child’s room decor. Also found at Home Depot.
- IKEA Trofast Storage Boxes: The heart of the storage system!
Step-by-Step Construction Guide for Your Play Table
1. Making Your Cuts and Drilling Pocket Holes
The first step is to accurately cut all your lumber according to the provided plans. The bases of the table are constructed using 1×12 lumber. Carefully make all your cuts for the base pieces, side panels, and middle dividers. If you’re using a miter saw and find that a 12-inch wide board exceeds its cutting capacity, a common technique is to make one pass, then flip the board over and complete the cut from the opposite side, ensuring a clean and straight line.
Once your pieces are cut, it’s time to drill the pocket holes using your Kreg Jig. This tool creates angled holes for screws, allowing for incredibly strong and hidden joints. Most of the pocket holes for the 1×12 pieces will be set for 3/4″ material thickness. However, remember to adjust your Kreg Jig settings when drilling holes that will connect to the 1/2″ thick tabletop material. This small adjustment ensures that your screws don’t punch through the thinner top.
2. Assembling the Bases and Dividers
With all pocket holes drilled, it’s time for assembly. Begin by attaching the side panels to the base pieces. Apply a generous amount of wood glue to the mating surfaces before fastening with 1.25″ pocket hole screws. Wood glue provides incredible strength to your joints, making the entire structure more robust and durable, especially for furniture that will see a lot of play. Ensure pieces are flush and square as you screw them together.
You will end up with two completed side-base units that look like this, ready for the next stage of assembly.
Next, integrate the middle dividers into the base pieces. These dividers are crucial for segmenting the storage areas and providing additional structural support. Take care to ensure they are perfectly centered for balanced aesthetics and functionality. Again, use wood glue along with your pocket hole screws for maximum durability.
3. Attaching the Base Trim and Storage Cleats
Once the main base structure is together, add the trim around the bottom of each base piece. This trim adds a finished look and helps conceal the structural elements beneath. For this, apply wood glue to the back of the trim pieces and secure them with 1.25″ brad nails using your Ryobi Airstrike 18g brad nailer (or similar). Brad nails are excellent for trim work as they leave very small holes that are easy to fill and hide.
Next, attach the 1×2 cleats. These vital pieces are what the IKEA Trofast storage baskets will rest upon. While the original plans might suggest adding these later, I found it significantly easier to attach them before connecting the bases to the tabletop. This allows for better access and ensures a more secure attachment. Again, use both wood glue and brad nails for a strong hold. Precision here is key to ensure your storage bins slide in and out smoothly.
4. Connecting the Bases and Adding the Tabletop
At this stage, connect the two base units with a stretcher piece. This stretcher, attached using 3/4″ pocket holes and 1.25″ pocket hole screws, serves two critical functions: it significantly enhances the overall stability of the table, preventing wobbling, and provides additional support for the tabletop, especially in the central area. Your structure should now resemble the image below, a strong and stable foundation for your play surface.
Now for the main play surface: the tabletop! I opted for 1/2″ MDF (Medium-Density Fiberboard) for my table’s top. MDF is an excellent choice for play surfaces because of its incredibly smooth finish, which is ideal for trains to roll on and LEGO bricks to connect to without snagging. Alternatively, hardwood plywood is another fantastic option, offering slightly more durability and resistance to impact.
To attach the top, lay the MDF or plywood flat on your workbench (or improvised support, as I did!) and carefully position the assembled base structure onto it. Ensure it’s perfectly aligned. Then, secure the base to the tabletop using 1″ pocket hole screws from underneath, driving them into the MDF/plywood. This method provides a clean look with no visible screw holes on the play surface.
5. Adding Additional Storage and Support
At this point, I added one more tub holder to the front of my table. Since my table would be positioned against a wall, this placement maximized accessible storage. If you plan to place your table in the center of a room, I highly recommend adding a tub holder on the opposite side as well. This doubles your under-table storage capacity and keeps toys organized from all angles. More storage means a tidier play area and happier parents!
6. Finishing Touches: Paint, Stain, and Protection
Once all structural components and supports were securely attached, I flipped the table upright and moved on to the finishing stages. For the tabletop surface, I chose Rust-Oleum Chalked paint in a sleek charcoal shade, which I found readily available at Home Depot. Chalk paint offers a beautiful, matte finish. After the paint dried completely, I applied several coats of Varathane Triple Thick Polyurethane over the top. This step is absolutely crucial as it provides a durable, protective layer that guards against scratches, scuffs, and spills – essential for any high-traffic play surface.
Next, I added the final trim pieces around the perimeter of the tabletop. These pieces not only provide a polished, finished look but also help to contain toys and provide a slight lip for trains or LEGO structures. Use wood glue and 1.25″ brad nails to securely attach these trims.
Time for the moment of truth – testing out the storage baskets! The smooth fit and easy access confirmed that all the measurements and cleat placements were perfect.
To ensure the table blended seamlessly with the existing decor of my son’s room, I stained the entire wooden structure (excluding the painted tabletop) using Varathane Dark Walnut Stain, also purchased from Home Depot. This rich, deep stain provides a warm and inviting look that complements the modern charcoal top, creating a piece that is both functional and aesthetically pleasing.
7. Personalizing Your Storage: Labels and Beyond
To truly organize the vast collection of trains, tracks, and LEGOs, I created custom labels for the storage baskets using my Silhouette Cameo machine. This brilliant crafting tool allows for endless customization, cutting vinyl with precision to create neat and functional labels. I’ve had mine for years, and it’s truly one of my favorite “indoor tools” for adding those perfect finishing touches to any project. These labels make it easy for my son to know where everything belongs, encouraging him to participate in tidying up.
The Finished Masterpiece: A Dream Play Table
And here it is – the finished DIY Train and LEGO Table, ready for countless hours of creative play! This project not only delivers an organized solution for toy storage but also provides a durable and dedicated surface for imaginative play, designed to withstand the rigors of childhood.
Thank you so much for joining me on this DIY journey! I hope this detailed guide empowers you to build this amazing train and LEGO table for the little ones in your life. Don’t hesitate to reach out if you have any questions along the way. Happy building!