
Welcome, fellow DIY enthusiasts! We’re absolutely thrilled to have you join us on another exciting woodworking journey. To stay connected with all our latest projects, behind-the-scenes glimpses, and creative inspirations, make sure to FOLLOW US ON INSTAGRAMand PINTEREST! We constantly share fresh ideas and step-by-step guides to help you transform your home with custom-built furniture.
Building a Dream: The DIY Platform Dresser Bed for Avery
Every child deserves a space that reflects their personality and meets their growing needs. Recently, I embarked on a mission to create just such a haven for my oldest daughter, Avery. For a decade, she’s shared a room, and as she approaches her twelfth birthday, the desire for her own private sanctuary became paramount. This led to closing off a loft space, a project that culminated in a beautiful new room for her. With that major transformation complete, my focus naturally shifted to optimizing Avery’s existing space, particularly her sleeping arrangements.
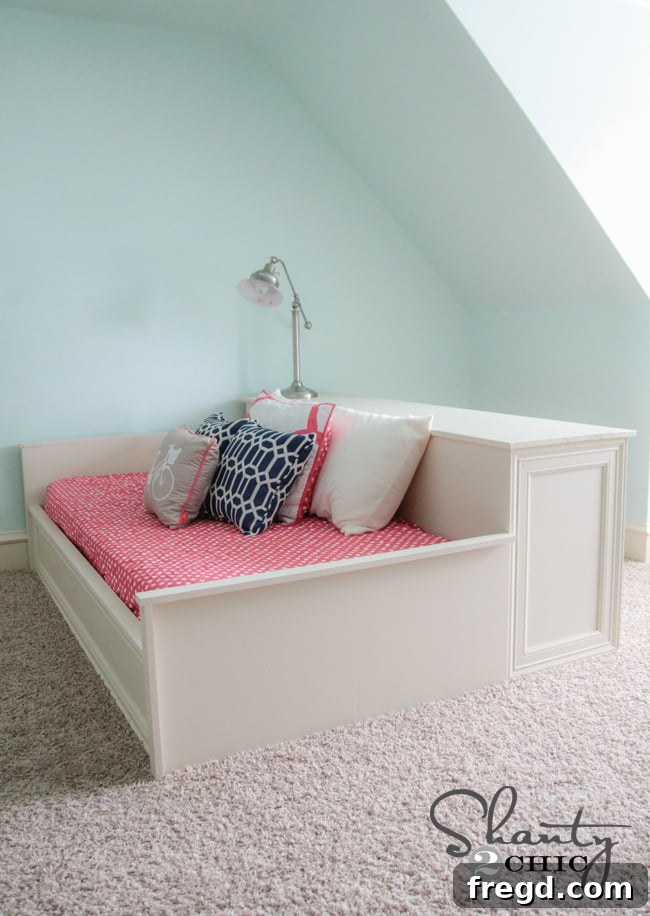
Being almost 12, Avery is keenly aware of my passion for building furniture. Over the past couple of years, she’s developed a discerning eye, often found perusing Pottery Barn Teen magazines with specific requests in mind. This blend of her maturing tastes and my woodworking skills inspired today’s incredible build: a custom DIY Platform Dresser Bed! This innovative design combines sleeping and storage into one stylish, space-saving solution perfect for any growing teenager’s room.
Isn’t it just fantastic? This project truly showcases how custom furniture can elevate a room’s functionality and aesthetic. Today, we’re diving specifically into the construction of the bed portion of this amazing two-part build. We’ve designed this as a comprehensive guide to make your DIY journey as smooth as possible.
Your Essential Guide: Download the FREE Plans!
To ensure you have all the precise measurements and detailed instructions at your fingertips, we’ve created a comprehensive set of FREE PLANS for this DIY Platform Dresser Bed HERE. Don’t hesitate to download and print them by clicking the link or the button below. These plans are your roadmap to successfully recreating this beautiful and functional piece of bedroom furniture.
Choosing Your Materials: The Power of PureBond Plywood
Let’s get started on the build! The foundation of this project heavily relies on long, sturdy pieces of hardwood plywood. When embarking on any large-scale woodworking project, selecting the right materials is crucial, not just for durability but also for cost-effectiveness and safety.
From the outset, my choice for the plywood was clear: PureBond Plywood. Many of you are already familiar with our strong endorsement for this exceptional product, which we’ve featured in numerous furniture builds. It’s truly a game-changer for DIYers and professional builders alike.
What makes PureBond Plywood stand out? Firstly, it’s proudly made in the USA, supporting local industries. More importantly, it’s completely formaldehyde-free. This is a significant advantage, especially when building furniture for children’s rooms, ensuring a healthier indoor environment for my family and yours. It’s also remarkably affordable. You achieve the sophisticated, elegant look of beautiful hardwood at a fraction of the cost typically associated with solid wood. Furthermore, PureBond is committed to sustainability, crafted from reusable resources, which aligns with our values for eco-conscious building. But for us, one of its most compelling features is its sheer beauty; the natural grain and finish are simply stunning.
Since discovering PureBond Plywood several years ago, it has become our undisputed go-to brand for all our plywood needs. The decision was incredibly easy given its combination of quality, safety, aesthetics, and value.
You can readily find PureBond Plywood at Home Depot. For this platform dresser bed, I opted for birch, both for its light, clean aesthetic and its durability. Plywood sheets typically come in large 4′ x 8′ dimensions. Transporting such massive sheets can be quite a challenge, especially when you have five energetic kids in tow! That’s why I often enlist the help of the friendly staff at Home Depot.
I had a wonderful associate in the lumber department precisely rip down the large sheets into more manageable sections for me. This service is invaluable, saving time and effort, and ensuring accurate initial cuts before I even get back to the workshop.
Precision Cutting with the Kreg Rip-Cut and Ryobi Circular Saw
While Home Depot provides initial cuts, there will always be additional cuts needed for a project of this scale. I’ve discovered the absolute easiest and most accurate way to rip down plywood at home is by combining my trusty Kreg Rip-Cut with my reliable Ryobi circular saw. This dynamic duo is a true powerhouse in the workshop, making what could be a challenging task incredibly simple and precise.
Initially, the Kreg Rip-Cut might look a bit intimidating with its various components, but trust me, once you’ve used it, you’ll wonder how you ever managed without it. It attaches seamlessly to your circular saw, transforming it into a guided ripping machine. The process is straightforward: first, you align the red arrow guide with the exact position of your saw blade. Then, you simply adjust the arrow on the ruler to the desired width of your cut. This intuitive setup ensures that every rip cut is consistent and accurate.
The secret to its incredible accuracy lies in the guide at the end of the ruler, which runs along the edge of your plywood sheet. This ingenious feature keeps your saw perfectly straight throughout the cut, eliminating any wobbles or deviations. You just line it up, push your saw, and let the Rip-Cut do the heavy lifting of maintaining a perfect line. It truly is SO EASY to achieve professional-quality cuts every time, making it an essential tool for any DIY project involving sheet goods.
Step-by-Step Assembly: Constructing Your Platform Bed
Building the Headboard and Footboard
We’ll begin by assembling the headboard and footboard, the primary visual components of your new bed. My process involved ripping the plywood pieces down to their required dimensions and then adding decorative trim. For attaching all the trim pieces, I relied on my trusty Ryobi Airstrike Nail Gun, which provides quick and secure fastening without the need for an air compressor. Crucially, beneath each piece of trim, I applied a generous line of Gorilla Wood Glue. Remember, glue provides an incredible amount of strength and stability to your joints, creating a bond that will last for years – never skip the glue!
A practical consideration for this build was the logistics of getting the finished bed upstairs. Given that I was working alone and didn’t have anyone at home to assist me with carrying large, heavy components, I made the strategic decision to build the headboard, footboard, side rails, and the main frame in my workshop. This allowed me to work efficiently and then transport the individual, lighter pieces upstairs for final assembly in Avery’s room. This approach saved a lot of potential back strain and frustration!
Utilizing the Kreg Jig for Strong Joinery
For the subsequent steps involving strong, concealed joints, I turned to my indispensable Kreg Jig. I am currently using the K5 model, and I absolutely adore it. It might sound peculiar to express such enthusiasm for a tool, but for anyone who loves woodworking, the Kreg Jig is truly something to get giddy about! It simplifies pocket-hole joinery, making it accessible and robust for DIY furniture builds.
Crafting the Side Rails
Next up are your bed’s side rails. It’s important to note that one of these rails will remain a plain piece of hardwood plywood, as it’s designed to seamlessly attach to the dresser component of this platform bed system (which we’ll cover in a future post!). The other side rail, however, will be beautifully trimmed out to match the headboard and footboard. I chose an inexpensive door casing for my trim, which provides an elegant finish without breaking the bank. Ensure you add 3/4″ pocket holes to each end of your bed rails. These strategically placed pocket holes are critical for securely attaching the rails to both the headboard and the footboard, creating a sturdy and reliable bed frame.
Assembling the Bed Frame
Finally, it’s time to construct the main frame of the bed, the structure that will support the mattress and connect all the major components. For this critical section, I utilized 3/4″ pocket holes along with 1.5″ pocket hole screws. The combination of pocket holes and the specific screw length ensures an incredibly strong and stable frame, essential for the longevity and safety of the bed. Take your time during this step to ensure all joints are tight and square, laying the groundwork for a robust platform bed.
Final Assembly in Avery’s Room
Once all these individual components – the headboard, footboard, side rails, and bed frame – were meticulously crafted in the workshop and carefully brought upstairs, the exciting phase of final assembly began. Seeing the pieces come together in their intended space is always incredibly rewarding. First, I securely attached the bed frame to the side rails. This step requires precision and a strong bond to ensure the structural integrity of the entire bed.
For this crucial connection, I used 1 1/4″ wood screws in conjunction with wood glue. The combination of mechanical fasteners and adhesive creates an incredibly robust joint, ensuring that the bed frame is firmly integrated with the side rails. This attention to detail in joinery is what makes DIY furniture not only beautiful but also long-lasting and reliable.
My final step in the bed assembly was connecting the headboard and footboard to the side rails and frame. Again, I opted for a combination of wood glue and 1 1/4″ pocket hole screws. This method provides superior strength and a clean finish, as the pocket holes are discreetly placed. With each component carefully secured, the platform bed truly began to take its final, impressive shape.
The Completed Platform Bed: Ready for the Next Phase!
And just like that, the core structure of our DIY Platform Dresser Bed is finished! Well, almost. It’s fully assembled and rock-solid, but still awaiting its transformative coat of paint and, of course, the integrated dresser unit. Even in its raw wood state, the quality and craftsmanship shine through, promising a beautiful and functional addition to Avery’s room.
Here are a few more captivating shots of the completed platform bed. Imagine the possibilities for customization with paint or stain! Now, I know you’re probably eager to see the integrated dresser that truly completes this innovative piece of bedroom furniture. But for that exciting reveal, you’ll have to wait just a little bit longer – stay tuned for next week’s post, where we’ll walk you through building and attaching the dresser!
Thank You for Joining Our DIY Adventure!
Thank you so much for stopping by and following along with this detailed guide to building the platform bed portion of our DIY Platform Dresser Bed. We genuinely appreciate your support and interest in our projects! If you found this tutorial helpful or inspiring, we would absolutely LOVE for you to share and PIN this bed with all your friends, family, and fellow DIY enthusiasts. Spreading the word helps us continue to create more free plans and valuable content for you.
A huge thank you and shout-out to Jay of Jay’s Custom Creationsfor his incredible work in transforming our original ideas and designs into these professional, easy-to-follow printable plans for our readers. Jay’s expertise is invaluable, and we encourage you to check out his website for a wealth of fantastic woodworking ideas, tips, and tutorials. His site is a treasure trove of inspiration for anyone looking to enhance their home with custom-built pieces!