
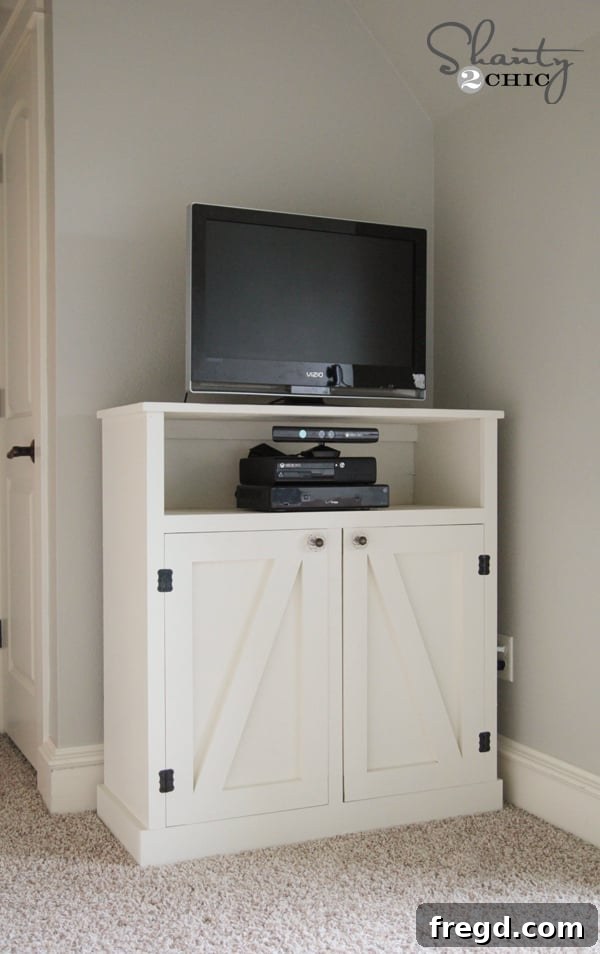
DIY Barn Door Media Console: Crafting Your Own Rustic Entertainment Center
There’s nothing quite as satisfying as bringing a piece of furniture to life with your own hands, especially when it meets a specific need and perfectly complements your home’s aesthetic. I’m absolutely thrilled to share my latest creation: a stunning DIY Barn Door Media Console! What makes this project even more special is that I crafted the entire piece from materials I already had on hand – predominantly from my scrap wood pile. This not only makes it incredibly cost-effective but also a testament to sustainable crafting.
For those who’ve been following along, you’ll know that I recently transformed a loft space into a cozy bedroom for my daughter. This renovation resulted in a unique, somewhat odd-shaped room that presented a delightful design challenge. We needed a functional TV console that could fit snugly into a corner, yet also seamlessly blend with the room’s existing theme and design. After much thought and sketching, this beautiful barn door-style console emerged, perfectly fulfilling all our requirements!
Isn’t it fantastic? Finally, her television is off the floor and securely housed in a piece that adds character and charm to her space. This makes both of us incredibly happy! In the following sections, I’ll guide you through the entire building process, offering insights and tips to help you create your own custom media console.
Accessing Your Free Barn Door Media Console Plans
To ensure your building experience is as smooth as possible, I’ve teamed up with our talented friend, Jay of Jay’s Custom Creations. Jay has meticulously translated my design into comprehensive, free printable plans, available for you to download with just a click! These detailed plans will walk you through every cut and measurement, making this project accessible even for novice woodworkers. You can get your hands on the FREE plans by clicking HERE or by clicking on the image below. While you’re at it, I highly recommend visiting Jay’s website; he has an incredible collection of other amazing woodworking plans that are definitely worth exploring!
Why Choose a DIY Barn Door Media Console?
Opting to build your own barn door media console offers a wealth of benefits beyond just saving money. First and foremost, it allows for unparalleled customization. You can tailor the dimensions to perfectly fit your space, choose materials that match your existing décor, and select hardware that reflects your personal style. The rustic charm of barn doors adds a unique, farmhouse-inspired touch that can elevate any room. Furthermore, a DIY project fosters a deep sense of accomplishment and pride. You’ll have a one-of-a-kind piece that tells a story, rather than a mass-produced item. This project is also a fantastic opportunity to hone your woodworking skills and even utilize leftover materials, contributing to a more sustainable approach to home furnishing. It’s practical, providing essential storage and display space, and aesthetically pleasing, serving as a focal point in your living area.
Essential Tools and Materials for Your Build
Before diving into the construction, gathering your tools and materials is crucial. For this project, you’ll need standard woodworking tools such as a tape measure, pencil, safety glasses, a miter saw or circular saw, and a sander. Specific tools that greatly simplify this build include a Kreg Jig (for strong, concealed pocket hole joints), a Ryobi cordless Airstrike Nail gun (for attaching trim without an air compressor), and a Ryobi Airstrike Stapler (for securing door backs). In terms of materials, I highly recommend Purebond hardwood plywood for the console’s main structure due to its durability and eco-friendly attributes. For trim, primed MDF or pine 1×4 and 1×2 boards work perfectly. You’ll also need wood glue, 1.5-inch pocket hole screws, 3/4-inch staples, wood putty, caulk, paint, and your chosen hardware (hinges and knobs).
Step-by-Step Guide to Building Your Media Console
1. Constructing the Console’s Main Box
The first fundamental step in this project is to build the sturdy outer box of the console. I opted for Purebond hardwood plywood for this section, which is an excellent choice for its strength, smooth finish, and formaldehyde-free composition. You can easily find Purebond plywood at Home Depot. A fantastic tip I always follow is to have the friendly team at Home Depot cut the large plywood sheets down to size for me. This not only saves me time and effort but also ensures precise cuts and makes transporting the material home much more manageable in a standard vehicle.
Throughout the entire build, my trusty Kreg Jig was an indispensable tool. I cannot emphasize enough how much I love my Kreg Jig – it truly revolutionizes joinery! If you’re new to Kreg Jigs, my colleague Ash and I created a video explaining what a Kreg Jig is and how it functions. For this particular console, I used 3/4-inch pocket holes to create incredibly strong and discreet joints. The model Ash and I frequently use is also linked HERE for your reference.
Once the pocket holes were drilled, I meticulously joined the plywood pieces using a combination of wood glue for added strength and 1.5-inch pocket hole screws for a firm, lasting connection.
Next, I installed the internal middle partition, following the same reliable method of drilling pocket holes and securing it with wood glue and screws. This partition is crucial for providing structural integrity and creating distinct storage compartments within the console.
At this stage, your console’s core structure should start taking shape, resembling a robust box with internal divisions.
2. Adding the Decorative Trim
Once the main box is assembled, it’s time to add the trim – a step that significantly enhances the aesthetic appeal and gives the console a more finished, custom look. This part is surprisingly easy and incredibly rewarding! I utilized my Ryobi cordless Airstrike Nail gun, combined with wood glue, to attach all the trim pieces securely. The Airstrike is a game-changer, eliminating the need for an air compressor and making trim work a breeze.
I began by attaching the bottom trim piece. For this section, I used primed MDF, conveniently pulled from my scrap pile. Primed MDF is excellent for trim as it’s stable, takes paint well, and often comes at a lower cost than solid wood. However, you can certainly use pine or any other 1×4 board if that’s what you have available or prefer.
Following the bottom piece, I moved on to adding the 1×2 trim. I started with the vertical outside pieces, ensuring they were perfectly aligned and level.
Then, the top horizontal trim piece was added, perfectly capping the console’s frame.
And finally, the middle trim piece, which elegantly frames the console’s compartments and provides a clean separation.
3. Crafting the Iconic Barn Doors
With the console’s main structure and trim in place, we’re ready for the fun part: building the signature barn doors! These doors are what truly give the piece its rustic charm and unique character. I even had a few adorable “helpers” join me for this exciting step, which always makes woodworking more enjoyable!
Once again, my Kreg Jig was essential for building the sturdy door frames. For this part, I used 1×3 boards, which provide a robust frame for the barn door style. I drilled 3/4-inch pocket holes into the ends of the horizontal pieces and secured them with 1.5-inch pocket hole screws, creating strong and neat corners for each door frame.
Next, I attached the back panel of each door. This is where the Ryobi Airstrike Stapler came in handy. I applied a line of wood glue around the perimeter of the door frame and then carefully positioned the back panel. Using 3/4-inch staples, I secured the back panel from the back side, stapling into the door frame. This method ensures a clean, fastener-free front surface for the doors.
The final detail for the doors was adding the diagonal brace, which gives barn doors their distinctive look. I found the easiest and most accurate way to do this was to hold the wood piece directly up to the assembled door frame. I then carefully marked the precise angles required for a perfect, flush fit. After marking, I cut the piece at the drawn angles using my miter saw. Once cut, I applied a line of wood glue to the back of the diagonal piece and secured it in place by nailing from the back of the door frame into the back of the diagonal piece, ensuring no fasteners were visible on the front.
4. The Finishing Touches: Back Panel, Top, and Hardware
The last structural steps involved adding the back panel and the top surface of the console. For the back, I used 1/4-inch hardwood plywood. As a testament to the versatility of a well-stocked scrap pile, I pieced together a few smaller scraps to create my back panel. This meant I didn’t have to buy a whole new sheet of plywood, which is a fantastic perk of DIY and a great way to minimize waste!
For the console’s top, I opted for a project panel. These panels come in various wood species and are pre-sanded, making them a convenient choice for a ready-to-finish surface. Alternatively, you could use hardwood plywood for the top as well. If you choose plywood, remember that you’ll need to apply edge banding to cover the exposed plywood layers for a clean, professional finish.
With all the major components assembled, it was time for the crucial finishing steps. I meticulously filled all visible nail holes and seams with wood putty, then applied caulk to any gaps for a seamless appearance. After the putty and caulk dried, I sanded the entire console smooth, preparing it for paint. I painted the whole piece the same elegant color as my daughter’s room trim: Antique White by Sherwin Williams (SW 6119). This neutral yet classic shade provides a fresh, clean look that brightens the room and allows the barn door design to truly stand out.
The final touches involved installing the hardware. I sourced the hinges for the barn doors from Home Depot, ensuring they were sturdy and suitable for cabinet doors. For a touch of sparkle and charm, I found these adorable glass knobs at Hobby Lobby. These small details make a big impact on the overall character of the piece. With the console complete, my wonderful hubby helped me lug it upstairs into her room, and just like that, it was done!
Bringing It All Together: Your New Media Console
Standing back and admiring the finished barn door media console fills me with immense satisfaction. It’s not just a piece of furniture; it’s a solution tailored to a specific need, crafted with care, and imbued with personal touch. The rustic charm of the barn doors, the practical storage compartments, and the perfect fit in her corner space make it an invaluable addition to my daughter’s room. This project demonstrates that with a little creativity, some basic woodworking skills, and free plans, you can transform simple materials into a functional and beautiful piece that enhances your home.
Here are a few more shots of the completed console, showcasing its details and how it fits into the room:
Thanks so much for stopping by and following along with this DIY barn door media console build! I hope this detailed guide has inspired you to tackle your own custom furniture project. If you have any questions at all about the plans, materials, or steps, please don’t hesitate to ask in the comments below – I’m always happy to help! I would absolutely LOVE for you to share and PIN these free plans with all your friends and fellow DIY enthusiasts!
Explore More DIY Home Projects for Your Space
The media console is just one piece of the puzzle in my daughter’s newly designed room. If you’re looking for more inspiration to personalize your home, be sure to check out some of the other exciting projects I’ve completed for her space:
DIY Board and Batten Wall: Learn how to add classic architectural detail and texture to any room with this step-by-step tutorial for a stunning board and batten accent wall.
DIY Built-In Daybed: Maximize space and create a cozy, functional sleeping and lounging area with integrated storage. This project is perfect for small rooms or creative layouts.
DIY Floating Shelf or Mantle: Discover how to build and install elegant floating shelves or a rustic mantle that adds character and display space without visible supports.