
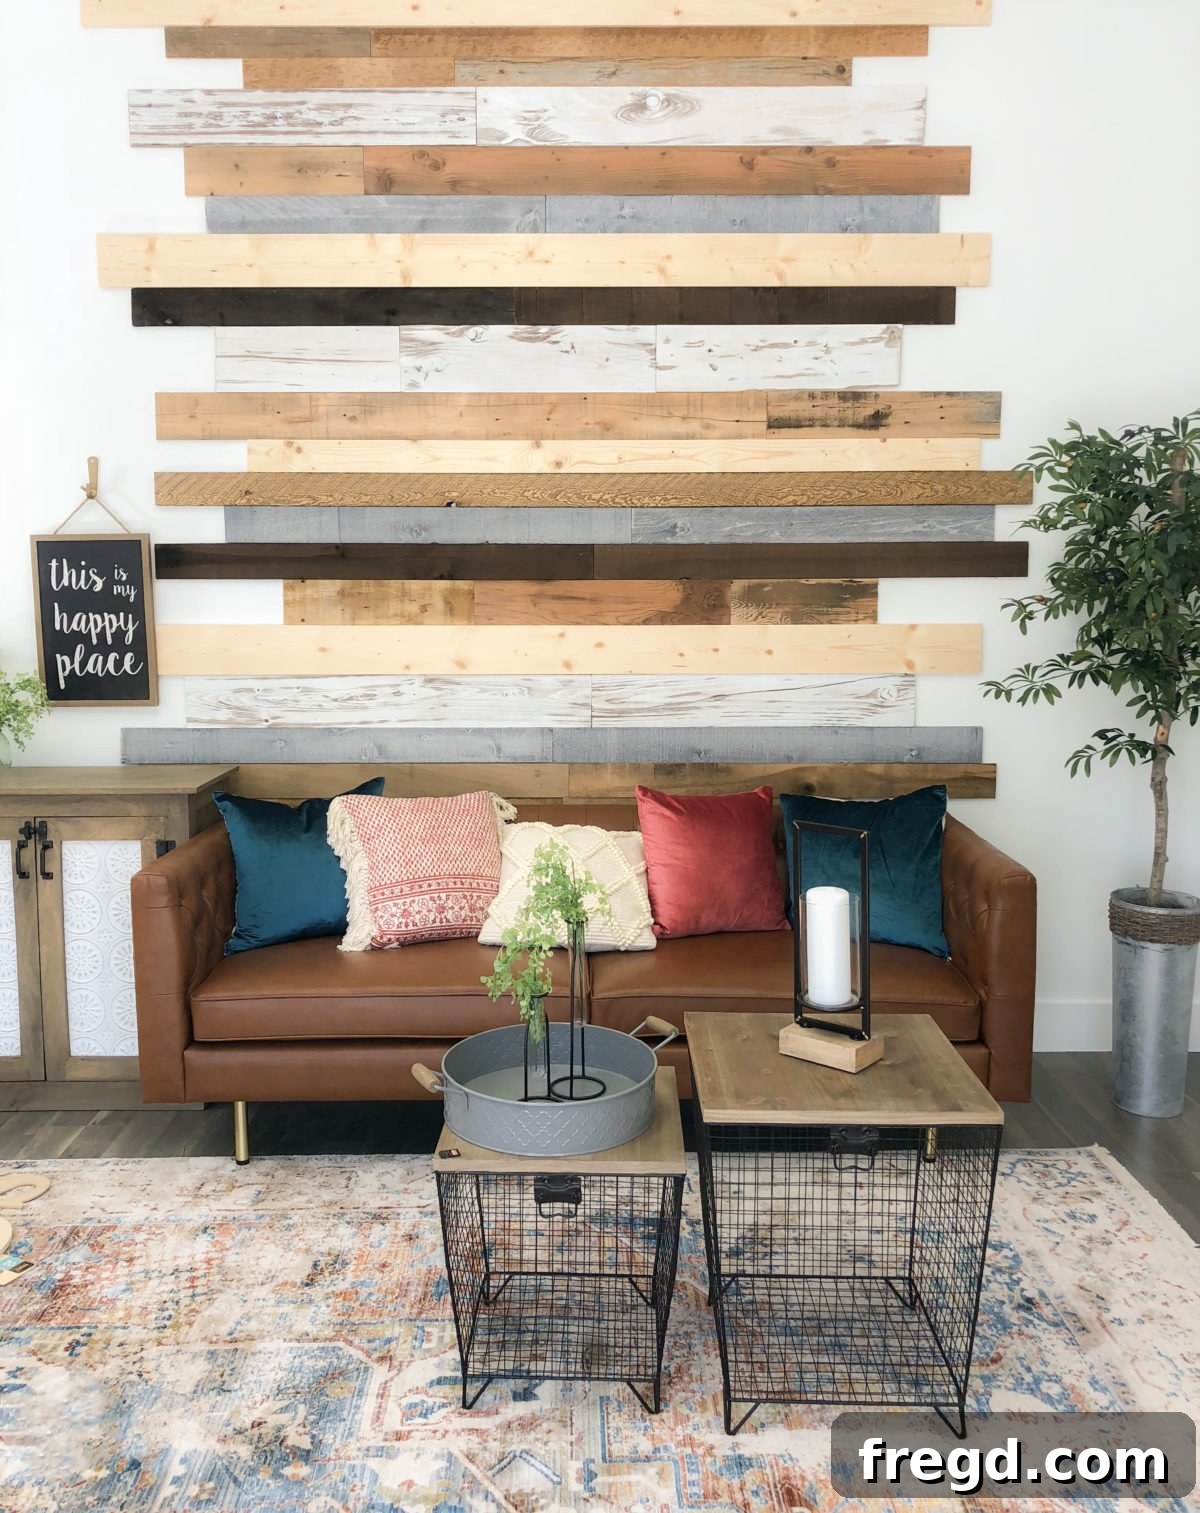
Hey fellow DIY enthusiasts! Moving into a new space always brings the excitement of fresh possibilities and the challenge of making it truly yours. When Ash and I recently settled into our new office, we were immediately faced with a common design dilemma: a large, blank white wall begging for personality. We knew it needed more than just a coat of paint; it required a feature that would infuse character, warmth, and a touch of unique style. Our solution? A breathtaking DIY Rustic Modern Plank Wall that not only transformed the room but also perfectly captured our aesthetic.
The Allure of a Rustic Modern Plank Wall
Isn’t it captivating? What makes this plank wall truly stand out is its dynamic interplay of textures and tones. Instead of a uniform application, we embraced variation by mixing different wood types, thicknesses, finishes, and depths. This deliberate design choice creates an accent wall that is rich in character, offering visual interest that evolves with the light and your viewing angle. This innovative approach is particularly effective for larger walls where a full, monotonous planking might feel overwhelming. By focusing on a specific section or creating a staggered pattern, you achieve a dramatic effect without needing to cover the entire length of the wall, making it both an artistic statement and a practical solution.
A rustic modern aesthetic seamlessly blends the raw, earthy appeal of natural wood with clean lines and contemporary design principles. This style is not just a trend; it’s a timeless way to add warmth, texture, and a sense of history to any interior. Our plank wall, with its diverse wood elements, embodies this fusion, providing a focal point that is both inviting and sophisticated. It tells a story, adds architectural detail, and serves as a backdrop that enhances any furniture or decor placed against it.
Watch Our Step-by-Step Transformation!
Curious to see exactly how we brought this vision to life? We’ve captured every detail of the process in a comprehensive video tutorial. From selecting the right planks to applying them securely, our video guides you through each stage, making it easier for you to replicate this stunning project in your own space. Get ready to be inspired and empowered to tackle this rewarding DIY challenge!
Click HERE to watch our detailed video tutorial or view it directly below:
Essential Tools and Materials for Your Plank Wall Project
Before diving into installation, gathering the right tools and materials is paramount. Investing in quality items will not only make the job easier but also ensure a more professional and durable finish. We’ve listed the core components we used, along with some practical advice for each. Just click the links to explore the options we recommend:
SUPPLIES:
Caulk Gun: An indispensable tool for applying construction adhesive evenly and efficiently. A good caulk gun provides control and reduces hand fatigue, especially on larger projects. We recommend a sturdy and reliable model that offers smooth dispensing. Check out this highly-rated caulk gun on Amazon for an affordable yet durable option that will serve you well for many DIY projects.
Construction Adhesive: This is the secret weapon for a truly secure and long-lasting plank wall. We absolutely love the product we used because of its superior bonding strength and quick grab. It instantly helps hold the wood planks firmly against the wall, allowing you time to secure them with nails without worrying about slippage. This adhesive minimizes the number of nails needed and helps prevent future warping or movement of the planks. It’s incredibly versatile and has been a staple in many of our DIY ventures. Find the construction adhesive we trust and recommend on Amazon here.
Brad Nailer: For fast, secure, and virtually invisible fastening, a brad nailer is a game-changer. We opted for a cordless nailer on our wall, which offered unparalleled freedom of movement and convenience, eliminating the need for air compressors or cumbersome hoses. If a cordless or pneumatic nailer is beyond your current budget, don’t worry! There are excellent, more budget-friendly alternatives that still deliver great results. A manual brad nailer or even a hammer and finish nails can work, though they require a bit more effort. Explore this fantastic and super inexpensive brad nailer option on Amazon that provides great value for DIYers.
Miter Saw: Precision cuts are crucial for a professional-looking plank wall, and a miter saw makes this task effortless. This tool allows you to make perfectly straight or angled cuts, ensuring your planks fit snugly together and create crisp, clean lines. A reliable miter saw is a cornerstone of any serious DIY workshop and will prove invaluable for countless projects beyond this wall. Discover the price and excellent reviews for a versatile miter saw on Amazon – a tool capable of building nearly every project you’ll find on our website, including this very plank wall!
Additional Recommended Tools & Materials:
- Measuring Tape & Pencil: For accurate measurements and markings.
- Level: Essential for ensuring your first row of planks is perfectly straight and that subsequent rows maintain alignment.
- Stud Finder: To locate wall studs for additional anchoring points, especially important for heavier planks or if you plan to hang items on the wall.
- Safety Glasses & Gloves: Always prioritize safety when working with power tools and adhesives.
Key Design Principles and Installation Tips
While our video walks you through the entire project comprehensively, here are a few critical reminders and expert tips to ensure your DIY Rustic Modern Plank Wall turns out beautifully and uniquely:
- Stagger Your Seams: To achieve a natural, organic look and enhance structural integrity, it’s crucial to avoid lining up the seams of your planks directly above or below each other. As you attach each new row, strategically move your seams so they are offset from the planks in the adjacent rows. This creates a visually pleasing, random pattern that mimics professional installations and prevents a “stacked” appearance.
- Embrace Variation: The beauty of a “rustic modern” aesthetic lies in its deliberate imperfection and diversity. With each new line of planks, consciously change the color, wood species, and thickness of the wood you’re using. This mix-and-match approach adds incredible depth, texture, and visual interest, preventing the wall from looking flat or monotonous. Think about integrating smooth, finished wood alongside rougher, reclaimed pieces, or blending lighter tones with darker hues to create a dynamic tapestry.
- Pre-Plan Your Layout: Before applying anything to the wall, lay out a section of your planks on the floor. This allows you to visualize the pattern, experiment with different combinations of wood, and ensure a balanced distribution of colors and textures. Taking this extra step can prevent costly mistakes and ensures you’ll love the final result.
- Wall Preparation: Ensure your wall is clean, dry, and free of any loose debris. If necessary, lightly sand or fill any major imperfections. While the planks will cover most of the wall, a smooth base ensures better adhesion.
- Start Level: Use your level to draw a perfectly horizontal reference line on the wall before attaching your first plank. This provides a crucial guide to keep your entire wall straight and true.
- Apply Adhesive Wisely: Apply a zig-zag bead of construction adhesive to the back of each plank, focusing on the edges and center. Avoid applying too much, as it can squeeze out and create a mess.
- Secure with Nails: After pressing a plank firmly into place, use your brad nailer to secure it. Aim for two nails into a stud (if possible) and two into the drywall at various points along the plank, ensuring a secure hold.
We believe in making the most of available resources. We’ve linked below to the specific types of wood we utilized for our stunning wall, providing you with a starting point. However, we encourage you to get creative! This project is an excellent opportunity to breathe new life into your scrap pile. Gather leftover wood pieces from previous projects, explore local lumberyards for unique cuts, or even repurpose old fencing or pallet wood (after proper cleaning and treatment). The more diverse your wood selection, the more captivating your final wall will be.
Our Wood Selections:
- Reclaimed Designworks Mixed Softwood Blend: Offering a rich variety of tones and textures from genuinely reclaimed materials.
- Porter Barnwood White Wood: Providing lighter, often weathered wood with subtle character, ideal for contrast.
- Weaber Weathered Hardwood Board: Pre-finished with a beautiful weathered look, perfect for adding an aged aesthetic.
- Weaber Nantucket Grey Poplar Weathered Board: A distinct grey tone that introduces a cooler, more contemporary element to the mix.
Final Touches and Enjoying Your New Space
Once all your planks are securely in place, step back and admire your handiwork! Depending on the desired aesthetic, you might choose to fill nail holes with wood putty for a smoother finish, or leave them exposed for an authentic rustic charm. Consider adding a clear matte sealant if your wood isn’t pre-finished and you want extra protection. The beauty of this project is its inherent flexibility – you are the artist, and the wall is your canvas.
A DIY Rustic Modern Plank Wall is more than just a decor element; it’s a testament to your creativity and a transformative addition to any room. It infuses warmth, texture, and a unique story into your living or working environment, creating a feature that is both eye-catching and deeply personal. Whether it’s in a home office, a living room, or a bedroom, this accent wall promises to be a conversation starter and a source of daily inspiration.
Thanks so much for stopping by, friends! We truly hope this detailed guide empowers and inspires you to create your very own DIY Rustic Modern Plank Wall. Get ready to turn that boring blank wall into the stunning focal point your space deserves!