
Transform Your Bedroom: Build Your Dream DIY Queen Bed on a Budget!
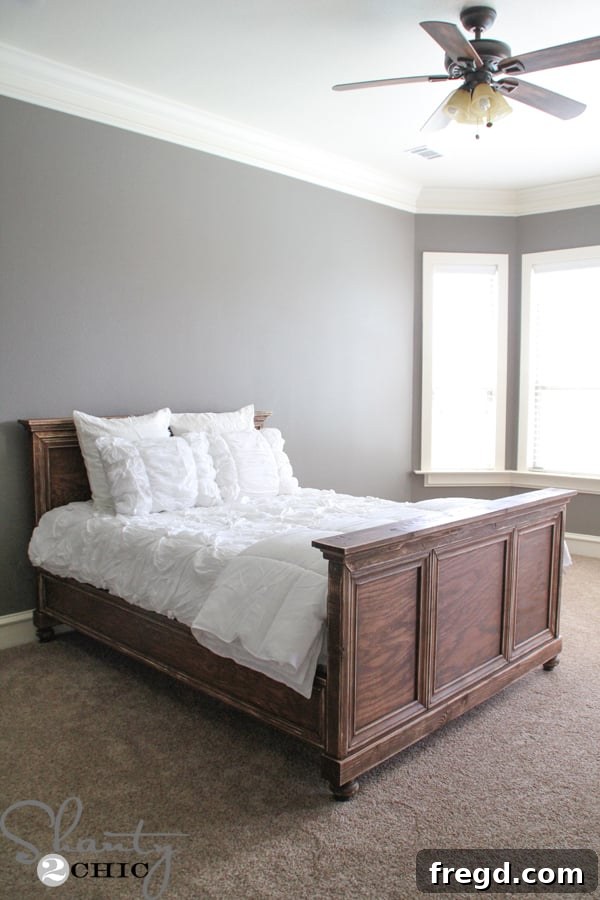
Hey there, fellow DIY enthusiasts and home decor lovers! I am absolutely bursting with excitement to finally unveil the crown jewel of my bedroom makeover – my brand new, custom-built DIY Queen Bed! After years of my mattress humbly resting on the floor, it has officially been elevated to a place of honor, supported by this stunning, handcrafted wooden bed frame. Believe me when I say, the satisfaction of building something so beautiful and functional with your own hands is truly unparalleled.
Why Choose a DIY Bed Frame? The Appeal of Handmade Furniture
In a world filled with mass-produced furniture, there’s something incredibly special about a piece built with intention and care. For me, the journey to creating this beautiful queen bed was driven by several key factors. Firstly, the astronomical cost of designer bed frames often puts them out of reach for many. I was inspired by a particular high-end wooden bed that retailed for an astonishing $3,000, not including shipping and tax! That kind of price tag simply wasn’t in my budget, but I refused to compromise on style or quality. Building it myself allowed me to achieve that coveted look for a fraction of the cost.
Secondly, customization is a huge benefit of DIY. When you build your own bed frame, you’re not limited to standard sizes or finishes. You can tailor it precisely to your needs, your room’s dimensions, and your personal aesthetic. From the type of wood to the stain color, every detail is an opportunity to make it uniquely yours. Finally, there’s the immense sense of accomplishment. Waking up every morning in a bed that you meticulously crafted is a constant source of pride and a beautiful reminder of what you can achieve.
Your One-Stop Shop: Partnering with Home Depot for Success
One of the best decisions I made for this project was partnering with Home Depot. They truly were a one-stop shop for everything I needed, making the entire process incredibly convenient. From the high-quality lumber to all the necessary tools and fasteners, I found it all readily available in their aisles. This eliminated the frustrating trips to multiple stores and allowed me to focus on the build itself. If you’re considering embarking on your own DIY bed frame adventure, I highly recommend exploring their extensive selection. Their knowledgeable staff can also be a fantastic resource for advice on wood types, cutting techniques, and finishing options.
Ready to get started on your own stunning DIY bed frame? You can grab the comprehensive, step-by-step tutorial and the FREE printable plans right HERE. Just click the image above or this link to download them instantly and begin planning your build!
The Journey from Raw Lumber to a Dream Bed: A Weekend Project
You might be surprised to learn that this magnificent queen bed frame came to life over the course of just one dedicated weekend. From the very first cut into the lumber to the final protective coat of stain, it was a labor of love that transformed a pile of wood into a beautiful piece of furniture. The process, while requiring careful attention to detail, is remarkably straightforward, especially with well-designed plans like the ones I’m sharing. It primarily involves precise measurements, accurate cuts, secure assembly, and a chosen finish to bring out the wood’s natural beauty.
My total investment in lumber for this project came in at around $400. This cost can vary slightly depending on your specific trim selections and local lumber prices, but it’s an incredible value when you consider the retail price of comparable beds. To create a gorgeous, durable wooden queen bed for just $400 is an absolute win, especially when the inspiration piece costs seven times that amount! It truly highlights the power of DIY to deliver high-quality results without breaking the bank.
Elevating Your Aesthetic: Choosing the Perfect Bedding
Beyond the sturdy frame, the bedding plays a crucial role in defining the overall look and feel of your bedroom sanctuary. I am absolutely captivated by the bedding I chose for this bed! The interplay of texture and crisp white fabric creates such a beautiful contrast with the rich color and style of the wooden frame. It’s an elegant combination that feels both cozy and sophisticated, perfectly complementing the rustic-chic vibe of the DIY bed.
I sourced this lovely bedding set from Birchlane. If you’re smitten with its charm and want to explore it further, you can easily click here to check it out on their website. The right bedding is truly the final flourish that completes your bedroom’s transformation, turning a functional space into a personal retreat.
Customizing Your Comfort: Adapting the Bed Frame to Any Size
One of the most frequently asked questions I receive about my DIY projects is regarding customization. I’m thrilled to share that these bed plans are incredibly versatile and can be easily modified to fit virtually any mattress size! While the original design is for a Queen, adjusting it for a King, Full, or Twin mattress is a simple process. The key is to measure meticulously and cut your lumber as you go, especially for the decorative trim pieces, ensuring a perfect fit and finish.
Here’s a quick guide to adjusting the dimensions for popular mattress sizes:
- For a King-size Bed: You’ll simply need to add an additional 16 inches to the overall width of the bed frame. This accounts for the increased width of a standard King mattress compared to a Queen.
- For a Full-size Bed: To accommodate a Full mattress, subtract 6 inches from the width and 5 inches from the length of the original Queen dimensions. This ensures a snug and secure fit without unnecessary overhang.
- For a Twin-size Bed: For a more compact Twin bed frame, you will subtract a total of 21 inches from the width. Always double-check your mattress dimensions before making any cuts to ensure accuracy.
Remember, these adjustments primarily affect the main support beams and cross-members. The headboard and footboard components might also need slight proportional adjustments to maintain the aesthetic appeal. Always refer to your specific mattress dimensions and the detailed plans before starting any cuts. The flexibility of these plans means you can create a beautiful, custom bed frame for any bedroom in your home, from the master suite to a child’s room or a guest bedroom.
Beyond the Build: The Lasting Value of DIY
The journey of building this DIY queen bed has been incredibly rewarding. It’s more than just saving money; it’s about investing your time and effort into creating something tangible, something that will be a central part of your home for years to come. The quality and sturdiness of a handmade wooden bed often surpass many mass-produced alternatives, offering durability that stands the test of time. Knowing that every joint, every screw, and every coat of stain was applied with care by your own hands adds an invaluable layer of meaning to your furniture.
This project is a testament to the fact that you don’t need to be a seasoned carpenter to create stunning pieces for your home. With clear plans, the right tools, and a little dedication, anyone can tackle a project like this and achieve results that look professionally made. It’s an empowering experience that builds not just furniture, but also confidence and new skills. So, if you’ve been dreaming of a beautiful, affordable, and personalized bed, there’s no better time to start than now.
Thank you so much for stopping by and sharing in my excitement! I hope my DIY queen bed inspires you to pick up some tools and start building your own dream furniture. Don’t forget to grab those FREE plans and embark on your own woodworking adventure!
~Ashley