
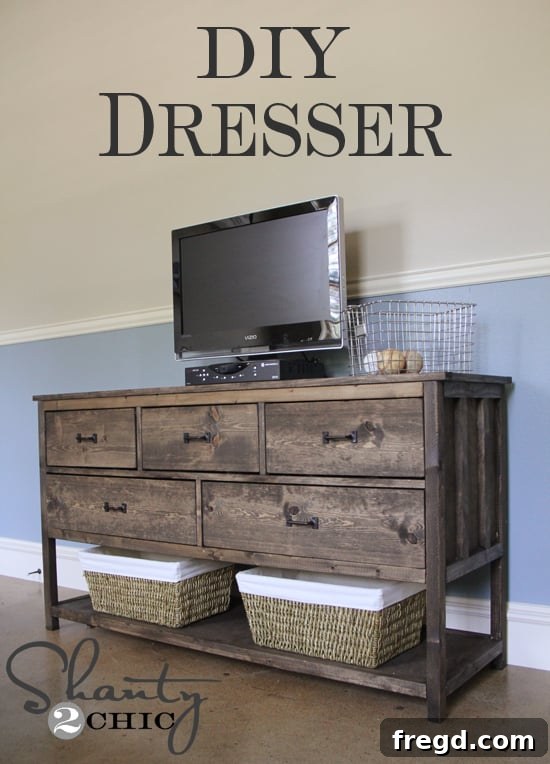
DIY Pottery Barn Inspired Dresser: Building a Dream Piece for My Son’s Room
Hey, fellow DIY enthusiasts! I am absolutely thrilled to finally share my latest furniture build – a project that has been a long time coming and fills me with immense pride. For months, my son’s television has been perched precariously, lacking a proper home, as you can see:
I know, right? A bit “shanty” indeed! 😉 It was high time for a serious upgrade, not just for the TV, but to bring much-needed organization and style to his space. This project was more than just building a piece of furniture; it was about transforming a cluttered corner into a functional and aesthetically pleasing part of his bedroom.
Overcoming the Dresser Challenge: My First DIY Dresser Experience
Truth be told, I’ve put off tackling a full-sized dresser for quite some time. The sheer number of drawers, the slides, the precise measurements – it all seemed a bit daunting. I feared it might be too complex, a project beyond my current DIY skill set. But I’m incredibly happy to report that not only did it not “kill” me, but it truly wasn’t as difficult as I’d imagined! The best part? His TV and all his clothes now have a beautiful, organized new home. Behold, the finished piece!
The inspiration for this stunning piece came from the classic, timeless designs of Pottery Barn, known for their durable and elegant furniture. To bring this vision to life, I turned to the incredibly talented Ana White, who provided a fantastic set of easy-to-follow plans for a Wide Cabin Dresser with metal slides, which you can find HERE! Her detailed instructions and clear diagrams made the entire process feel manageable, even for someone who initially felt intimidated by dresser builds. These plans are a game-changer for anyone looking to create a high-quality, custom dresser without the guesswork.
The Essential Tool: Why Every DIYer Needs a Kreg Jig®
Let me emphasize this point: the Kreg Jig® is an absolute MUST-HAVE for this build, and frankly, for almost any furniture project you undertake. If you’ve been on the fence about investing in one, consider this your definitive nudge. Just glance at our last 10-15 furniture projects, and you’ll see why it’s become an indispensable tool in our workshop. It makes strong, hidden pocket hole joints incredibly easy to create, giving your projects a professional, seamless finish. I promise, once you use it, you’ll wonder how you ever built anything without it!
I’ll walk you through some key steps and offer a few tips here, but for the complete, step-by-step guide to building this beautiful Pottery Barn Inspired Dresser, make sure to visit Ana White’s site HERE. Her plans are meticulously detailed and perfect for all skill levels.
Throughout this project, my Kreg Jig® was put to extensive use, ensuring strong and reliable connections across many components. The precision and strength it provides are unmatched, making it ideal for the structural integrity of a dresser.
Constructing the Core: Sides and Base with Pocket Holes
Building the framework began with the dresser sides. The Kreg Jig® allowed for quick and secure pocket holes, which are crucial for stable construction. This method creates incredibly strong joints, essential for furniture that will see daily use and hold a significant amount of weight. The hidden nature of these screws also contributes to the clean, finished look of the piece.
Next, attention turned to the base. A solid foundation is paramount for any piece of furniture, especially a dresser that will hold numerous items. Again, pocket holes were my go-to for assembling the base components. This ensured a robust and level structure, ready to support the entire dresser frame and its contents.
Once attached, the base provided the sturdy platform the dresser needed, looking seamless and strong. This critical step sets the stage for the rest of the build, guaranteeing stability from the ground up.
Securing the Top: A Crucial Element for Durability
Before attaching the top to the dresser frame, it was prepared with the same precision, utilizing pocket holes for a firm connection. The top is not just a surface; it adds significant structural integrity and completes the dresser’s silhouette. This image shows the top component ready for final assembly.
The Power of Adhesion: Gorilla Wood Glue
In addition to pocket hole screws, I used Gorilla Wood Glue on ALL of my joints! This wood glue is phenomenal. It never fails to provide an incredibly strong bond, adding an extra layer of durability and stability to every connection. It’s become our absolute favorite wood adhesive for a reason – reliability and exceptional strength, ensuring that our furniture builds stand the test of time.
Material Spotlight: PureBond Hardwood Plywood
For this particular project, I had the pleasure of finally trying out some PureBond Hardwood Plywood. I had heard so much buzz about its quality and environmental benefits, and I’m pleased to confirm that it certainly lived up to its hype! I opted for 3/4″ birch plywood from Home Depot. A helpful associate at Home Depot cut the large sheets into 15 3/4″ strips, precisely as Ana’s plans recommended. This simple step saved me a tremendous amount of time in the workshop and made transporting the materials home significantly easier. PureBond plywood is an excellent choice for DIY furniture projects, offering durability, a beautiful finish, and peace of mind knowing it’s formaldehyde-free.
Navigating Drawer Slides: A Detailed Guide Coming Soon
While I won’t delve into a full tutorial on metal drawer slides here, as that’s a topic worthy of its own detailed post, I will be sharing a more specific guide on working with them in the future. In the meantime, if you’re looking for some initial guidance, Ash offers some valuable tips HERE on her stunning Pottery Barn inspired coffee table build, which uses similar techniques. Installing drawer slides can seem tricky, but with the right approach, it’s a manageable part of creating functional drawers.
The Dresser, Ready for its Finishing Touches
Here it is, all assembled and ready for a beautiful coat of stain! At this stage, the raw wood showcases the craftsmanship and sturdy construction, a testament to the effort put into each joint and cut. It’s always satisfying to see a piece come together, even before the final finish is applied.
The Perfect Finish: Rust-Oleum Ultimate Wood Stain in Dark Walnut
To ensure continuity and a cohesive look in his room, I used the same stain on this dresser that I applied to the other furniture pieces I’ve built for his space. And let me tell you, this stain is an absolute game-changer! It’s Rust-Oleum Ultimate Wood Stain in Dark Walnut. The best part? It dries in less than an hour and only requires a single coat to achieve a rich, deep color. As a busy mommy with a never-ending to-do list, this quick-drying, one-coat solution makes me incredibly happy! It saves so much time and delivers a gorgeous, professional-looking finish every time.
Hardware Selection: Classic and Affordable Sash Pulls
For the hardware, I matched the style I had previously used on other pieces in the room, maintaining a consistent aesthetic. These charming sash pulls are not only stylish but also incredibly affordable, readily available at Lowe’s. They add a touch of classic, rustic elegance that perfectly complements the overall design of the dresser and ties in beautifully with the other furniture.
The Grand Reveal: Dresser in Its New Home
With the final coat of stain dry and the hardware in place, my wonderful hubby helped me move the dresser into his room. It’s always a special moment seeing a handmade piece finally take its rightful place. I took a few more pictures to share the complete transformation with you all!
I truly hope you love it as much as I do! It definitely beats the old clothes basket situation for storing his essentials – just sayin’! This DIY dresser not only provides practical storage but also elevates the entire aesthetic of his room, proving that custom-built furniture can be both beautiful and highly functional.
If you’re feeling inspired, I’d love for you to share this post with your friends and Pin it to your DIY boards! It’s a rewarding project that truly makes a difference in a space.
Completing the Room: Other DIY Projects for His Space
This dresser is just one piece of the puzzle in creating a cohesive and stylish room for my son. You can also explore the other DIY furniture builds I’ve crafted for his space, all designed to complement each other and provide practical solutions:
DIY Restoration Hardware Inspired Nightstand
DIY Kentwood Bookcase
DIY Pottery Barn Teen Inspired Platform Bed
Affordable & Easy DIY Shelves!
Thanks so much for stopping by, everyone! I hope this detailed look into building a custom dresser inspires you to take on your own woodworking projects. Remember, with the right plans and tools, creating beautiful and functional furniture is entirely within reach. Don’t forget to check out Ana White’s site for the full set of plans on this fantastic DIY dresser!
~Whitney