
Create Timeless Memories: Your Ultimate Guide to DIY Wood Photo Blocks
The holiday season is a special time for family, warmth, and heartfelt gifts. While store-bought presents have their place, there’s something truly invaluable about a handmade gift—especially one that captures cherished memories. This year, I decided to brave my creative inhibitions and craft something truly personal for my incredibly artistic in-laws: custom DIY wood photo blocks featuring pictures of my beloved children. They adore receiving new photographs, and as a passionate advocate for photo art, this project was a perfect blend of sentiment and style. These personalized photo blocks serve as a beautiful and rustic display for your most treasured family moments, making them an ideal gift or a wonderful addition to your own home decor.
Crafting these unique decorative pieces not only allows you to showcase your favorite family photos in a charming, tangible way but also offers a rewarding hands-on experience. Imagine the joy your loved ones will feel unwrapping a gift that holds such personal significance, each block a tiny canvas displaying a precious memory. This comprehensive tutorial will guide you through every step, ensuring you can create your own stunning set of wood photo blocks, regardless of your crafting experience. Let’s dive in and transform simple pieces of wood into beautiful, memory-filled keepsakes!
Why DIY Photo Blocks Are the Perfect Personalized Gift
In an age dominated by digital screens, tangible photographs hold a special kind of magic. DIY photo blocks elevate these moments, transforming them into art pieces that add character and warmth to any room. Here’s why this project is a must-try for anyone looking to create meaningful decor:
- Uniquely Personal: Unlike mass-produced decor, these blocks are deeply personal. Each block tells a story, making it a conversation starter and a constant reminder of love and family.
- Rustic Charm: The distressed wood finish gives these blocks a cozy, farmhouse-chic aesthetic that complements a variety of home decor styles, from modern minimalist to rustic traditional.
- Incredibly Versatile: One of the greatest advantages of these photo blocks is their adaptability. They can be rearranged, stacked, or displayed individually, offering endless possibilities for styling on mantels, bookshelves, desks, or coffee tables.
- Handmade with Love: The act of creating something with your own hands infuses the gift with extra love and thought, making it far more precious than anything bought from a store. It’s a true labor of love that recipients will cherish for years.
- Affordable & Fun: This project is surprisingly cost-effective, using readily available materials. It’s also an enjoyable craft that you can customize to fit any occasion or recipient.
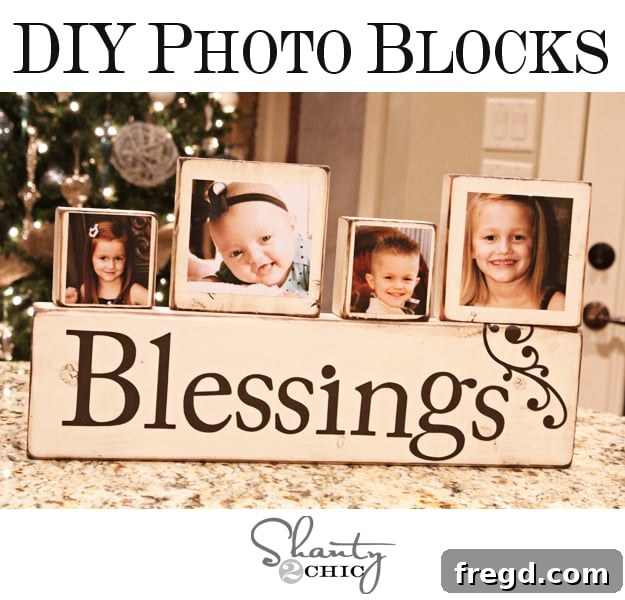
Ready to embark on this creative journey? Here’s a glimpse of the beautiful DIY photo blocks we’re going to create:
Your Step-by-Step Guide to Crafting DIY Photo Blocks
Let’s get started on bringing your personalized photo blocks to life. Follow these detailed steps for a smooth and enjoyable crafting experience.
Materials and Tools You’ll Need:
Before beginning, gather all your supplies to ensure a seamless crafting process:
- Wood: (1) 2x4x8 lumber piece, (1) 2x6x8 lumber piece (pine or common board works well, readily available at hardware stores like Lowe’s)
- Saw: Miter saw or circular saw (for precise cuts)
- Paint: Rust-Oleum Painter’s Touch in Heirloom White (or your preferred base color)
- Sanding Block: 80-grit sanding block
- Wood Stain: Dark Walnut stain (or a complementary shade)
- Applicators: Sponge brush for stain, old t-shirt or rag for wiping excess stain
- Photos: Printed photographs (4×6 or 5×7, depending on block size)
- Photo Trimmer: Paper trimmer or craft knife with a cutting mat
- Adhesive: 3M Photo Safe Spray Adhesive
- Sealant (Optional but Recommended): Matte Mod Podge
- Application Brush: Paintbrush for Mod Podge
- Vinyl Cutting Machine (Optional, for embellishments): Silhouette Machine (or similar)
- Vinyl: Silhouette’s Brown Vinyl (or preferred color/type for lettering)
- Safety Gear: Safety glasses, gloves (especially when cutting and staining)
- Workspace: Well-ventilated area with protective covering
Step 1: Preparing Your Wood Blocks
The foundation of your DIY photo blocks begins with carefully cut wood. I sourced a 2x4x8 and a 2x6x8 piece of lumber from my local Lowe’s, opting for a mix of sizes to create visual interest in the final display. While you could stick to just one size, the variation adds a dynamic touch.
It’s important to remember that lumber dimensions are nominal. A “2×4” is actually 1.5 inches by 3.5 inches, and a “2×6” is 1.5 inches by 5.5 inches. To create perfect squares, I cut the 2×4 into 3.5-inch lengths and the 2×6 into 5.5-inch lengths using my miter saw. This ensures each block has a square face to adhere your photos to. Additionally, I cut one longer piece from the 2×6, approximately 20 inches long. This longer block serves as a base or an accent piece, adding another layer of versatility to the arrangement. Always wear safety glasses and use proper cutting techniques when operating power tools.
Step 2: Painting Your Blocks with a Base Coat
Once your wood blocks are perfectly cut, it’s time to give them a fresh coat of paint. For this project, I chose my absolute favorite: Rust-Oleum Painter’s Touch in Heirloom White. This particular shade provides a beautiful, soft, antique white finish that serves as an excellent base for the rustic, distressed look we’re aiming for. Ensure you work in a well-ventilated area or outdoors when spraying paint.
Apply one to two thin, even coats to all sides of each block, allowing adequate drying time between coats as per the manufacturer’s instructions. Patience is key here; rushing this step can lead to drips or an uneven finish. The goal is complete, smooth coverage, creating a clean canvas for the next steps.
Step 3: Achieving a Distressed, Shanty-Chic Look
After the Heirloom White paint has fully dried, it’s time to introduce that charming, aged aesthetic. Grab an 80-grit sanding block and gently run it along the edges and corners of each block. The goal is to lightly distress the paint, revealing hints of the natural wood underneath and creating a slightly worn, “shanty” effect. Don’t be afraid to experiment with the pressure; a lighter touch will create subtle distressing, while more pressure will expose more wood.
Step 4: Adding Depth with Dark Walnut Stain
To further enhance the distressed look and add rich, contrasting depth, apply a dark walnut stain. Using a sponge brush, very lightly dab or brush the stain onto the sanded edges. The key is to apply it sparingly, focusing only on the areas where you’ve removed paint with sanding. You’re not looking for full coverage, but rather a subtle tint that highlights the worn edges and creates a beautiful, aged patina.
Immediately after applying the stain, use an old t-shirt or soft rag to wipe off any excess. This step is crucial for achieving that perfectly “shanty” look, preventing the stain from looking too heavy or unnatural. The result should be beautifully defined, subtly aged edges that frame your future photos perfectly. Allow the stain to dry completely according to product instructions before moving on.
At this stage, your blocks should look wonderfully rustic and ready for their photographic transformation:
Step 5: Preparing and Attaching Your Photos
Now for the heart of the project: your cherished photos! The trick here is to cut your pictures slightly smaller than your wood blocks to allow the beautifully distressed edges to show through. For my smaller blocks, I typically use 4×6 inch photos, and for larger blocks, 5×7 inch photos work wonderfully. However, for this particular project, I had only 4×6 prints available, so I used those across all blocks. The key is to cut each picture approximately 1/2 inch smaller than the face of its respective block. A paper trimmer is invaluable for achieving clean, precise cuts.
Once your photos are perfectly sized, it’s time to adhere them to the blocks. I highly recommend using 3M Photo Safe Spray Adhesive. This adhesive is fantastic because it provides a strong bond while being acid-free, ensuring your precious photos won’t yellow or degrade over time. Work in a well-ventilated area and follow the product instructions for application. Spray a light, even coat on the back of each photo, then carefully center and press it onto the face of a wood block. Smooth out any bubbles, working from the center outwards, to ensure a flawless finish.
Step 6: Sealing Your Photos with Mod Podge
While the 3M spray adhesive provides a strong hold, adding a layer of Mod Podge is a crucial step for protection and durability. This sealant creates a beautiful, clear finish that protects your photos from moisture, UV damage, and everyday wear and tear. You can leave your blocks as is after the spray adhesive, but for a truly lasting piece of photo art, Mod Podge is highly recommended. I prefer to use Matte Mod Podge as it eliminates glare and gives a soft, professional look that complements the rustic aesthetic of the wood blocks.
Using a clean paintbrush, apply a thin, even layer of Matte Mod Podge directly over the photograph. Don’t worry if it goes on white; Mod Podge dries completely clear, leaving a smooth, protective finish. Apply only to the side with the picture. Allow each coat to dry completely before handling, which typically takes about 15-20 minutes. For extra durability, you can apply a second thin coat after the first has dried. This step ensures your beautiful DIY photo blocks will stand the test of time.
Step 7: Personalizing with Vinyl Lettering (Optional, but highly recommended!)
This is where you can truly add a personalized touch to your DIY photo blocks. For this step, I relied on my favorite crafting tool: the Silhouette Machine. If you don’t own one, consider this a sign to get one – its versatility for DIY projects is endless!
Using Silhouette’s Brown Vinyl, I designed and cut out the word “Blessings” on my machine. When laying out the letters in the software, I carefully spaced them to optimize the use of vinyl, fitting as many letters as possible into the smallest space. This is a great tip for conserving materials.
The Silhouette machine makes the cutting process incredibly simple and precise. Once the machine completed its work (while I was multitasking, burping the baby!), I carefully peeled the vinyl letters from the sheet. This process, known as “weeding,” involves removing the excess vinyl, leaving only your desired design.
Then, I carefully attached the “Blessings” vinyl to one of my wood blocks. While it looked cute, I felt it needed a little something extra to truly make it pop. So, I added a delicate vinyl “scrolly” design, which instantly elevated the aesthetic and added a touch of elegance to the rustic charm. This demonstrates how small details can make a big difference in personalized decor.
Yes, much better! This optional step truly customizes your project and adds an extra layer of thoughtfulness.
Step 8: Displaying Your Finished Photo Blocks
After all your photo blocks are completely dry and any Mod Podge or vinyl has set, they are ready for display! This is the most rewarding part, seeing your hard work come to life. The beauty of these blocks lies in their versatility. You can stack them high, arrange them in a linear fashion, or create a dynamic, asymmetrical grouping. Here are several ways to showcase your beautiful creations:
Another fun aspect is that you can arrange the blocks however you want, constantly refreshing your display to suit your mood or decor changes. This makes them absolutely perfect for someone with a ‘fickle decorator’ spirit, like myself!
Tips for Success and Creative Variations
To ensure your DIY photo block project is a resounding success, consider these additional tips and ideas for customization:
- Ventilation is Key: Always work in a well-ventilated area, especially when using spray paint, spray adhesive, and stain.
- Patience with Drying Times: Rushing steps can compromise the finish. Allow ample drying time for paint, stain, and Mod Podge.
- Test on Scraps: If you’re unsure about a technique (like distressing or staining), test it on a scrap piece of wood first.
- Photo Quality: High-resolution photos will yield the best results. Consider a matte or semi-gloss print finish.
- Alternative Embellishments: If you don’t have a Silhouette machine, you can use stencils, rubber stamps, or even hand-paint designs onto your blocks. Calligraphy adds a beautiful touch!
- Different Wood Types: Experiment with different types of wood, such as oak or maple, for varied grain patterns and textures.
- Seasonal Themes: Create sets of blocks for different holidays or seasons, swapping out photos and embellishments to match.
- Gift Sets: Package a few blocks together with a ribbon for a thoughtful housewarming, wedding, or birthday gift.
Conclusion: Crafting Memories, One Block at a Time
I genuinely loved making these DIY photo blocks. There’s an immense satisfaction that comes from creating something beautiful and meaningful with your own hands. I can hardly wait to make a set for myself – ones I don’t have to wrap up! But the true excitement lies in imagining my in-laws’ reaction when they receive this deeply personal gift. These blocks are more than just decor; they are tangible pieces of love, memory, and heartfelt effort.
So, if you haven’t yet dipped your toes into the rewarding world of DIY personalized gifts, now is the perfect time to start. Whether for a holiday, a special occasion, or just because, these custom wood photo blocks are sure to be cherished. And if you’ve been eyeing a Silhouette machine, consider this your nudge – it’s a game-changer for countless creative projects!
Happy crafting and have a wonderful weekend!
~Whitney