
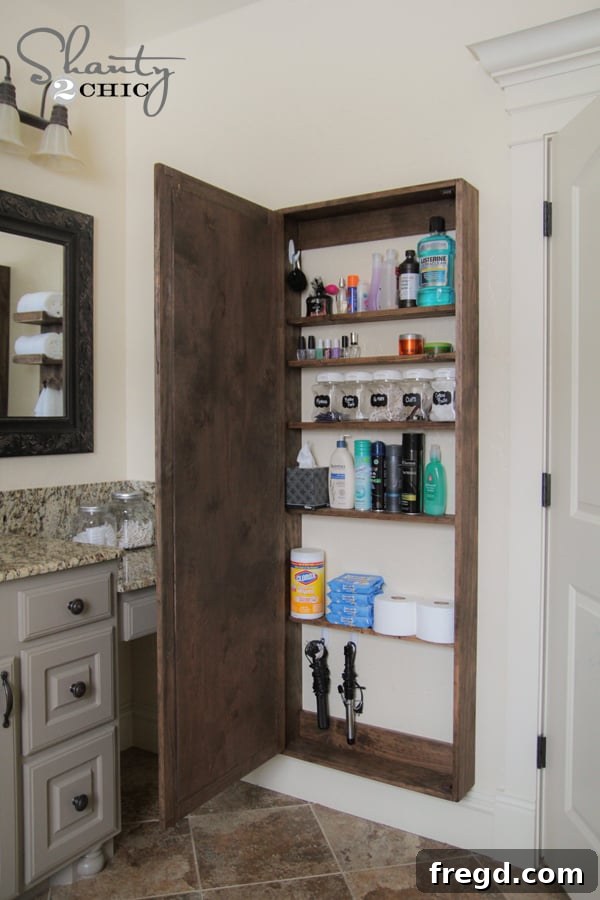
Transform Your Bathroom: Build a Stylish DIY Full-Length Mirror Storage Cabinet
Prepare to revolutionize your bathroom with a project that’s as practical as it is beautiful! Today, I am absolutely thrilled to unveil my latest creation: a stunning DIY Full-Length Mirror Storage Cabinet. This isn’t just a simple DIY – it’s a game-changer for bathroom organization and aesthetics. After weeks of imagining this piece, from its sleek design to its incredible functionality, seeing it come to life has surpassed all my expectations. I even shared a little sneak peek with my amazing followers on INSTAGRAM last week, and the response was incredible! There’s something undeniably satisfying about having a full-length mirror readily available, making those last-minute outfit checks effortless, a significant upgrade from using a makeshift reflection in a shower door or a computer screen. But why stop at just a mirror? I challenged myself to make this essential item pull double duty, integrating a spacious storage case right behind it. The results? Absolutely magnificent! This ingenious design means you can “kill two birds with one stone,” maximizing both utility and style in even the most compact bathrooms. Let me show you how this dream project turned out!
Why This DIY Bathroom Mirror Storage Cabinet is a Must-Have
Isn’t that just incredibly brilliant? Who wouldn’t appreciate a dose of beautiful, practical functionality woven into their bathroom decor? I certainly do, and I’m confident you will too! This project isn’t just about building a cabinet; it’s about reclaiming space, streamlining your daily routine, and adding a custom touch that truly elevates your home. Throughout this comprehensive guide, I will walk you through every single step of the build process, ensuring you have all the information you need to create your own masterpiece. To make things even easier, you can download the complete, FREE printable plans right HERE, or simply click on the button below. These detailed plans include all measurements and instructions, serving as your ultimate roadmap for success!
Let’s roll up our sleeves and dive into this exciting project!
Essential Tools & Materials for Your DIY Bathroom Mirror Storage Case
Before we begin cutting and assembling, gathering all your necessary tools and materials is paramount. A well-prepared workspace not only makes the process smoother but also ensures greater safety and precision. This project is surprisingly budget-friendly, proving that you don’t need to break the bank to achieve custom, high-end results. I managed to purchase all the lumber and supplies for this entire DIY Bathroom Mirror Storage Case for less than $100, which is an incredible value for such a functional and beautiful piece!
DIY Bathroom Mirror Storage Case – Supply List
To construct your elegant and practical storage mirror, you’ll need the following:
- 2 – 1 x 6 x 8 pine or whitewood boards: These will form the sturdy frame of your cabinet, providing ample depth for storage. Pine is a popular choice for its workability and cost-effectiveness, while whitewood offers a similar appeal.
- 4 – 1 x 4 x 8 pine or whitewood boards: Used for the mirror door frame and the internal shelves. When selecting these, prioritize straightness to ensure a professional finish and proper alignment.
- 1/4″ hardwood plywood cut to 19″ x 63″: This piece serves as the back panel for your mirror door, providing a stable surface for the mirror and connecting the frame. Hardwood plywood is recommended for its durability.
- Full Length beveled mirror: I found a fantastic option at Home Depot. Look for one that measures approximately 19″ x 63″ to match these plans, ideally with a beveled edge for added elegance and a clear, undistorted reflection.
- 3M Stainable Wood Filler: Essential for filling pocket holes and any minor imperfections, ensuring a smooth, seamless surface ready for staining.
- ScotchBlue Painter’s Tape: Useful for holding pieces in place while adhesive dries, or for protecting surfaces during staining.
- 3M Advanced Abrasives 120 grit sanding paper: For effective sanding to achieve a smooth finish and prepare the wood for staining.
- 3M safety glasses: Your safety is paramount! Always wear appropriate eye protection when cutting, drilling, and sanding.
- 4 decorative hinges: Choose hinges that complement your desired aesthetic. Decorative hinges can add a touch of charm and style to the finished cabinet.
- 1 pull or knob: A stylish pull or knob will complete the look of your mirror door and make it easy to open.
- Magnet closures: These simple yet effective closures will keep your mirror door securely shut, protecting your stored items.
- Wood stain of your color choice: Personalize your cabinet with a stain that matches your bathroom decor. I used a rich dark walnut, but the possibilities are endless!
- Mirror Adhesive: Specifically designed for adhering mirrors, ensuring a strong, lasting bond without damaging the mirror’s backing.
- Wood Glue: For reinforcing joints and ensuring maximum stability.
- 1.25″ Pocket Hole Screws: For securely joining the frame components using your Kreg Jig.
- 3″ Torx or Wood Screws: For safely mounting the cabinet to wall studs.
Essential Tools You’ll Need:
- Miter Saw: Crucial for making precise, straight cuts on your lumber.
- Kreg Jig: A fantastic tool for creating strong, concealed pocket-hole joints.
- Drill/Driver: For drilling pilot holes and driving screws.
- Cordless Stapler (e.g., Ryobi AirStrike Stapler): For efficiently attaching the plywood back to the mirror door frame.
- Stud Finder: Absolutely necessary for safely mounting your cabinet to the wall by locating structural studs.
- Level: To ensure your cabinet hangs perfectly straight.
- Clamps (especially a Kreg Right Angle Clamp): For holding pieces securely in place during assembly and while attaching the door.
- Scraper: For smoothing wood filler.
- Tape Measure & Pencil: For accurate marking and measuring.
Step-by-Step Construction: Building Your DIY Bathroom Mirror Storage Case
Phase 1: Crafting the Mirror Door
The journey to a beautifully organized bathroom begins with crafting the mirrored door. We’ll start with the star of the show: a high-quality, full-length mirror. For this project, I opted for a fantastic beveled mirror from Home Depot, which I secured for a mere $25. What makes this particular mirror stand out is not just its elegant beveled edge, but its superior optical clarity. Unlike many budget-friendly full-length mirrors that can distort your reflection – giving you that unsettling “funhouse” effect – this one offers a crisp, true-to-life image. This ensures you can confidently assess your outfit before stepping out, knowing you’re seeing an accurate representation. It’s crucial to note that the dimensions and subsequent cuts in these plans are specifically tailored to this 19″ x 63″ mirror. Should you choose a different mirror, whether due to availability or personal preference, remember to meticulously adjust all measurements for the door frame and the overall cabinet to precisely accommodate your chosen mirror. Taking the time to double-check your mirror’s dimensions at the outset will save considerable time and effort during the build.
Our door construction begins with the 1/4″ hardwood plywood back. This sturdy panel will serve as the foundation for our mirror. I highly recommend taking advantage of the cutting services offered at many home improvement stores, such as Home Depot. The helpful staff can precisely cut your large plywood sheet to the required 19″ x 63″ dimensions, saving you time and ensuring perfectly straight edges, which are essential for a professional finish.
Next, it’s time to cut the wood for the mirror’s frame. For this component, I utilized 1×4 pine boards. Pine is a fantastic choice for DIY projects due to its affordability and ease of working. Alternatively, you can opt for whitewood to save a bit of money, but always make sure to carefully select boards that are as straight as possible. Warped or twisted wood can lead to significant challenges down the line and compromise the final appearance. Accurate cuts are critical here, so if you’re new to using a miter saw or need a refresher, be sure to watch our comprehensive “How to Use a Miter Saw” video HERE! Safety is paramount; remember to always wear your 3M safety glasses during all cutting operations.
With your pieces cut, the next step involves creating strong, hidden joints using a Kreg Jig. I made 3/4″ pocket holes in each end of my 16″ frame pieces. Pocket holes are an excellent method for joining wood, offering superior strength and a clean finish since the screws are concealed. If you’re unfamiliar with this ingenious tool, don’t worry! We have a fantastic resource to guide you. Check out our “How to Use a Kreg Jig” video HERE for a step-by-step demonstration on mastering pocket hole joinery.
Prepping for a Flawless Finish: Sanding the Mirror Door Frame
Before permanently assembling all the frame pieces, I find it incredibly helpful to perform a quick preliminary sanding. Using a 3M Advanced Abrasives 120-grit sanding pad, I swiftly smooth out any splinters or rough edges. This simple step, done before assembly, prevents the hassle of sanding intricate corners later and ensures a much more pleasant building experience. The portability of these sanding pads is a huge plus – you can keep one in your pocket for quick touch-ups as you work, ensuring every piece is perfectly smooth before it’s joined. This small effort contributes significantly to the overall professional look and feel of your finished project.
Now, let’s bring the frame together. I securely attached the 16″ pieces to the longer 67″ pieces using 1.25″ pocket hole screws. For added strength and stability, I also applied a bead of wood glue to each joint before driving the screws. This combination of glue and screws creates an incredibly robust connection, essential for a door that will be opened and closed regularly. Take your time to ensure all corners are square before tightening the screws completely.
After both ends were attached, my mirror door frame took on its complete rectangular shape, looking sturdy and ready for its next stage. Double-check your measurements one last time to confirm everything is perfectly aligned and square.
With the frame assembled, the next step is to attach it to our 1/4″ hardwood plywood back. Apply a generous, even bead of wood glue to the entire perimeter of the wooden frame. Carefully position the frame onto the plywood, ensuring it’s centered and aligned. Then, using my trusty Ryobi cordless stapler, I secured the frame to the plywood from the back. The staples provide immediate hold while the glue dries, creating a robust and seamless panel that forms the foundation of our mirror door. The cordless stapler is a fantastic tool for this, offering convenience and speed without sacrificing holding power.
Phase 2: Constructing the Cabinet Frame and Internal Structure
With our mirror door beautifully constructed, we now shift our focus to the core of the storage solution: the main cabinet frame. This frame will house all your bathroom essentials, so building it robustly and accurately is key. For this part, I used 1×6 pine boards, chosen for their strength and the generous depth they provide for the shelves. I carefully cut two pieces at 23 1/8″ and two longer pieces at 68 3/4″. Precision in these cuts is vital for a square and stable cabinet. Just as with the mirror door, I then added 3/4″ pocket holes to the ends of my shorter boards. These pocket holes will allow us to create strong, hidden joints for a clean, professional appearance.
Assembling the cabinet frame requires careful alignment. I utilized my trusty Kreg Right Angle Clamp to hold everything perfectly square and secure while I attached the pieces using 1.25″ pocket hole screws. The Right Angle Clamp is an invaluable tool for ensuring your corners are true 90 degrees, preventing any frustrating wobbles or misalignments in the finished cabinet. Apply wood glue to all mating surfaces before driving the screws for maximum durability and strength.
With the main frame assembled, it’s time to incorporate the crucial top and bottom braces. These pieces serve a dual purpose: they add structural integrity to the cabinet and, more importantly, provide secure attachment points for mounting the cabinet to your bathroom wall. I cut seven 1×4 pieces, each at 23 1/8″. These pieces are the same length as our internal shelf pieces, simplifying the cutting process. Before attaching them, I added pocket holes to these brace boards, specifically positioned so they will sit flush with the back of the cabinet frame. This strategic placement ensures that when you mount the cabinet, the screws go directly into your wall studs through these strong, hidden attachment points.
You can clearly see in this image, taken from the back, how the pocket holes are strategically placed on the brace pieces. Once attached, these braces will align perfectly flush with the rear edge of the cabinet, creating a clean and robust mounting surface. Drive 1.25″ pocket hole screws to secure these braces firmly in place, ensuring the cabinet will be strong enough to hold your items and securely mount to the wall.
With the frame and braces assembled, your cabinet should now resemble a sturdy, open box, ready for its interior organization. Take a moment to admire your progress and ensure all joints are tight and square.
Phase 3: Installing the Shelves and Preparing for Finish
Now it’s time to add the internal shelves, transforming the open frame into a functional storage unit! Each of the remaining 1×4 pieces (which are also 23 1/8″ long) will become a shelf. For each shelf piece, add 3/4″ pocket holes on both ends. You have the freedom to customize the shelf placement to best suit your storage needs. Think about what items you’ll be storing – taller bottles, smaller cosmetics, or specific appliances – and arrange the shelves accordingly. For your reference, here is where I chose to attach mine, providing a balanced and versatile storage layout. Use 1.25″ pocket hole screws to firmly attach each shelf, ensuring they are level and secure.
Before moving on to staining, achieving a flawless finish is crucial. This involves filling all those visible pocket holes and any other minor imperfections in the wood. I used 3M Stainable Wood Filler for this step, which is an excellent product because it accepts stain just like the surrounding wood, making the repairs virtually invisible. Apply a generous amount of wood filler to each pocket hole, pressing it firmly into the void.
Once the filler is applied, use a scraper to carefully flatten it out, ensuring it’s perfectly flush with the wood surface. Work quickly before the filler begins to dry. This creates a smooth, even surface, preventing any bumps or irregularities from showing through the stain. This method is often preferred over using wood plugs for pocket holes, as it’s quicker, easier, and yields a remarkably smooth finish that seamlessly blends in.
Allow the wood filler to dry completely according to the manufacturer’s instructions. Once dry, use your 3M sanding pad (120-grit, or finer if desired for an extra-smooth finish) to gently sand over the filled areas. This final sanding step smooths out any residual filler, leaving a perfectly uniform surface that is ready to absorb stain evenly. The combination of filling and sanding creates an incredibly professional, blemish-free appearance that will truly elevate the finished look of your DIY Bathroom Mirror Storage Case.
And that concludes the primary construction phase! Your cabinet frame and mirror door are now built and sanded, ready for the exciting step of finishing. Give yourself a pat on the back for reaching this significant milestone!
Finishing Touches & Installation: Bringing Your Vision to Life
With the structural elements complete, it’s time to add character and protection to your new storage cabinet through staining. I paused the building process here and stained all the wooden components – both the cabinet frame and the mirror door frame – using Varathane stain in a rich Dark Walnut finish, which I purchased from Home Depot. I absolutely adore this stain; it penetrates beautifully, enhancing the natural grain of the wood while providing a durable, elegant color. Apply the stain according to the manufacturer’s instructions, ensuring an even coat and wiping off any excess for a consistent finish. Allow the stain to dry completely, typically for 24-48 hours, before proceeding to the next steps.
Once the stain was thoroughly dry, the next crucial step was to adhere the mirror to the newly stained door frame. For this, I used a specialized mirror adhesive, also readily available at Home Depot. It’s essential to use an adhesive specifically designed for mirrors, as many general-purpose adhesives can react with and damage the mirror’s silver backing over time. I applied a thin, continuous bead of the mirror adhesive around the backside perimeter of the mirror. Carefully center the mirror onto the door frame, ensuring even margins on all sides. To hold everything securely in place while the adhesive cured, I used ScotchBlue Painter’s Tape across the mirror and frame. This provides gentle pressure, ensuring a strong bond without causing any damage. Allow ample time for the mirror adhesive to fully cure as per product instructions before moving or handling the door.
Secure Wall Mounting: Ensuring Stability and Safety
The final critical step for the cabinet itself is securely attaching it to the wall. This is where your strategically placed brace pieces come into play. Begin by using a stud finder to meticulously locate the wall studs in your desired mounting location. Mark these stud locations clearly on your wall and then transfer these markings to the corresponding brace pieces on your cabinet frame. This ensures you’ll be screwing directly into the structural elements of your wall, providing maximum stability and safety. Using a drill, pre-drill pilot holes through the brace pieces and into the wall studs. This prevents the wood from splitting and makes driving the screws much easier. Then, use 3″ torx or sturdy wood screws to firmly attach the cabinet through the pre-drilled holes in the top and bottom braces, directly into the wall studs. I used a couple of screws for the top brace and made sure to add two to the bottom brace piece as well for comprehensive support.
Before attaching the mirror door, double-check that the cabinet frame is perfectly level. Use a reliable level on the top and sides of the cabinet to make any final adjustments. A level cabinet ensures the door hangs correctly and operates smoothly, preventing any unsightly gaps or alignment issues.
To attach the mirror door, I found it easiest to use two clamps to hold the door precisely in its open position while I installed the hinges. This frees up both hands and ensures perfect alignment. First, attach your chosen decorative hinges to the door itself. Then, carefully align the door with the cabinet frame and attach the other side of the hinges to the frame. Take your time during this step to ensure smooth operation and proper spacing around the door.
Adding Style and Security: Hinges, Pulls, and Latches
Hinges aren’t just functional; they can also be a beautiful decorative element! I was so excited about these charming furniture hinges I discovered at Home Depot. They add a touch of personality and elegance to the cabinet, perfectly complementing the rich dark walnut stain. Don’t underestimate the power of hardware to enhance the overall aesthetic of your DIY projects.
The absolute final step in constructing your DIY Bathroom Mirror Storage Case is adding the practical and aesthetic elements that complete its functionality. I installed simple magnet closures on the inside of the cabinet frame and the mirror door. These are incredibly easy to install, usually requiring just a few screws, and they ensure that your door stays securely closed when not in use, keeping your stored items neatly tucked away. To complete the look and provide easy access, I then attached a stylish pull or knob to the front of the mirror door. Choose a pull that matches your bathroom’s existing hardware or introduces a new, complementary element. These small details make a big difference in the user experience and overall finish of your custom cabinet.
And there she is – completely finished and ready to grace your bathroom with both style and unparalleled organization!
Maximizing Internal Organization: Smart Storage Solutions
Now for a peek at the sheer organizational goodness hidden inside this beautiful cabinet! This is where the true magic of a DIY project shines – customizing every inch to perfectly suit your needs. The adjustable shelves provide incredible flexibility for storing everything from tall hairsprays to smaller lotions and potions. With everything neatly tucked away, your bathroom counter will remain clutter-free and serene.
To further enhance the internal organization, I’ve incorporated a few clever additions. On the inside of the cabinet, I used 3M Command Strip hooks to provide dedicated hanging spots. These are perfect for keeping small items like rubber bands easily accessible and tidy. Below those, I’ve used larger Command Hooks to safely store my curling iron and flat iron. The beauty of Command products is their versatility and damage-free removal, making them ideal for adapting your storage as your needs evolve. This thoughtful use of vertical space ensures that even your styling tools have their own designated spot, preventing tangled cords and cluttered drawers.
And for those shelves, I highly recommend SnapWare containers! These are the same fantastic containers I use to keep my pantry immaculately organized, and they work just as brilliantly here. They’re incredibly durable and won’t shatter if they accidentally get dropped – a major plus when you have five energetic kids running around, because, let’s be honest, accidents can and do happen! Their clear design allows for quick identification of contents, making your morning routine even more efficient. Fill them with cotton swabs, hair ties, first aid essentials, or anything else that needs a designated, protected spot.
Conclusion: Your Dream Bathroom Awaits!
So, what are your thoughts on this incredible DIY Bathroom Mirror Storage Case? I genuinely believe this project is a true triumph in functional design and home organization. I personally love absolutely everything about it! I finally have the full-length mirror I’ve always wanted, perfectly integrated with a ton of hidden storage – truly the best of both worlds. This is more than just a piece of furniture; it’s a statement of style, efficiency, and DIY accomplishment. It proves that with a little effort and the right guidance, you can create custom solutions that perfectly meet your family’s needs and elevate your living space. I would be absolutely thrilled if you would share and PIN my storage case with all your friends and fellow DIY enthusiasts! Let’s inspire more people to tackle amazing home projects. If you have any questions or tips from your own build, please share them in the comments below!
Happy Building, and enjoy your beautifully organized, dual-purpose mirror!