
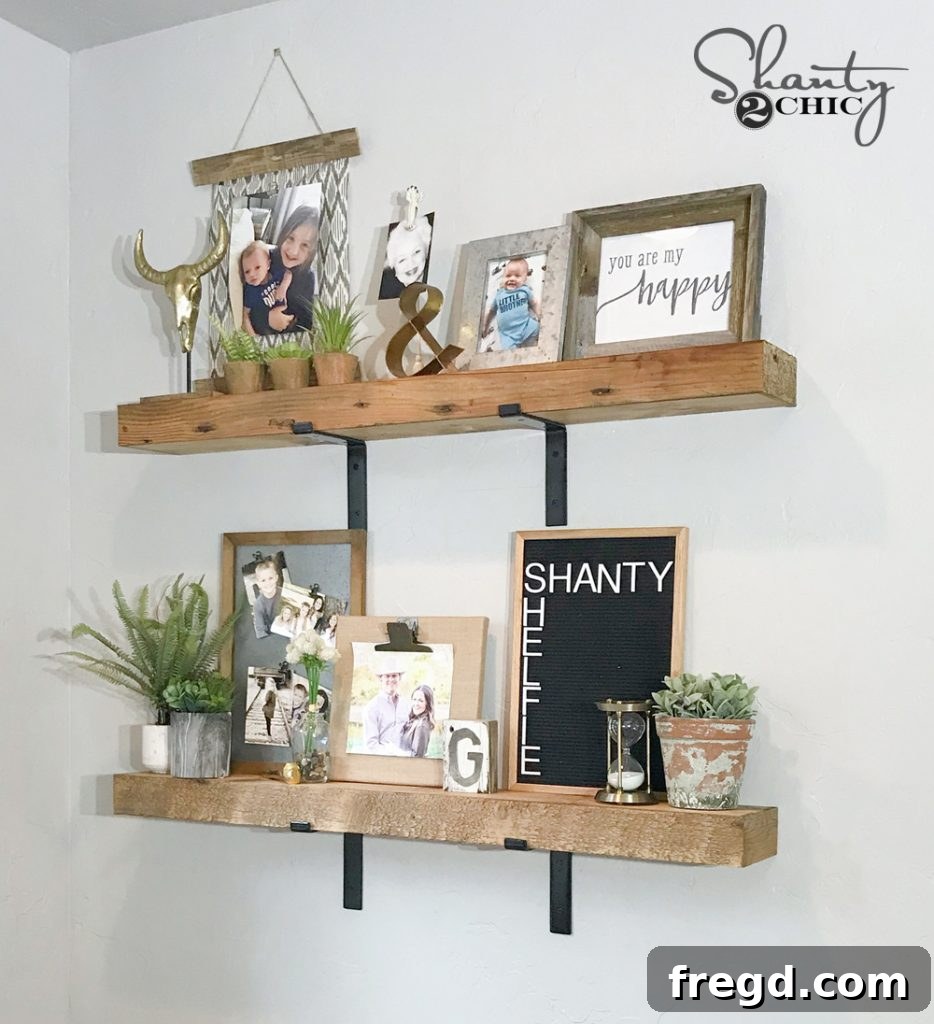
Hello DIY Enthusiasts!
Welcome to another exciting project that will transform your living space. Today, we’re thrilled to share the detailed guide for creating our incredibly stylish and functional DIY Chunky Industrial Shelves. These shelves were designed to add a touch of rustic elegance and practical storage to any room, especially a bedroom, living area, or even a home office. The inspiration for this build stemmed from discovering the exceptionally versatile and robust metal brackets by Crates & Pallet. Their industrial aesthetic and ingenious design immediately sparked the idea for a new, easy-to-build shelving solution that looks far more complex than it actually is. If you’re eager to see these shelves come to life, don’t miss our comprehensive walkthrough in this week’s YouTube video!
Aren’t they absolutely captivating? These shelves perfectly blend strength with refined style, offering a bold statement piece for your walls while providing ample space for decor, books, or essentials. The beauty of this project lies in its accessibility – even if you’re relatively new to woodworking, our step-by-step instructions and the smart design of the Crates & Pallet brackets make this a highly achievable and rewarding endeavor.
The Genius Behind the Brackets: Crates & Pallet
One of the most appealing aspects of embarking on this shelving project is the thoughtful design of the Crates & Pallet brackets. Unlike many other shelf supports that require specific board dimensions or custom cuts, these brackets are specifically engineered for dimensional lumber. This means you can simply purchase standard boards from your local hardware store, pair them with these robust brackets, and you’re already halfway to building stunning shelves without needing advanced tools or specialized skills.
The specific brackets we utilized are perfectly sized to accommodate a standard 1×8 or 2×8 board. This feature is incredibly beneficial for aspiring DIYers who might not possess a full suite of woodworking tools or extensive experience in crafting shelves from scratch. The straightforward compatibility eliminates guesswork and complex measurements, streamlining the entire process. While these brackets are fantastic on their own for simple shelving, we wanted to elevate the look and create something truly unique – shelves that exude the substantial, rustic charm of a thick, reclaimed piece of timber. And that’s precisely where this project comes in!
Why Choose DIY Chunky Industrial Shelves?
Beyond the sheer satisfaction of building something with your own hands, there are numerous compelling reasons to opt for these DIY chunky industrial shelves:
- Unmatched Style: The industrial-chic aesthetic, combined with the chunky profile, creates a captivating focal point in any room. It’s a timeless look that complements various decor styles, from modern farmhouse to minimalist industrial.
- Customization: Unlike mass-produced shelves, you have complete control over the length, finish, and overall character. You can choose a stain to match existing furniture, a bold paint color for a pop, or a distressed finish for an authentic reclaimed look.
- Cost-Effective: Building your own shelves is often significantly more affordable than purchasing custom-made or high-end industrial shelving. The Crates & Pallet brackets provide a premium look without the premium price tag.
- Durability: Constructed from solid wood and robust steel brackets, these shelves are built to last. They offer reliable support for heavier items, ensuring your treasured possessions are displayed securely.
- Space Optimization: Wall-mounted shelves are fantastic for utilizing vertical space, freeing up floor area, and creating visual interest. They’re perfect for displaying decor, organizing books, or storing everyday items without cluttering surfaces.
Before we dive into the construction details, we highly recommend downloading and printing our comprehensive FREE PLANS! These plans provide precise measurements, cut lists, and diagrams to guide you through every step, ensuring a smooth and successful build.
Essential Tools and Materials
To embark on this rewarding project, gathering the right tools and materials beforehand will make the process much smoother. Here’s a comprehensive list:
Materials:
- Crates & Pallet 8-inch Forged Steel Shelf Brackets: The foundation of our industrial look. (You can find them here).
- 1×8 Dimensional Lumber: For the top and bottom panels of your chunky shelf box. The number of boards depends on your desired shelf length.
- 1×2 Dimensional Lumber: Used for the internal framing of the shelf box.
- Reclaimed Wood Trim Boards (or alternative trim): Approximately 3/8″ or 3/4″ thick and 3″ wide, depending on your preference for the “chunky” thickness and the amount you rip off the 1x8s. These create the illusion of solid, thick wood.
- Wood Glue: For strong, lasting joints.
- 1.25-inch Brad Nails: For securing the wood components during assembly.
- 3-inch Wood Screws: For securely mounting the metal brackets to wall studs.
- 1-inch Wood Screws: For attaching the finished shelf box to the brackets from underneath.
- Wood Stain or Paint: To achieve your desired finish.
- Clear Protective Topcoat: For durability and longevity.
- Heavy-Duty Wall Anchors (Optional): If you cannot attach brackets directly to wall studs.
Tools:
- Miter Saw or Circular Saw with a Straight Edge Guide: For accurate cross-cuts.
- Table Saw: Essential for ripping the 1×8 boards to the precise width needed.
- Brad Nailer: For quick and efficient fastening of brad nails.
- Cordless Drill/Driver: For pre-drilling holes and driving screws.
- Stud Finder: Crucial for locating wall studs for secure bracket installation.
- Level (Long and Short): To ensure your shelves are perfectly straight.
- Measuring Tape and Pencil: For accurate measurements and marking cuts.
- Safety Glasses and Hearing Protection: Always prioritize safety!
- Sander or Sandpaper (various grits): For smooth finishes.
- Clamps: Helpful for holding pieces together while glue dries or during assembly.
Step-by-Step Construction Guide for Your Chunky Industrial Shelves
Now that you have your materials and tools ready, let’s dive into the detailed construction process. Precision is key for a professional-looking finish, so take your time with each step.
Step 1: Preparing Your Wood – Ripping the 1×8 Boards
The first crucial step involves adjusting the width of your 1×8 boards to perfectly fit the Crates & Pallet brackets and accommodate the decorative trim. These brackets are designed for a standard 8-inch board, which actually measures 7 1/4 inches wide. Our goal is to create a substantial, chunky look by adding trim to the edges. Therefore, you’ll need to rip down the 1×8 boards that will form the top and bottom surfaces of your shelf box.
The amount you rip off will depend on the thickness of your chosen trim. If, like us, you are using reclaimed wood trim boards that are 3/8 inch thick, you will need to rip 3/8 inch off of both 1×8 boards. This ensures that when the trim is added, the total width will still fit snugly within the bracket’s embrace. If your trim is thicker, for instance, 3/4 inch thick (like a standard 1x board), you will rip 3/4 inch off each 1×8 board. This step is critical for a flush, professional finish, so measure twice and cut once with your table saw, always prioritizing safety.
Step 2: Building the Inner Frame of the Shelf Box
With your top and bottom boards prepared, it’s time to construct the internal framework of your shelf. This frame provides structural integrity and the core around which the chunky aesthetic is built. You’ll construct this frame using 1×2 boards. Once you’ve made your cuts according to the dimensions in the FREE PLANS, you will assemble the frame components. Apply a generous bead of wood glue to all mating surfaces before securing them together. Use 1.25-inch brad nails with your brad nailer to hold everything firmly in place while the glue dries. Ensure all corners are square for a sturdy and true shelf.
Step 3: Attaching the Top Board
Next, take one of the 1×8 boards you ripped to the correct thickness in Step 1. This will form the top surface of your chunky shelf. Carefully align this board over the constructed 1×2 frame. Apply wood glue to the top edges of the 1×2 frame, then position the 1×8 board. Secure it firmly in place using 1.25-inch brad nails, ensuring they penetrate both the 1×8 and the 1×2 frame for a strong bond. Distribute the nails evenly along the length of the board.
Step 4: Attaching the Bottom Board
Once the top board is securely attached, carefully flip the entire assembly over. Now, repeat the exact same process for the second ripped 1×8 board, which will form the bottom surface of your shelf box. Apply wood glue to the remaining exposed edges of the 1×2 frame, position the 1×8 board, and secure it with 1.25-inch brad nails. Ensure the edges are flush and the board is centered to maintain a consistent appearance. At this point, you will have a sturdy, hollow box that is ready for the decorative trim.
Step 5: Adding the Front Trim Piece
Now for the exciting part – adding the trim that gives these shelves their signature chunky, reclaimed wood appearance! Start with the front trim piece. This piece requires precise mitered cuts for a seamless look. It will be cut to a length of 48 inches (or your desired shelf length) from short point to short point, with each end mitered at a 45-degree angle. This angle ensures that when the side trim pieces are added, they will meet perfectly at the corners. Apply wood glue generously to the front edge of your shelf box and then carefully attach this mitered trim board using 1.25-inch brad nails. Press firmly to ensure a strong bond while the glue sets.
Step 6: Completing the Side Trim Pieces
To finish the “chunky” look, you’ll now add the two side trim pieces. The front end of each side piece will also need to be cut at a 45-degree miter to perfectly meet the mitered front board, creating a clean, professional corner joint. The back end of these side pieces, however, will be cut flat (at a 90-degree angle) since they will sit flush against the wall when installed. Apply wood glue to the side edges of the shelf box and securely attach the side trim pieces with 1.25-inch brad nails. Ensure all joints are tight and the trim is flush with the top and bottom boards. This step truly completes the substantial, reclaimed wood illusion.
Finishing Touches: Stain, Paint, and Protection
With the construction complete, it’s time to bring your shelves to life with a beautiful finish. This is where your personal style can truly shine! Since we opted for reclaimed wood on the trim, we carefully selected a matching stain color to apply to the top and bottom 1×8 boards. This unified finish creates a cohesive and authentic look, making it appear as if the entire shelf is crafted from a single, thick piece of reclaimed timber.
If you prefer a different aesthetic, you could choose a contrasting stain, a vibrant paint color, or even a distressed whitewash finish for a farmhouse feel. Always sand your shelves thoroughly before applying any finish to ensure a smooth, even application. Follow the manufacturer’s instructions for drying times between coats of stain or paint, and consider adding a protective clear topcoat. A satin or matte polyurethane will protect the wood from wear and tear while preserving your chosen aesthetic, making your shelves durable and easy to clean for years to come.
Installation: Securely Mounting Your Shelves
While your beautifully finished shelves are drying, it’s the perfect time to install the Crates & Pallet brackets on your wall. Proper installation is paramount for both the safety and stability of your new shelves. We strongly recommend attaching your brackets directly into wall studs for the most secure hold. Use a stud finder to locate the studs and mark their positions accurately. Then, pre-drill pilot holes and attach the brackets using sturdy 3-inch wood screws. This ensures maximum weight capacity and peace of mind.
If attaching to studs isn’t an option for your desired shelf placement, you can still install these shelves using heavy-duty wall anchors. However, it’s crucial to select anchors that are rated for significant weight and follow their installation instructions precisely. Always use a level to ensure your brackets are perfectly aligned and spaced evenly before securing them to the wall. Misaligned brackets can lead to crooked shelves and an unstable setup.
Once your shelves are dry and the brackets are firmly in place, carefully lift and set your new shelf box on top of the installed brackets. Make any final adjustments to ensure it sits perfectly centered and level. Finally, for an extra layer of security, attach the shelf box to the brackets from underneath. Using smaller 1-inch wood screws, drive them up through the pre-drilled holes (or pilot holes you drill) in the brackets and into the bottom of your shelf box. This step permanently locks the shelf in place, preventing any accidental movement and ensuring everything is held firmly and safely.
And just like that, you’re done!
We are absolutely thrilled with the striking appearance and robust functionality of these DIY Chunky Industrial Shelves. The thoughtful design of the Crates & Pallet brackets not only simplifies the construction process but also adds an authentic, industrial detail that elevates the entire aesthetic. Their timeless appeal and sturdy construction make them a fantastic addition to any home seeking a blend of style, storage, and personal touch. You can easily find these indispensable brackets online HERE to start your own stunning shelving project today!