
Hello DIY enthusiasts and home decor lovers!
Transform Your Table: DIY Wood Chargers for Rustic Elegance
Welcome back to another exciting DIY adventure! We’re thrilled to share a fantastic new YouTube video tutorial that walks you through crafting your very own stylish wood chargers. These aren’t just any chargers; they are incredibly simple to make, budget-friendly, and add a touch of rustic elegance to any table setting. Whether you’re planning a cozy family dinner, a festive holiday feast, or simply want to elevate your everyday meals, these handmade wooden chargers are the perfect solution.
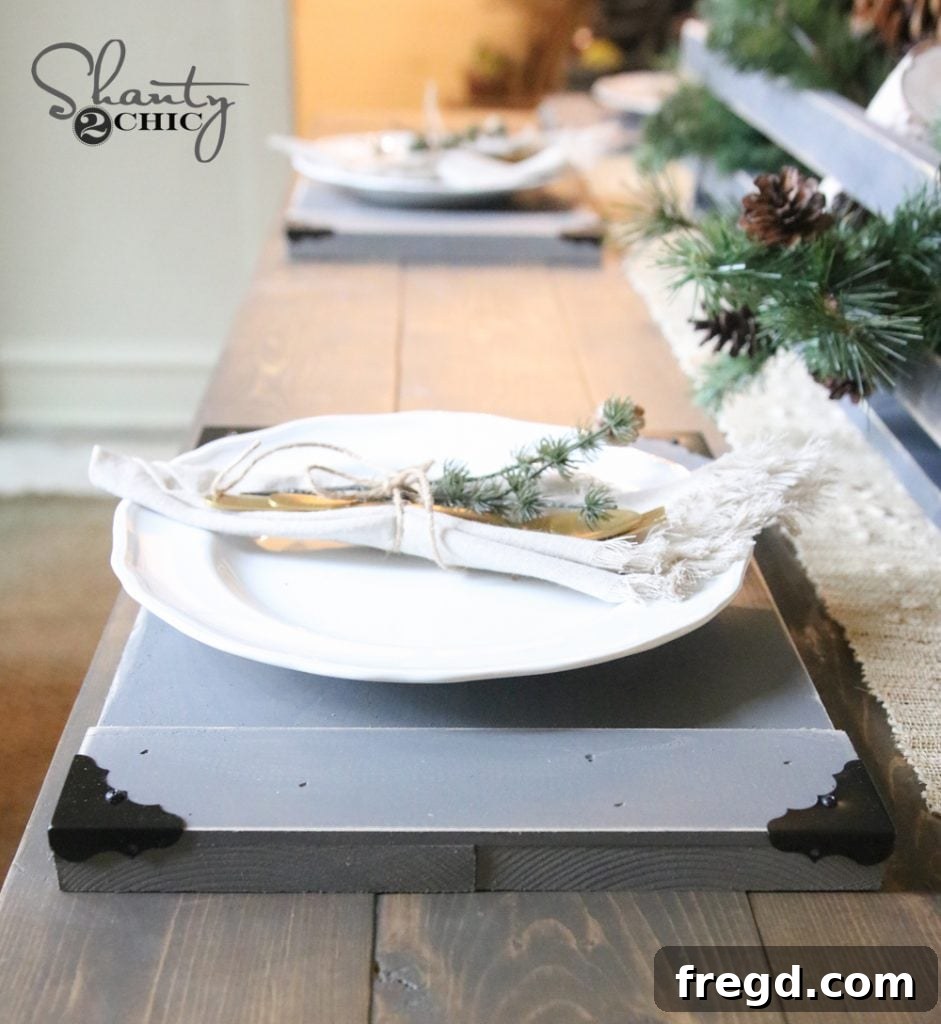
This project is proudly part of our comprehensive 5-Tool Ebook, available HERE on Etsy. If you’re looking to expand your DIY skills with essential tools and creative projects, our Ebook is an invaluable resource. Before we dive into the step-by-step guide, take a moment to admire just how charming and versatile these finished wood chargers are!
Why DIY Wood Chargers Are a Must-Have for Your Home
In a world of mass-produced items, there’s something incredibly satisfying about creating functional and beautiful pieces for your home with your own hands. DIY wood chargers offer a unique blend of practicality and personalized style. Here’s why this project is perfect for you:
- Unbeatable Affordability: Store-bought chargers, especially those with a rustic or artisan look, can be surprisingly expensive. By crafting your own, you save a significant amount of money, allowing you to furnish your entire dining table for a fraction of the cost.
- Customizable Design: The beauty of DIY lies in customization. You get to choose the wood, the paint color, the finish, and even the decorative accents. This means your chargers will perfectly match your existing home decor or the theme of your next gathering.
- Rustic Charm and Warmth: Wood naturally brings warmth, texture, and an inviting feel to any space. These chargers are designed to enhance your table with a cozy, farmhouse-inspired, or modern rustic aesthetic, making every meal feel special.
- Beginner-Friendly Project: Don’t let woodworking intimidate you! This project is designed to be straightforward and uses common power tools that even beginners can master with a little practice. Our video tutorial and free plans break down every step, making it incredibly accessible.
- Perfect for Any Occasion: From casual weeknight dinners to elaborate holiday feasts, these versatile chargers can be dressed up or down. Imagine them accentuating your Thanksgiving spread, Christmas dinner, or a simple Sunday brunch.
Watch the Full DIY Tutorial and Download Free Plans!
We understand that visual learners appreciate seeing the process in action. That’s why we’ve put together a comprehensive video tutorial to guide you through every step. You can check out our DIY video HERE on YouTube, or simply click the play button below!
To make things even easier, we’ve prepared detailed, printable plans for this project. These plans include precise measurements and diagrams, ensuring your cuts are accurate and your assembly is smooth. You can download and print the FREE plans by clicking HERE!
What You’ll Need: Materials and Tools
Before you begin, gather all your materials and tools. Having everything organized will make the building process much smoother and more enjoyable. Remember to prioritize safety and wear appropriate protective gear, such as safety glasses, during all cutting and nailing steps.
Materials per Charger:
- Wood Boards:
- Two (2) 1×6 boards (exact length specified in free plans) – These will form the main planked surface of your charger.
- Two (2) 1/4″ x 3 craft boards (exact length specified in free plans) – These thinner boards will serve as decorative and structural side trims.
- Adhesive: Strong wood glue for a durable bond.
- Nails: 5/8″ brad nails for attaching the craft boards.
- Finishing:
- Spray paint (e.g., Rust-Oleum Painter’s Touch Satin in Granite) or wood stain of your choice.
- Sandpaper (medium to fine grit) for distressing and smoothing.
- Decorative Accents: Metal corners (available at hardware stores like Home Depot).
- Optional: Small screws or brad nails for attaching metal corners, if they don’t come with their own fasteners.
Tools You’ll Use:
- Miter Saw: We highly recommend the Ryobi 18V Miter Saw for precise and clean cuts. Its portability and accuracy make it ideal for projects like this.
- Brad Nailer: The Ryobi 18V Brad Nailer is perfect for quickly and securely attaching the craft boards without splitting the wood.
- Measuring Tape: For accurate measurements.
- Pencil: For marking your cuts.
- Safety Glasses: Essential for protecting your eyes from flying debris.
- Work Surface: A stable and clean area to work on.
Step-by-Step Guide: Crafting Your Beautiful Wood Chargers
Step 1: Making Your Precise Cuts
Accuracy in your cuts is paramount for a professional-looking finish. Begin by carefully measuring and marking your wood boards according to the dimensions provided in our free plans. For this project, you will be cutting your 1×6 boards and your 1/4″ x 3 craft boards to specific lengths. We used our trusty Ryobi 18V Miter Saw for all our cuts. This tool makes quick work of repetitive cuts and ensures smooth, straight edges, which are critical for seamless assembly. Double-check your measurements before making any cuts to avoid waste.
Remember, the wood on the left is the 1×6 board, and the wood on the right is the 1/4″ x 3 craft board. These are the components for just one wood charger, so if you’re making a set, multiply your cuts accordingly!
Step 2: Assembling the Charger Base with Wood Glue
Once all your pieces are cut, it’s time to assemble the main body of the charger. Take your two 1×6 boards and carefully align their long edges. Ensure they are perfectly flush to create a seamless surface. Apply a generous, even line of strong wood glue down the entire length of the meeting edges. This glue will provide a robust bond, making your charger sturdy and durable. After applying the glue, press the boards firmly together. While not explicitly shown in the original process, it’s often a good practice to use wood clamps to hold the boards together while the glue dries, ensuring a tight bond and preventing any gaps. Allow the glue to dry completely according to the manufacturer’s instructions before proceeding to the next step.
Step 3: Attaching the Side Craft Boards
With the main base of your charger assembled and dry, it’s time to add the side craft boards. These boards not only provide a decorative edge but also help to further secure the two 1×6 planks together. Carefully position one 1/4″ x 3 craft board along one of the long edges of your assembled 1×6 base. Make sure it’s flush with the top and bottom surfaces. Using your Ryobi 18V Brad Nailer and 5/8″ brad nails, begin to nail the craft board securely in place. Drive nails at regular intervals along the entire length of the board, being careful to keep them straight and avoid splitting the wood. Repeat this process for the other side, attaching the second craft board. The brad nailer makes this step quick and efficient, leaving minimal holes that can easily be filled later if desired.
One side finished and looking great!
And the other side completed, bringing the charger together!
Step 4: Painting and Distressing for a Perfect Finish
Now for the exciting part – bringing your charger to life with color and character! We chose to spray paint our chargers using Rust-Oleum Painter’s Touch Satin in a color called Granite, which we absolutely adore! This specific shade, found at Home Depot, offers a sophisticated and versatile look that complements a wide range of decor styles. When spray painting, work in a well-ventilated area and apply several thin, even coats rather than one thick coat to prevent drips and ensure a smooth finish. Allow each coat to dry to the touch before applying the next.
Once the paint has thoroughly dried, it’s time to add that beloved distressed look. Using sandpaper (start with a medium grit and finish with a finer grit), gently sand the edges and corners of the charger. This technique reveals hints of the natural wood underneath, creating an aged, weathered appearance that is characteristic of rustic and farmhouse styles. You can control the level of distressing to match your personal preference – from subtle wear to more pronounced antique effects.
Step 5: Adding Decorative Metal Corners
The final touch that truly elevates these wood chargers is the addition of decorative metal corners. These charming accents not only provide a finished look but also offer a touch of industrial or vintage flair. We sourced our metal corners from Home Depot, and you can see them online HERE.
Before attaching them, we gave our metal corners a quick coat of black spray paint. This creates a striking contrast against the granite-colored wood and enhances their visual impact. Once the paint on the corners is dry, carefully position one corner on each of the four corners of your wood charger. Secure them in place using the small fasteners they typically come with, or by using tiny brad nails or screws. Take your time with this step to ensure each corner is perfectly aligned and securely fastened.
Customization Ideas to Make Them Uniquely Yours
While the Granite finish with black metal corners is undeniably chic, the possibilities for customizing your DIY wood chargers are endless. Here are a few ideas to spark your creativity:
- Vary the Finish: Instead of paint, consider a rich wood stain to highlight the natural grain of the wood. A dark walnut or a light oak stain can dramatically change the aesthetic.
- Distress Differently: Experiment with different distressing techniques. Use a wire brush for deeper gouges or try a chalk paint finish for a more antique, chippy look.
- Seasonal Themes: Paint chargers in festive colors for holidays – deep reds and greens for Christmas, pastels for Easter, or autumnal hues for Thanksgiving.
- Stenciling and Decals: Add a personalized touch with stenciled monograms, intricate patterns, or even seasonal decals. A clear protective coat over the stencil will ensure durability.
- Embellish with Fabric: For a softer look, consider wrapping the edges of your chargers with burlap, ribbon, or patterned fabric, securing it with glue or small tacks.
- Alternative Hardware: Explore different types of metal corners or even small decorative handles for a unique touch.
Elevate Your Dining Experience with Handmade Chargers
And just like that, you’re all finished! You now have beautiful, handcrafted wood chargers that are sure to impress your guests and bring a special touch to your dining table. This project demonstrates how simple tools and readily available materials can be transformed into stunning pieces of home decor. Not only have you created something beautiful, but you’ve also honed your DIY skills and gained the satisfaction of making something with your own two hands.
We encourage you to embark on this rewarding project and share your creations with us! Don’t forget to revisit our YouTube video for visual guidance and download the free plans for precise measurements. For more incredible DIY projects and tool insights, be sure to explore our 5-Tool Ebook. Happy crafting!