
Crafting Comfort: A DIY Fall Wreath Project During Life’s Unexpected Twists
Hello, wonderful friends and fellow creators!
Whitney here, and I first want to extend my deepest gratitude to each of you who reached out with prayers and heartwarming messages on our Facebook page last week. Your support truly meant the world to me during a challenging time.
A Personal Update: Navigating Life’s Unexpected Pauses
For those who weren’t aware, I found myself in the hospital last week, facing an unexpected complication: low amniotic fluid at 32 weeks pregnant. It was quite a surprise, to say the least, and a moment that certainly put things into perspective. The immediate concern for our little one was overwhelming, but after a couple of days of close monitoring, we received the most reassuring news: our baby looked incredibly healthy and happy. What a relief! I was sent home with clear instructions to take it easy and ensure I felt plenty of kicks and movement, focusing entirely on rest and recovery for both myself and the baby.
This period was a powerful reminder of how precious health is, and how invaluable a strong support system can be. My family stepped up in a huge way, ensuring our other children were well cared for, allowing me to focus completely on my well-being. Their love and practical help were truly a blessing, and I am endlessly thankful for them. And of course, I am incredibly thankful for you, our community. Your thoughtful messages and well wishes provided such a comforting boost during an anxious time. It’s moments like these that truly highlight the beauty of connection and the power of collective good thoughts.
The short version of this journey is that while I absolutely love diving into ambitious furniture building projects, my body will need a significant pause from such strenuous activities for at least the next six weeks, if not longer. But fear not, my creative spirit cannot be quelled! My trusty hot glue gun, however, is about to see an unprecedented amount of action. This means a shift towards simpler, gentler, yet equally fulfilling DIY endeavors that bring beauty and warmth into our home.
Embracing Autumn: A Fresh Look for Our Front Door
This natural shift towards less physically demanding crafts leads me perfectly to my latest completed project! It’s a project I actually started before my unexpected hospital visit, and I was absolutely thrilled to finally put the finishing touches on it. The need was clear: our front door was crying out for a new Fall wreath. The previous one had seen better days and frankly, was looking a bit… sad. Fall is such a vibrant, welcoming season, and our entryway needed to reflect that warmth and beauty.
Creating a beautiful, inviting front door display is one of my favorite ways to welcome a new season. It sets the tone for your entire home and offers a warm greeting to every guest. For autumn, I envision rich textures, natural elements, and colors that evoke cozy evenings and crisp, golden days. This DIY Fall wreath project delivers exactly that, and I’m excited to share how you can recreate this charm for your own home. It’s not just about decorating; it’s about infusing your living space with personal touches and seasonal joy, all while keeping things incredibly budget-friendly and simple enough for anyone to tackle.
Gathering Your Materials: An Affordable Fall Transformation
One of the best parts about this project is how incredibly affordable it is, without compromising on style. Most of my supplies came from a single trip to Hobby Lobby, proving that you don’t need to break the bank to create stunning seasonal decor. Here’s what you’ll need to bring this charming Fall wreath to life:
3 Fake Pumpkin Stems: I found these adorable, realistic-looking pumpkin stems at Hobby Lobby for around $1 each. They are incredibly versatile for crafts, allowing you to customize their look. When selecting yours, consider variety in size or shape if available, although identical ones work perfectly too, especially once painted.
Wood Monogram: A single wooden monogram letter, also from Hobby Lobby, cost me just $1. This adds a beautiful, personalized touch to your wreath. Choose the initial of your last name or any letter that holds significance for your home.
Grapevine Wreath: The foundation of our project, this grapevine wreath was a steal at $3 from Hobby Lobby. Grapevine wreaths are excellent bases for DIY projects because of their natural texture and the ease with which you can attach elements to them.
Burlap Cut into 2″ Strips: I purchased just 1/4 yard of burlap fabric at Hobby Lobby for under $2. If you buy it by the yard, you’ll have plenty left over for other projects! The rustic texture of burlap is quintessential Fall and perfect for creating beautiful rosettes. You’ll need scissors to cut your fabric into consistent 2-inch wide strips.
You will also need:
* Cream Colored Spray Paint: This will unify your pumpkins and monogram, giving them a sophisticated, cohesive look. Choose a matte or satin finish for a natural feel.
* Hot Glue Gun and Plenty of Glue Sticks: Your best friend for this project! Ensure you have enough glue sticks to secure all your elements firmly.
* Small Piece of Felt: Crucial for the base of your burlap rosettes, providing a sturdy foundation for the fabric flowers.
Step-by-Step Guide: Crafting Your Rustic Fall Wreath
Let’s dive into the fun part – bringing all these elements together to create your stunning Fall wreath!
1. Preparing Your Elements: Pumpkins and Monogram
My first step was to prepare the faux pumpkins. They typically come with little green plastic stems on top and often sticks or wires inserted into the bottom for displaying. To achieve a clean, cohesive look and ensure they sit flush on the wreath, I carefully pulled off the stems from the top and removed any sticks or wires from the bottoms. This makes them much easier to work with and glue securely.
Next, I took my prepared pumpkins and the wooden monogram letter into the garage for a quick spray paint session. Using the cream-colored spray paint, I applied a good, even coat to all surfaces. Make sure to spray in a well-ventilated area and use quick, sweeping motions to avoid drips. It’s always better to apply two thin coats than one thick, heavy coat. The cream paint instantly transformed them, giving them a unified, elegant, and somewhat farmhouse-chic aesthetic that perfectly complements the rustic burlap. While these elements were drying thoroughly, I moved on to creating the beautiful burlap rosettes.
2. Crafting Beautiful Burlap Rosettes
Burlap rosettes are a cornerstone of rustic Fall decor, and they are surprisingly simple to make! I’ve shared a few rosette tutorials before, but in case you haven’t seen them or need a quick refresher, here’s the process:
Start with one of your 2-inch wide burlap strips. You’ll begin by folding the end of the strip. I typically make two folds, creating a small, neat starting point. This initial fold is then hot-glued securely to a small, round piece of felt. The felt acts as the sturdy base for your rosette, giving it structure and making it easy to attach to your wreath.
Now, the magic happens! With the initial fold secured to the felt, you simply begin to roll the burlap strip outwards, carefully wrapping it around the central felt piece. As you roll, you’ll apply small dots of hot glue to secure each section of burlap to the previous layer and to the felt base. The key is to keep the rolling motion consistent and to allow the burlap to naturally twist and form petals. Don’t overthink it; the slight imperfections in the fabric actually add to the charm of the rosette.
Continue rolling and gluing, building up the rosette to your desired fullness. You can create rosettes of various sizes by simply using longer or shorter strips of burlap. For a tighter, more compact flower, roll it Tightly. For a looser, more open bloom, allow a bit more give in your rolling. The process is incredibly forgiving, and once you get the hang of it, you’ll be making these quickly and effortlessly. It truly is super easy!
Once you reach the end of your burlap strip, you’ll have a small tail of fabric remaining. Carefully cut the rosette out from the larger strip (if you didn’t cut individual strips beforehand), and then hot glue this tail to the back of the felt base. This neatens the finish and ensures your rosette won’t unravel. That’s it! Repeat this process to create as many rosettes as you desire to adorn your wreath. I made enough to create a beautiful, clustered effect.
3. Assembling Your Masterpiece
Once all your cream-painted pumpkins and monogram are dry, and you’ve crafted a lovely collection of burlap rosettes, it’s time for the exciting assembly phase! This is where your vision truly comes to life. I like to arrange all the elements on the grapevine wreath first, without glue, to get a sense of the layout and balance before committing with hot glue. This allows for adjustments and ensures you’re happy with the final composition.
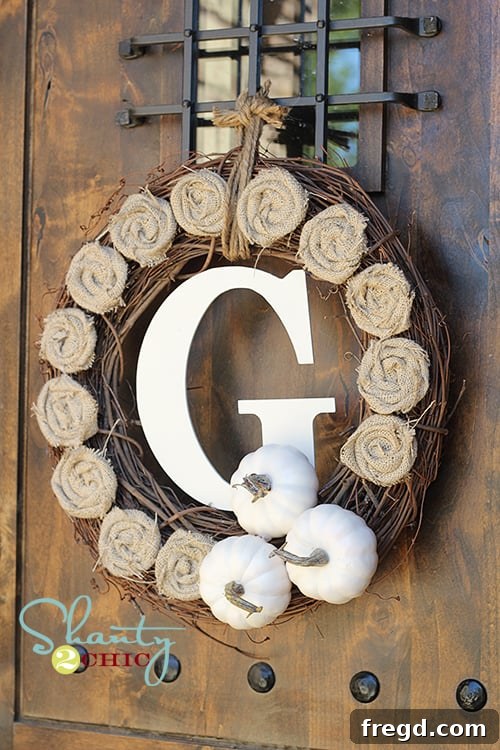
I started by hot gluing the burlap rosettes onto the grapevine wreath, clustering them around the bottom and slightly up one side. Next, I strategically placed my painted pumpkins at the very bottom, overlapping them slightly to create a fuller look. To ensure they were extra secure and wouldn’t shift, I also applied hot glue between the pumpkins themselves, joining them firmly together. This creates a solid base for the other elements. Finally, the personalized monogram was added. I simply glued it wherever it naturally touched the other elements – the rosettes, the pumpkins, and the grapevine wreath. Hot glue is truly a crafter’s best friend for its quick hold and strong bond!
4. The Finishing Touch: Hanging Your Wreath
To hang my newly crafted Fall wreath on the door, I used some thick, natural twine. You can thread it through the grapevine wreath itself or create a small loop at the top, securing it with hot glue if needed for extra stability. The twine adds another rustic element that beautifully complements the burlap and grapevine.
Your Beautiful Fall Wreath: A Welcoming Home
And now, for the grand reveal! Are you ready to see the finished project, hanging proudly on our front door?
I truly hope you love it as much as I do! It brings such a fresh, inviting feeling to our entryway. My old wreath was definitely in need of an upgrade, and this new creation brightens things up considerably, perfectly capturing the essence of the autumn season. It’s a testament to how even simple, budget-friendly crafts can make a huge impact on your home’s decor and your own mood.
This project was a wonderful reminder that creativity doesn’t always have to be grand or complicated. Sometimes, the most satisfying projects are those that allow for gentle, mindful crafting, especially during times when life calls for a slower pace. It’s a joy to create something beautiful with your own hands, knowing it adds a personal touch to your home.
Thank you once again, from the bottom of my heart, for all your incredible support and kindness. Your messages truly lifted my spirits last week, and I appreciate each and every one of you more than words can say. Stay creative, enjoy the beautiful Fall season, and have a truly wonderful week!
~Whitney