
Welcome, fellow DIY enthusiasts!
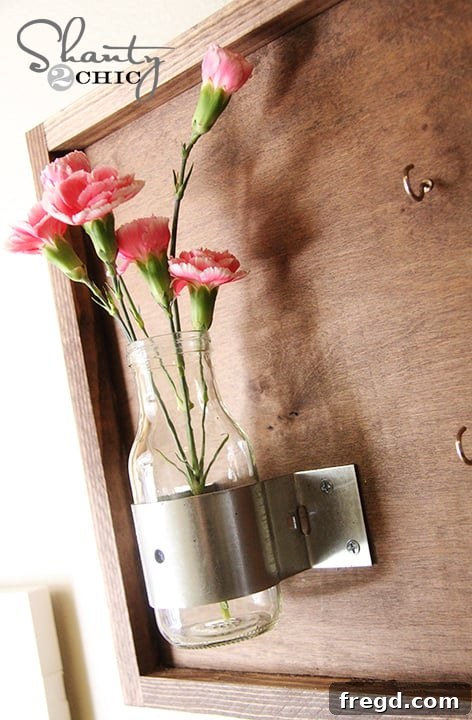
I trust you all enjoyed a wonderfully productive weekend. Mine certainly was, starting with an inspiring trip to Lowe’s with one of my girls. It’s truly incredible how many project ideas can spark just by wandering through the aisles of a hardware store! I walked out with materials for five new projects, and I’m thrilled to share one of my latest creations with you today: a brand-new, stylish Key Holder that’s both functional and charming.
For years, our beloved mason jar key hook served us well. It was a simple, rustic solution that held our keys perfectly. However, with only three designated spots, our family has grown, and so has our collection of keys! It was clear that an upgrade was long overdue to accommodate our evolving needs and bring a fresh look to our entryway organization. The goal was to create something with more capacity, a touch of modern rustic flair, and a unique design element that would truly stand out.
And here it is, the result of that inspiration and a little bit of elbow grease. Prepare to be delighted!
Isn’t it fantastic? This project is not only visually appealing but also incredibly straightforward to make. If you’ve been searching for an approachable entry point into woodworking, this DIY key holder is an excellent choice. It combines basic cuts with simple assembly, making it perfect for beginners eager to tackle their first handmade home decor piece. You’ll gain confidence and a beautiful, practical item for your home in one go!
Let’s dive into the details and get started on building your very own custom key organizer.
Crafting Your DIY Key Holder: Materials and Foundation
Every great project begins with quality materials. For the main board of this key holder, I chose to work with a piece of PureBond Plywood. If you’ve followed our work for a while, you’ll know that Ash and I are huge advocates for PureBond products, and for very good reasons. Their commitment to quality and health-conscious manufacturing aligns perfectly with our values, making it our preferred choice for countless projects, big and small.
Our appreciation for PureBond Plywood goes beyond just its beautiful finish. We’ve delved into its significant health benefits, primarily its formaldehyde-free adhesive system. This ensures a healthier indoor air quality in our home, a crucial consideration for any DIY enthusiast. Beyond the health advantages, the consistent quality and stunning grain patterns of PureBond plywood elevate the aesthetic appeal of all our creations, giving them a professional and refined look. It’s truly our go-to material whenever we require any type of plywood or hardwood plywood for our woodworking endeavors. For a deeper dive into why we love this product so much, you can watch us discuss its numerous benefits in this video HERE.
We strongly encourage you to follow PureBond on Facebook. They consistently share inspiring how-to projects from other talented bloggers and DIYers who utilize their products, providing a wealth of ideas and innovative applications. Plus, they frequently host fantastic giveaways, giving you a chance to win some of their premium materials for your next project!
Another fantastic advantage of working with PureBond is the availability of scraps. I often have a wealth of perfectly good offcuts, just like the piece I used for this key holder, patiently waiting to be transformed into something fabulous. This makes smaller projects like this one incredibly cost-effective and eco-friendly. Furthermore, you can readily purchase hardwood plywood in convenient 2’x2′ pieces, ideal for projects that don’t require a full sheet. Here is the specific piece I selected for our key holder today:
Building the Sturdy Frame
To construct the frame that will beautifully encase our plywood board, I opted for a standard 1x2x8′ pine board. Pine is an excellent choice for this kind of project due to its affordability, ease of working with, and smooth finish when sanded and stained. You’ll only need one 8-foot board for this project, making it very economical. My initial two cuts were for the longer sides of the frame, each measuring 22 inches. Always use a miter saw for precise, clean cuts to ensure your frame pieces fit together seamlessly.
Once the two longer pieces were cut, I moved on to attaching them to the plywood base. For a robust and lasting bond, I employed a combination of Gorilla Wood Glue and my trusty Ryobi Finish Nailer. The wood glue provides exceptional strength, creating a joint that will hold up over time, while the finish nailer quickly secures the pieces in place while the glue dries, preventing any shifting. Apply a continuous bead of glue along the edge of your plywood and then align your pine frame piece, securing it with nails spaced every few inches. Always wear appropriate safety glasses when using power tools.
Next, you’ll need to cut the two shorter pieces for the frame. These will fit snugly between the two longer pieces you’ve just attached. It’s crucial to measure your own piece of wood for these final cuts rather than relying solely on a fixed measurement. Wood can sometimes have slight variations, and an accurate measurement ensures a perfect, custom fit for your frame. This attention to detail will result in a professional-looking finish with tight, gap-free joints. Measure the inside distance between your two long frame pieces and cut your remaining two pine pieces to that exact length.
And just like that, the core wooden structure of your key holder is complete! It’s a testament to how simple yet rewarding woodworking can be. This foundational step is arguably the easiest part, setting the stage for the beautiful finishing touches that will bring your project to life.
Adding Character: Staining and Hardware
Now for the exciting part – giving your key holder its distinctive character with a beautiful finish. For this project, I chose one of my absolute favorite wood stains: Rust-Oleum Wood Stain in Dark Walnut. This particular shade offers a rich, deep hue that enhances the natural grain of the wood, providing a classic, sophisticated, and somewhat rustic appeal that perfectly complements our chosen hardware.
One of the many reasons I adore this specific stain is its remarkably quick drying time. After just an hour, it’s typically dry to the touch and ready for the next step, which drastically speeds up the project timeline. This efficiency is invaluable when you’re eager to see your creation come together. Apply the stain evenly with a brush or rag, allowing it to penetrate the wood, and then wipe off any excess for a smooth, consistent finish. For deeper color, you can apply a second coat after the first has dried. Once the stain had fully dried, I was ready to move on to attaching the unique hardware that truly makes this key holder special.
The Distinctive Bottle Feature
For the decorative bottle element, I stumbled upon these fantastic little silver components at Lowe’s, called Pipe Rail Ties. They were a budget-friendly find at just $1.38 a piece at my local store, fitting perfectly within my ‘shanty chic’ project budget. These ties, typically used for securing pipes, offer a wonderfully industrial yet rustic aesthetic, and their circular shape makes them ideal for holding a glass bottle securely in place. Here’s a quick look at the price tag from Lowe’s, so you know what to look for:
For the bottle itself, I repurposed an Archer Farms (from Target) coffee drink bottle. These typically come in convenient packs of four, making them an excellent source for multiple projects or just for enjoying the coffee! They are very similar in size and shape to the popular Starbucks coffee bottles, but I found the Archer Farms bottles to have a slightly more rounded, aesthetically pleasing profile for this particular design. Plus, I managed to snag them on sale, paying under $1 per bottle – a true bargain for upcycled decor! Before attaching, I simply peeled off the plastic wrapper and thoroughly washed the bottle to ensure it was clean and ready. This small step makes a big difference in the final presentation.
The design of the pipe rail tie is perfect for these bottles; the bottle fits snugly and securely within the metal ring. Once you fasten the metal piece to the wooden board using screws, the bottle will be firmly held in place, preventing any wobbling or accidental falls. This secure fit is essential for a functional key holder that you can rely on daily.
To attach the pipe rail ties to the wooden board, I used standard wood screws. It’s important to select screws with a head large enough not to slip through the holes of the metal pipe tie, ensuring a firm grip. Equally crucial is choosing screws that are short enough to securely penetrate the board without protruding through the other side. This prevents any damage to your wall when the key holder is hung and keeps the back of your project looking clean and professional. Always ensure your screws are appropriate for the thickness of your wood.
For drilling the pilot holes and driving the screws, I relied on my absolute favorite tool: the Ryobi Lithium Drill. This powerful and versatile tool is a game-changer for any DIY project. Its lightweight design, long-lasting battery, and impressive torque make it a joy to use, significantly simplifying tasks like this. If you don’t already own one, I highly recommend adding it to your toolkit – you’ll wonder how you ever managed without it! It makes drilling and driving screws effortless and efficient, perfect for both novice and experienced DIYers. Seriously, put it on your wish list; you will thank us later.
You can find a direct link to our recommended Ryobi drill at Home Depot here.
Adding the Key Hooks
The final practical step is adding the essential cup hooks that will hold your keys. I found these sleek silver cup hooks at Target, which perfectly complemented the silver pipe rail ties and the dark walnut stain, tying the entire look together. Matching your hardware finishes creates a cohesive and professional appearance.
I spaced my cup hooks approximately 3 inches apart horizontally and about 4 inches from both the top and bottom edges of the board. This spacing provides ample room for multiple keyrings without them overcrowding each other, ensuring easy access. To install them, I like to use my drill to create a small pilot hole first. This prevents the wood from splitting and makes it incredibly easy to twist the cup hooks into place by hand. Just screw them in until they are snug and facing the desired direction. It’s a quick and simple process that completes the functionality of your key holder.
The Grand Reveal: Hanging Your DIY Masterpiece
The very last step is to proudly hang your newly crafted key holder! I used a simple sawtooth hanger on the back of the board, which is easy to install and provides a secure hanging point. Then, I simply hung it from a screw securely fastened into the wall. Ensure your screw is properly anchored, ideally into a wall stud or with a suitable wall anchor, to safely support the weight of your key holder and all your keys. Take a moment to step back and admire your handiwork – a functional and stylish addition to your home!
Here are a few more detailed pictures of the finished DIY Bottle Key Holder from various angles, showcasing its charm and functionality. Imagine this beautiful piece greeting you every time you walk through your door, keeping your keys organized and adding a touch of rustic chic to your decor.
Conclusion: Your New Favorite Home Organizer
So, what do you think of this DIY key holder? It’s proof that you don’t need a massive budget or advanced skills to create something truly impactful for your home. This project is incredibly affordable, remarkably easy to execute, and delivers an undeniably chic result. The combination of the rich dark walnut stain, the industrial pipe rail ties, the upcycled glass bottle, and the functional silver hooks creates a piece that is both practical and a delightful conversation starter. I genuinely hope you love it as much as I do and find it to be a perfect addition to your entryway or mudroom.
Customize Your Key Holder!
One of the best aspects of DIY is the ability to customize. Consider these ideas to make your key holder uniquely yours:
- **Different Stains or Paints:** Experiment with lighter wood stains, bold paint colors, or even a distressed finish to match your existing decor.
- **Bottle Choice:** Use a different shaped bottle, perhaps one with an interesting texture or color, to change the aesthetic.
- **Hardware Finishes:** Opt for black, bronze, or brass hooks and pipe ties for a completely different look.
- **Decorative Elements:** Add a small plant or fresh flowers to the bottle, or attach a small tag with a word like “KEYS” for an extra touch.
We would be absolutely thrilled if you shared this project with your friends and family. Pin this tutorial extensively to your favorite DIY and home decor boards on Pinterest – spreading the inspiration helps us continue to create and share more exciting projects with you! Thank you so much for taking the time to stop by and explore this simple yet rewarding DIY journey with us.
If you’re keen to stay updated with all our latest project posts and tutorials, ensure you’re receiving our email updates. You can easily sign up HERE and have our fresh content delivered straight to your inbox!
~Whitney