
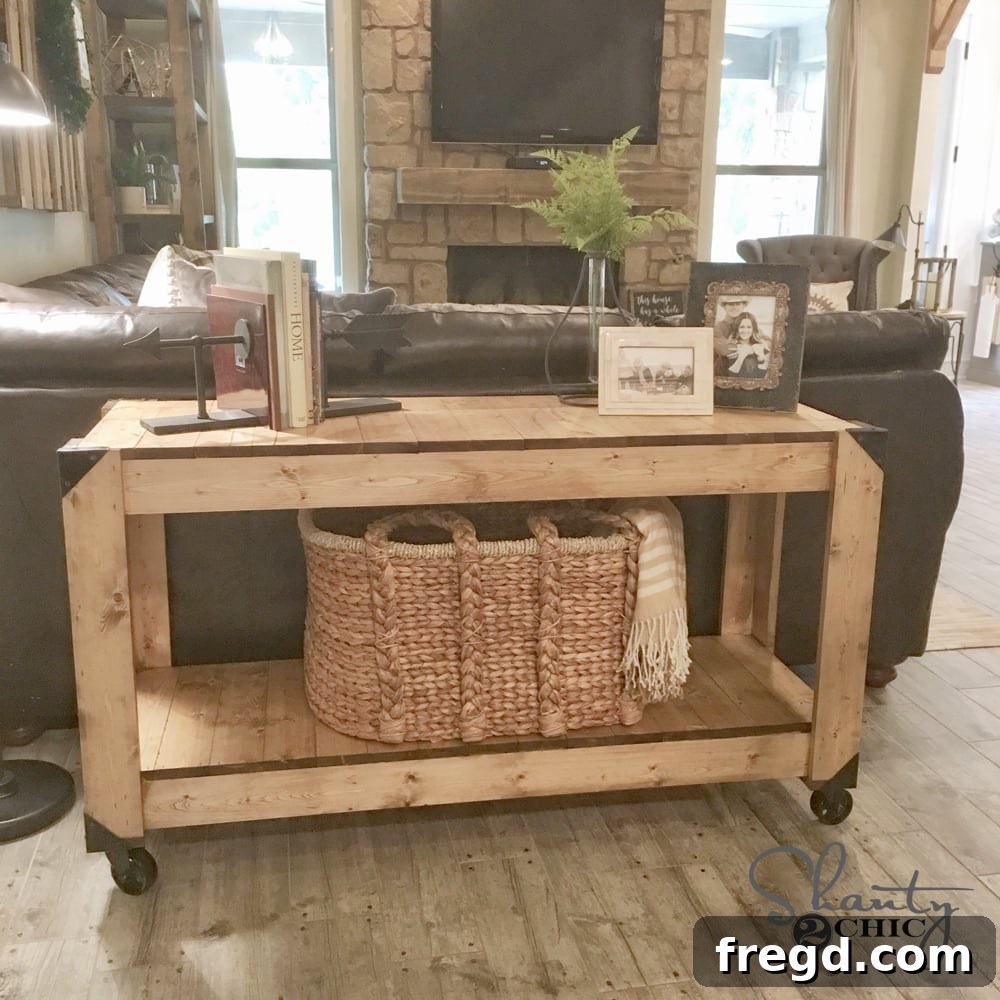
Build Your Dream Console Table: A Simple 3-Tool DIY Project for Every Home
Welcome, DIY enthusiasts! Are you ready to transform your living space with a beautiful, custom-built console table? We’re thrilled to share an incredibly achievable project that allows you to create stunning furniture with minimal tools and maximum impact. This detailed guide will walk you through building a gorgeous console table using just three essential tools, making it perfect for beginners and seasoned builders alike. Whether you’re looking to enhance your entryway, add functionality behind your sofa, or simply embark on a rewarding woodworking adventure, this project is designed for you. Get ready to craft a piece that reflects your personal style and adds a touch of rustic charm or modern elegance to any room.
Building your own furniture is more than just a hobby; it’s an opportunity to save money, customize dimensions and finishes to perfectly match your home decor, and gain immense satisfaction from a job well done. Our special 3-tool console table design makes high-quality craftsmanship accessible to everyone, proving that you don’t need a professional workshop to create beautiful and durable pieces. We’ve simplified the process without compromising on style or stability, ensuring that your finished console table will be a cherished addition to your home for years to come.
To kick things off, we highly recommend watching our comprehensive how-to video. It provides invaluable visual guidance, demonstrating each step of the building process in detail, from making initial cuts to applying the final touches. Seeing the techniques in action can greatly boost your confidence and clarify any questions you might have. Don’t miss out on this essential resource! Watch the Full How-To Video on YouTube Here!
Your Comprehensive Resource: Free Console Table Plans
To ensure your success, we’ve prepared detailed, easy-to-follow plans for this 3-tool console table. These plans include precise measurements, a comprehensive cut list, and step-by-step instructions to guide you through every phase of the construction. Having a clear blueprint is crucial for any woodworking project, and our free plans are designed to eliminate guesswork and streamline your building experience. Download them now and let’s get started on bringing your vision to life!
Download Your FREE 3-Tool Console Table Plans by Clicking Here!
Essential Tools and Materials for Your Console Table Project
One of the most exciting aspects of this project is its simplicity in terms of required tools. You truly only need three main tools to get this console table built, making it an accessible project for almost anyone. The key tools include: a saw (for making precise cuts), a Brad nailer (for quick and secure fastenings), and wood glue (for durable joints). For this build, we specifically utilized our reliable 18V Ryobi Brad nailer and 1.25″ brad nails, which proved perfect for the task.
Beyond the tools, you’ll need a selection of lumber, specifically 1×4 boards which form the bulk of the table’s structure. Additionally, for the finishing touches, you’ll want wood stain (we chose Varathane Stain in Golden Oak for its rich, warm hue), decorative casters for mobility, and optional metal corner accents to give your table a distinctive, industrial look. We sourced our casters and metal corners conveniently from Amazon and gave them a coat of Rust-Oleum black spray paint for a cohesive finish. Having all your materials and tools ready before you begin will ensure a smooth and efficient building process.
Step-by-Step Guide: Building Your 3-Tool Console Table
Phase 1: Precision Cutting – Preparing Your Lumber
The very first step to any successful woodworking project is accurate cutting. Refer to the free plans for the exact dimensions required for each piece of lumber. Take your time to measure twice and cut once, as precision at this stage will ensure all your components fit together perfectly. Once all your pieces are cut, it’s a good idea to lay them out according to the plan to visualize the assembly and confirm everything is correct. Here’s a visual of our cut list:
Phase 2: Constructing the Frames – The Foundation of Your Console Table
The console table’s robust structure begins with two identical frames, which will serve as the top surface and the bottom shelf. These frames are constructed by joining longer runners to shorter runners, forming a sturdy rectangular box. Apply a generous amount of wood glue to the joints before securing them with your 1.25″ brad nails using the nailer. The combination of glue and nails creates a strong, lasting bond, essential for the table’s stability. Construct both frames carefully, ensuring they are square and even. This meticulous approach will pay off in the final assembly, providing a solid base for the rest of your project.
Upon completion of this step, you will have two perfectly symmetrical frames, ready for the next stage of planking. These frames are the core structural components, so ensuring their integrity and accuracy is paramount.
Phase 3: Adding Character – Planking the Frames
With your frames built, it’s time to add the surface planks that will form the top and bottom shelves. Each frame requires 15 individual 1×4 boards, all cut to the same length as per your plans. Apply wood glue along the top edges of the frame where each plank will sit, then carefully position the planks, securing them with your brad nailer. Ensure consistent spacing between planks for an aesthetically pleasing result. This step is where the flat surfaces of your console table truly take shape, transforming the open frames into solid, functional shelves.
Once planked, each shelf will boast a beautiful, finished surface, ready to hold your decor items. The texture and grain of the wood will begin to shine through, promising a stunning final piece. Here is an example of one shelf after the planking is complete:
Phase 4: Crafting the Legs – Sturdy and Stylish Supports
After both shelves are completed, turn your attention to the table’s legs. Each leg is formed by attaching two 1×4 boards together along their edges. Apply wood glue meticulously between the seams of the boards to create a strong bond, then secure them together using brad nails. This technique results in legs that are robust and have a clean, finished appearance from most angles. Pay attention to creating four identical legs for a balanced table.
Once all four legs are assembled, they should exhibit a consistent quality and readiness to be integrated into the table’s structure. These legs will provide the essential support and contribute significantly to the overall aesthetic of your console table.
Phase 5: Assembling the Structure – Bringing the Table Together
Now comes the exciting part: joining the legs to the prepared frames to form the console table’s main structure. This step is surprisingly straightforward. Apply ample wood glue to the surfaces where the legs will meet the frames. Then, attach one leg to each corner of the frames using your nail gun. It’s crucial to pay close attention to the alignment of the legs. Position them so that the side of the leg showing a seam always faces the side of the table. This thoughtful alignment ensures a uniform and polished look across the entire piece, concealing visible seams and enhancing the table’s finished aesthetic.
Careful attachment here contributes greatly to the overall stability and appearance of your console table. Double-check that all connections are secure and that the table stands level.
Ensure that the top of each leg lines up perfectly flush with the top surface of the table, and similarly, the bottom of each leg aligns with the bottom shelf. This precision creates a seamless and professional finish.
The structural integrity is largely dependent on these connections, so take your time and ensure each leg is firmly attached.
Phase 6: Preparing for Mobility – Attaching Foot Pads
Almost done with the basic lumber assembly! Now it’s time to add the foot pads, which are crucial for attaching casters later. Carefully turn your console table upside down. Apply wood glue to each foot pad and then secure them to the bottom of each leg using brad nails. These small wooden blocks provide a solid anchor point for the casters, ensuring they are securely fastened and can support the weight of the table and anything you place on it. This step lays the groundwork for making your console table easily movable.
With the foot pads in place, the core wooden structure of your console table is complete. Take a moment to admire your handiwork!
Finishing Touches: Staining, Casters, and Decorative Hardware
The lumber assembly is now complete, and your console table is structurally sound. The next exciting phase is adding the finishing touches that will bring out its character and protect the wood. We began by giving the entire piece a rich coat of Varathane Stain in Golden Oak. This particular stain provides a warm, inviting hue that enhances the natural grain of the wood, adding depth and a touch of classic elegance. When applying stain, ensure you work in a well-ventilated area and follow the manufacturer’s instructions for application and drying times for best results. A good quality stain not only beautifies but also offers essential protection against wear and tear.
Once the stain was completely dry, it was time to add the casters. We sourced these fantastic casters from Amazon, which are both durable and stylish. To give them a unified look with our intended aesthetic, we applied a coat of Rust-Oleum black spray paint. This simple step transforms off-the-shelf hardware into custom components that perfectly match the table’s design. Attaching the casters to the previously installed foot pads is straightforward: simply screw them into place, ensuring they are tightly fastened for smooth and stable mobility. Casters add a practical element, allowing you to easily move your console table as needed for cleaning or rearranging your space.
To further elevate the console table’s design and add a touch of industrial-chic flair, we decided to incorporate decorative metal corners. We found these great corners, also available on Amazon, and spray painted them black to match the casters. These small details make a big difference, transforming a simple wooden table into a piece with character and unique style. Attaching them is simple; typically, they come with pre-drilled holes for easy screwing into the corners of your table. They not only look fantastic but can also offer a bit of extra protection to the table’s edges. How charming are these accents?
With the metal corners securely in place, your console table is truly taking on its final, impressive form. These hardware elements are the perfect finishing touch, completing the cohesive and stylish look you’ve worked to achieve.
The Grand Reveal: Your Beautifully Completed Console Table!
That’s it, DIYers! Your magnificent 3-tool console table is now complete. Before bringing it inside and adorning it with your favorite decorative pieces, we couldn’t resist putting it to a quick test to ensure everything was perfect. The sense of accomplishment that comes with building a functional and beautiful piece of furniture with your own hands is truly unparalleled. This console table, crafted with care and precision, is ready to be a central feature in your home.
Here it is again, in all its finished glory! This DIY console table is not just a piece of furniture; it’s a testament to your skills and creativity. Its versatile design makes it suitable for various spaces – as an entryway table to welcome guests, a functional sofa table in your living room, or even a chic display shelf in a hallway. The possibilities are endless.
Caring for Your Handcrafted Console Table
To ensure your new console table remains a beautiful centerpiece for years, a little care goes a long way. Regularly dust the surfaces with a soft cloth to prevent buildup. For spills, wipe them immediately with a damp cloth and then dry thoroughly. Avoid using harsh chemical cleaners, as these can damage the stain and wood finish. If you used casters, periodically check that they are clean and free of debris for smooth rolling. With proper care, your DIY console table will continue to bring joy and functionality to your home.
Share Your Masterpiece!
We hope you found this guide inspiring and easy to follow. We absolutely love seeing your creations! If you’ve built this 3-tool console table, or any other project using our plans, please share photos with us on social media. Your success stories motivate us and inspire others in the DIY community. Don’t forget to SUBSCRIBE to our YouTube channel HERE! We release new video tutorials every Wednesday, packed with fresh ideas and projects you won’t want to miss. Happy building, and we look forward to seeing what you create!