
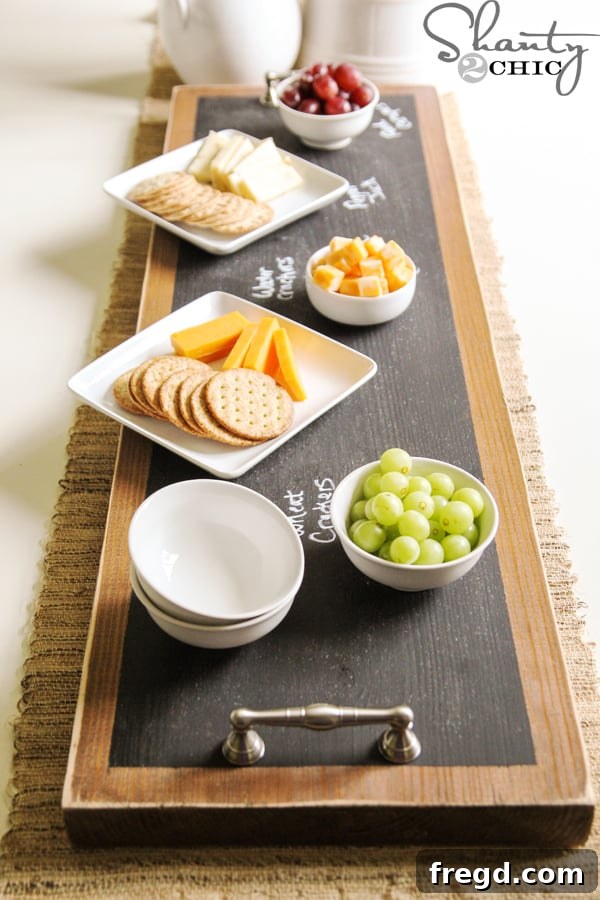
Summer is just around the corner, bringing with it the delightful promise of warm weather, vibrant gatherings, and memorable cookouts with cherished friends and family. As hosts, we often seek creative yet simple ways to elevate our entertaining game, transforming ordinary get-togethers into something truly special. If you’re looking for a project that combines rustic charm, practical functionality, and a touch of personalized flair, then you’ve come to the right place! We are thrilled to share a fantastic DIY endeavor that will undoubtedly become a staple for all your future events: a custom Chalkboard Serving Tray!
This project is not only incredibly enjoyable to make but also surprisingly straightforward, yielding a result that’s both charming and incredibly useful. Imagine a beautiful serving tray where you can write personalized messages, label appetizers, or even doodle fun artwork for your guests. It’s a wonderful conversation starter and a highly versatile addition to any home. Ready to create your own unique Chalkboard Serving Tray? Let’s dive into the step-by-step process!
Why a DIY Chalkboard Serving Tray is Your Next Must-Have Project
In the realm of home entertaining, presentation is everything. A beautifully arranged spread can turn a simple meal into an experience. Our DIY Chalkboard Serving Tray offers an irresistible blend of aesthetics and practicality. Here’s why this project is a game-changer for your hosting toolkit:
- Personalized Touch: The chalkboard surface allows for endless customization. Welcome guests with a handwritten message, label an array of cheeses, list your signature cocktails, or simply draw a festive design. The possibilities are only limited by your imagination.
- Versatile Functionality: Beyond serving food and drinks, this tray can also be used as a decorative centerpiece, a stylish catch-all for mail and keys, or even a unique photo prop. Its rustic appeal fits seamlessly into various decor styles, from farmhouse chic to modern minimalist.
- Cost-Effective: Compared to purchasing high-end serving platters, crafting your own allows for significant savings without compromising on style or quality. With a single board, you can create multiple trays, making it an excellent value.
- Satisfaction of DIY: There’s immense pride in showcasing something you’ve crafted with your own hands. This project is approachable for beginners but offers enough creative freedom for seasoned DIYers.
- Great Gift Idea: Handmade gifts always hold a special place. A personalized chalkboard serving tray makes a thoughtful and practical present for housewarmings, weddings, or any special occasion.
Gather Your Materials and Tools
Before embarking on any DIY project, it’s essential to gather all your necessary tools and materials. This ensures a smooth workflow and prevents frustrating interruptions. For our Chalkboard Serving Tray, you’ll need the following:
Materials:
- 2×12 @ 8ft. wood board (or desired length)
- Wood stain (we love Rust-Oleum’s Early American)
- Chalkboard spray paint (Rust-Oleum is a great choice)
- Painter’s tape (1 1/2″ width recommended)
- Decorative pulls/handles (2 per tray)
- Gorilla Glue Super Glue Gel (or a strong adhesive suitable for wood and metal/plastic)
- Clean cloths
Tools:
- Miter saw (or have your hardware store cut the wood for you)
- Foam brush
- Orbital sander (like the Ryobi Corner Cat) or sandpaper
Step-by-Step Guide to Crafting Your Chalkboard Serving Tray
Let’s get started on bringing your vision to life! Follow these detailed steps to create a beautiful and functional chalkboard serving tray.
Step 1: Cutting Your Wood Boards
I started with a substantial 2×12 @ 8ft. board, which cost around $13. This generous length allowed me to create three individual trays from a single piece of wood, maximizing efficiency and value. For precise cuts, I utilized my 10″ sliding compound miter saw. This tool makes quick work of cross-cuts, ensuring straight and clean edges for your tray. If you don’t own a miter saw, don’t fret! Most hardware stores offer a cutting service, where they can cut your lumber to specified dimensions for a minimal fee, or sometimes even for free with your purchase. It’s always a good idea to call ahead and confirm their services and policies. For those interested in mastering their own tools, we have a helpful video tutorial on how to use a saw.
From my 8ft. board, I cut one piece to 2 feet and two pieces to 3 feet in length. These dimensions offer a good balance of serving area and portability. You can certainly customize the length of your trays to suit your personal preferences or specific needs. However, keep in mind that trays much longer than 3 feet might become unwieldy and difficult to move around, especially when loaded with food and dishes. Consider the weight and balance when choosing your dimensions. After cutting, lightly sand any rough edges to ensure a smooth finish.
Step 2: Staining for a Rich Foundation
For the rich, warm base of the tray, I chose Rust-Oleum’s Early American wood stain. This particular shade is a current favorite, offering a classic, inviting hue that beautifully complements a variety of decor styles. Staining not only enhances the natural grain of the wood but also provides a protective layer, increasing the longevity of your tray.
Using a foam brush, apply a single, even coat of stain to the tops and sides of your cut boards. Foam brushes are excellent for applying stain smoothly and evenly, preventing brush marks. After applying, allow the stain to penetrate the wood for about 5-10 minutes. The exact time can vary depending on the wood type and desired intensity of the color. Then, with a clean, lint-free cloth, thoroughly wipe away any excess stain. This step is crucial for achieving a uniform finish and preventing stickiness. Allow the stained boards to dry completely according to the manufacturer’s instructions before moving on to the next step. Adequate drying time ensures that the subsequent layers of paint adhere properly.
Step 3: Preparing for Chalkboard Paint with Painter’s Tape
Once your stained boards are completely dry, it’s time to prepare them for the chalkboard paint. This step requires precision to create a clean, defined border. I used 1 1/2″ painter’s tape, carefully positioning it approximately 3/4″ from the edge of the board. This creates a beautiful, stained border around the chalkboard surface. Make sure the tape is pressed down firmly to prevent any paint bleed. Additionally, I covered the sides of the boards with tape as well. This extra measure protects the stained edges from any potential overspray when applying the chalkboard paint, ensuring a professional and neat finish.
Step 4: Applying the Chalkboard Magic
Now for the fun part – transforming your board into a writable chalkboard surface! Grab your chalkboard spray paint (Rust-Oleum’s version is fantastic). Shake the can well and apply two thin, even coats of paint to the exposed surface. Spray paint is incredibly efficient for this step, providing a smooth and uniform finish. Remember to maintain a consistent distance from the board and use sweeping motions to avoid drips and uneven coverage. Allow adequate drying time between coats as recommended by the spray paint manufacturer. This chalkboard spray paint is truly remarkable; it adheres beautifully and creates a durable, functional writing surface that will withstand countless messages and doodles.
Step 5: Distressing the Edges for Character (Optional but Recommended)
After the chalkboard paint has fully dried and you’ve carefully removed the painter’s tape to reveal your crisp lines, it’s time to add a touch of rustic charm by distressing the edges. I used my beloved Ryobi Corner Cat sander for this step; it’s by far my favorite sander due to its ergonomic design and effectiveness in tight spaces. Lightly sand all the edges of the board, focusing on the corners and anywhere you want to create a worn, vintage look. The goal is to gently reveal some of the stained wood underneath the chalkboard paint, adding depth and character. The extent of distressing is entirely up to your personal preference – some like a heavily distressed look, while others prefer just a subtle hint of wear. Eyeball it as you go, creating a unique finish for your tray.
Step 6: Attaching Your Stylish Pulls
Now for the handles that will give your tray its functionality and added aesthetic appeal! I splurged a little on these adorable pulls, which cost about $5 each, because I simply fell in love with their design. However, if you’re aiming to keep costs down, you can easily find more budget-friendly pulls at hardware stores or online retailers. The key challenge with using a thick 2x board is finding knob screws long enough to pass through the wood and secure the pulls properly. This is where a fantastic adhesive comes into play! My secret weapon for this step was the Gorilla Glue Super Glue GEL. This stuff is truly amazing! Unlike traditional super glue, it has a thick, gel-like consistency, which prevents dripping and allows for more precise application. It’s incredibly strong and acts quickly, creating a robust bond perfect for this application.
To attach the pulls, simply apply a generous amount of the Gorilla Glue Super Glue GEL to the bottom surface of each pull. Then, carefully flip them over and firmly press them onto each end of the board, centering them evenly. Apply sustained pressure for a few moments to ensure a strong initial bond. The strength of this glue is no exaggeration – I’ve personally carried this large tray, fully loaded with bowls and food, around various events, and even confidently lifted it by just one handle! The pulls do not budge whatsoever. I’m thoroughly impressed by its holding power, and I’m confident you will be too!
Seasoning Your Chalkboard Surface
Before you start writing on your brand-new chalkboard tray, it’s essential to “season” the surface. This prevents permanent ghosting from your first chalk marks. To season your tray:
- Take a piece of chalk and rub it lightly over the entire chalkboard surface, covering it completely.
- Use a clean, dry cloth or a chalkboard eraser to wipe away the chalk.
- Repeat this process several times.
Your chalkboard is now ready for all your creative messages and labels!
Versatile Uses for Your Custom Tray
The beauty of this DIY Chalkboard Serving Tray lies in its incredible versatility. Here are just a few ideas to inspire your next gathering or home decor setup:
- Appetizer Platter: Label different cheeses, charcuterie items, or dips for easy identification by guests.
- Beverage Station: Write “Cocktail Menu” or “Refreshments” and list the drinks on offer.
- Dessert Display: Announce the day’s sweet treats, perfect for parties or bake sales.
- Holiday Decor: Customize messages for festive occasions like “Happy Halloween,” “Merry Christmas,” or “Happy New Year.”
- Everyday Organization: Use it in your entryway to hold keys, mail, and a daily reminder or inspirational quote.
- Kid’s Activity Board: A fun surface for children to draw on with chalk (under supervision, of course!).
And just like that, your unique, handcrafted Chalkboard Serving Tray is complete!
Cost-Effective and Creative Entertaining
I am absolutely loving the result of this project! With the $5 pulls, the total cost for materials to make two 3ft. trays and one 2ft. tray came out to approximately $15 per tray. This is an incredibly budget-friendly way to add custom, stylish pieces to your home decor and entertaining arsenal. It’s truly amazing what you can create with a single piece of lumber and a few basic supplies!
Many of you often ask about the best chalk pens to use for chalkboard projects. While traditional chalk works perfectly, chalk pens offer a cleaner, more precise application and vibrant colors. I’ll include a link below to the exact chalk pens we prefer and use for all our chalkboard creations, ensuring you get the best results for your new tray.
Share Your Creations!
If you’re as excited about this DIY Chalkboard Serving Tray as I am, I would absolutely adore it if you would pin this project! Sharing helps spread the joy of DIY and inspires others to create beautiful things for their homes. Don’t forget to share your own finished trays with us – we love seeing your unique interpretations and how you bring these projects to life.
Thank you so much for stopping by and spending some time with our latest DIY adventure. Happy crafting and happy entertaining!
~Ashley