
Transform Your Pantry: Easy DIY Chalkboard Labels for Ultimate Organization
Welcome to our community of DIY enthusiasts! For more inspiring projects and updates, be sure to follow us on Pinterest and Facebook!
A well-organized pantry isn’t just about aesthetics; it’s about creating a functional, stress-free space that enhances your daily routine. Imagine effortlessly finding exactly what you need, reducing food waste, and even saving time on meal prep. Today, we’re diving into a simple yet impactful DIY project: creating beautiful, reusable chalkboard labels for your pantry. These labels will not only bring a charming, rustic touch to your kitchen but also revolutionize how you store and access your pantry staples.
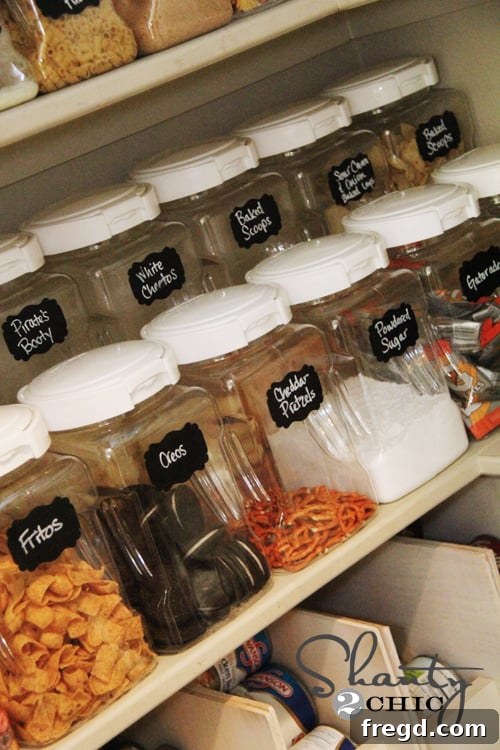
Many of you have inquired about the specific airtight canisters I use to keep my pantry items fresh and neatly stored. These containers are a game-changer for maintaining an organized and efficient kitchen. I find them indispensable for everything from flour and sugar to pasta and snacks. You can find them readily available on Amazon, and I highly recommend exploring the different sizes to suit all your storage needs. They’re designed to seal in freshness, making your ingredients last longer and keeping pests out. Check out these fantastic airtight canisters on Amazon – they often qualify for free shipping, too!
I recently received an outpouring of appreciation and shares for my printable banner letters, and I’m thrilled to know they’ve been helpful for your projects. Your enthusiasm truly fuels my creativity! This week, I’m excited to share another quick and easy tutorial that will elevate your home organization. We’re going to tackle the art of making custom chalkboard labels that are not only simple to create but also incredibly durable and versatile. Once you see how easy and effective these are, you might just find yourself wanting to label everything in your house – trust me, the urge is strong!
I’ve experimented with various types of labels over time, but these DIY chalkboard labels have quickly become my absolute favorite for their charming look and practical functionality. They bring that classic chalkboard appeal without the messy dust, offering a clean, rustic, and easily customizable solution for any storage container. Let me show you how these beautiful labels turned out in my pantry makeover:
Why Choose DIY Chalkboard Labels for Your Home?
There’s something inherently appealing about chalkboard labels. They offer a timeless, classic look that complements almost any decor style, from modern farmhouses to minimalist kitchens. Beyond their aesthetic charm, DIY chalkboard labels provide unparalleled flexibility. Unlike permanent labels, these can be easily updated and reused, adapting to your evolving storage needs. Change your mind about what goes where? No problem! Simply wipe clean and rewrite. This adaptability makes them perfect for busy households where pantry contents might shift, or for seasonal baking supplies that come and go.
Furthermore, crafting these labels yourself allows for complete customization. You can choose the exact size, shape, and even the “chalk” color to match your personal style and the specific containers you’re labeling. This level of personalization adds a unique, handcrafted touch to your home, transforming mundane storage into a stylish display. It’s a simple project that yields impressive results, making your pantry not just organized, but also beautiful and uniquely yours. Plus, the satisfaction of creating something functional and lovely with your own hands is truly priceless!
Essential Supplies for Your DIY Chalkboard Labels
The beauty of this project lies in its simplicity and the readily available materials. You don’t need a craft room full of specialized tools; just a few key items will get you started on your path to a beautifully labeled pantry. I’ve found everything I needed on Amazon, which, I must admit, has become my go-to for pretty much everything these days!
Chalkboard Contact Paper: The Foundation of Your Labels
The secret to achieving that authentic chalkboard look without the fuss of actual chalkboards or messy paint is chalkboard contact paper. This self-adhesive paper is incredibly versatile and easy to work with. It comes in a roll, allowing you to cut or punch out any shape or size you desire. The surface is perfect for writing with liquid chalk markers and can be wiped clean with a damp cloth, making it endlessly reusable. When choosing your contact paper, look for a good quality brand that offers strong adhesion but also allows for repositioning if you don’t get it right the first time. I sourced my chalkboard contact paper from Amazon, and I’ve been incredibly happy with its performance. It’s a fundamental item for this project, providing the perfect canvas for your labels.
Decorative Paper Punch: Adding a Touch of Elegance
While you could certainly cut out your labels by hand, using a decorative paper punch elevates the look instantly. It gives your labels a consistent, professional, and charming shape without any effort. I opted for a punch with a beautiful, intricate design that added a touch of elegance to my otherwise simple labels. The choice of shape is entirely up to your personal preference – stars, circles, scalloped edges, or even custom shapes can all work wonderfully. You can often find a wide variety of paper punches on Amazon, or check your local craft store. If you shop at a craft store, don’t forget to look for coupons to save a little extra!
Wet-Erase Chalk Pen: The Secret to Smudge-Proof Labels
This is arguably the most crucial item for anyone with busy hands around the house, especially if you have little ones! Traditional chalk is charming, but it’s also prone to smudging and erasing with the slightest touch, making it impractical for frequently handled items. That’s why I was absolutely thrilled to discover wet-erase chalk pens. These pens provide the beautiful, opaque look of chalk but dry into a durable, smudge-proof finish. Your labels will stay crisp and clear, resisting accidental wipes from curious fingers. To erase or change a label, all you need is a damp paper towel or cloth, and it wipes clean effortlessly, leaving no residue. This feature makes these labels truly reusable and kid-proof, saving you time and frustration. The convenience and longevity offered by a quality wet-erase chalk pen are simply fantastic.
With these three essential supplies, you’ll be amazed at how easily you can label nearly every item in your home. I created all the labels you see in my pantry photos, and barely made a dent in my roll of chalkboard contact paper. A little goes a long way!
Step-by-Step Guide to Crafting Your Chalkboard Labels
Now that we have all our materials, let’s walk through the incredibly simple process of creating these custom labels. You’ll be amazed at how quickly you can transform your pantry from chaotic to chic.
1. Prepare Your Materials and Workspace
Before you begin, ensure you have a clean, flat surface to work on. Gather your roll of chalkboard contact paper, your chosen paper punch, and your wet-erase chalk pen. Take a moment to consider which items in your pantry need labels and estimate how many you’ll need. It’s always a good idea to make a few extra in case of mistakes or future additions.
2. Punching Out Your Perfect Shapes
This is where the magic of the paper punch comes in. Simply feed the chalkboard contact paper into your punch, ensuring the non-adhesive side is facing up (this is the side you’ll write on). Press down firmly to create your desired shape. Repeat this process until you have enough labels for all your containers. The punch makes this step incredibly fast and yields perfectly uniform shapes every time. It’s so satisfying to create a whole batch of these in minutes!
I made a whole bunch just by pushing it down… So easy!
3. Writing Your Labels with Precision
Now for the fun part: writing! Before you start on your labels, it’s a good idea to “prime” your wet-erase chalk pen by shaking it well and pressing the tip onto a scrap piece of paper until the ink flows smoothly. Then, with a steady hand, write the names of your pantry items clearly and neatly on each label. The wet-erase pen allows for smooth writing and vibrant, opaque letters that truly mimic the look of traditional chalk, but with superior durability. Don’t rush this step – clear, legible labels are key to a functional pantry.
4. Application: Peel, Stick, Organize!
Once your labels are written and the ink has dried for a minute or two, it’s time to apply them to your containers. Simply peel the backing off each chalkboard label to expose the adhesive. Carefully position the label on your desired canister or jar, pressing down firmly from the center outwards to smooth out any air bubbles and ensure good adhesion. That’s it! Your custom, beautiful, and functional chalkboard labels are now in place, ready to bring order and charm to your pantry.
Aren’t they just adorable? I absolutely love how these turned out. And the best part is knowing that I have all the supplies on hand to whip up more whenever the need arises, keeping my pantry perpetually organized and beautiful.
Beyond the Pantry: Expanding Your Labeling Horizon
While we’ve focused on pantry organization today, the versatility of these DIY chalkboard labels extends far beyond the kitchen. Imagine bringing the same level of organization and charm to other areas of your home. You could label storage bins in your craft room, toy boxes in the kids’ play area, laundry room supplies, or even file folders in your home office. The wet-erase feature makes them perfect for seasonal storage, allowing you to easily update contents without wasting labels. This simple craft empowers you to create a more organized and visually cohesive environment throughout your entire living space, proving that a little labeling can go a long way in simplifying daily life.
Maximizing Your Pantry Organization: Additional Tips
Creating beautiful labels is a fantastic first step, but true pantry organization often involves a few more strategies to maintain order long-term. Consider implementing a system where frequently used items are stored at eye level, while less common ingredients are placed on higher or lower shelves. Group similar items together – all baking supplies in one zone, snacks in another, and so on. Clear containers, like the airtight ones mentioned earlier, are excellent for quickly assessing stock levels. Regularly decluttering your pantry and checking expiration dates will also prevent accumulation and ensure everything remains fresh. By combining these practical tips with your new, stylish chalkboard labels, you’ll achieve a pantry that’s not only a joy to look at but also a highly efficient hub of your kitchen.
Conclusion: Embrace the Joy of an Organized Home
I truly hope you love these DIY chalkboard labels as much as I do! They are a testament to how simple projects can make a huge impact on the functionality and aesthetic appeal of your home. Creating an organized space, especially in a high-traffic area like the pantry, brings a sense of calm and efficiency to your daily life. It’s a small effort with significant rewards.
If you found this tutorial helpful, I would be absolutely thrilled if you would share and pin this post to help inspire others to embrace DIY organization! Your support helps us continue to bring you more creative and practical ideas for your home.
Please don’t hesitate to reach out if you have any questions at all about this project or home organization in general. I’m always happy to help! Wishing you a wonderfully organized and productive week!
~ Whitney