
Welcome to a world of organized pantry bliss!
Transform Your Pantry: DIY Stackable Canned Food Organizers for Effortless Rotation
Hello, fellow home organizers and DIY enthusiasts! I’m thrilled to share a project today that has truly revolutionized my kitchen and pantry management: our custom-built, 7-can stackable canned food organizers. If you’ve ever wrestled with overflowing shelves, duplicate purchases, or expired cans hiding in the back, then this comprehensive guide is for you. We’ll dive deep into creating these incredibly efficient organizers, along with my tried-and-true tips and tricks for a perfectly functional pantry. For those of you who’ve patiently waited for this post – bless your hearts! As I’ve shared previously in my DIY Spice Rack tutorial, our mission is to harness the power of wood and DIY to craft practical, beautiful solutions that make our kitchens and homes operate more smoothly and efficiently.
The Pantry Problem: Taming the Canned Goods Chaos
Several months ago, I finally decided to tackle the daunting task of organizing my pantry. With a bustling family of seven, our household constantly requires a large, diverse stock of canned foods, from vegetables and fruits to soups and sauces. Before this project, our pantry was a constant battleground of cans precariously stacked, making it nearly impossible to find what we needed, let alone ensure we were using the oldest items first. The dreaded “mystery can” scenario was a weekly occurrence! This experience ultimately led to one of the best “kitchen” decisions I’ve ever made: designing and building these individual, stackable canned food organizers.
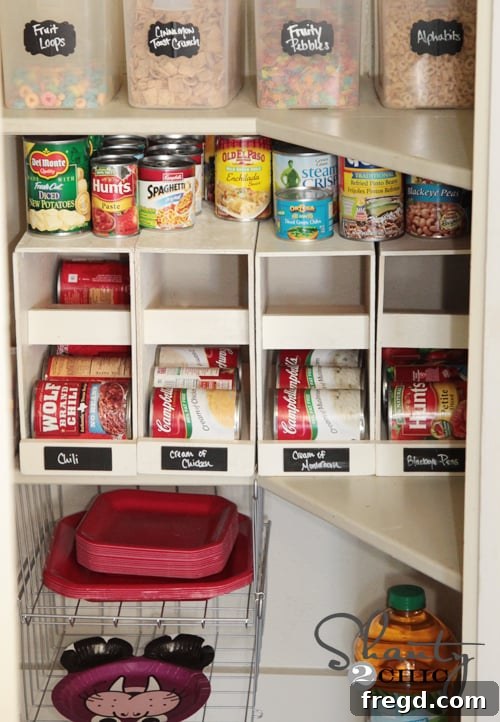
Unlike bulky, one-size-fits-all racks, these smart organizers are designed to store your cans in a first-in, first-out (FIFO) rotation system. You simply load new cans from the top, and the older cans automatically roll to the front for easy access. This not only prevents food waste but also simplifies meal planning and grocery shopping. The brilliance of making them individual is the flexibility it offers: you can craft as few or as many as your canned food stash demands, tailoring your storage to your exact needs. Here’s a peek at how they transformed our pantry:
These versatile units can be neatly stacked on top of each other to maximize vertical space, or, as you can see in my setup, the top piece can cleverly serve as an additional shelf, perfect for smaller jars or frequently used items. This modular design makes them incredibly adaptable to any pantry size or configuration.
And here’s a broader view, revealing the overall impact these organizers have had on our pantry’s functionality and aesthetic:
While organizing my pantry has brought immense peace of mind, it hasn’t quite solved *every* household mystery… like how snacks disappear the moment they enter the house!
(No, he couldn’t wait for me to finish the photos!) Does this scene look familiar to anyone else? It just goes to show that even the most organized pantry is still a hub of family activity!
DIY Canned Food Organizers: Your Step-by-Step Guide to a Tidy Pantry
Now, let’s get down to business and organize those cans with a fun and rewarding DIY project!
Gather Your Supplies for Each Organizer:
To construct each robust and efficient canned food organizer, you’ll need the following materials. We’ve designed these to be incredibly cost-effective, coming in at under $5 a piece! This makes building a whole set for your pantry a budget-friendly endeavor.
- 1/4″ Hardwood Plywood: This will be used for the sturdy side and top pieces. I purchased a standard 4′x8′ sheet and had the incredibly helpful team at Home Depot cut it down into manageable 11.5″ wide strips for me. This initial cut saves a lot of time and ensures straight edges. If your needs are smaller, you can opt for more compact panels like a 2′x2′ or 2′x4′ sheet, minimizing waste.
- 1×12 Board: This forms the main shelf pieces where your cans will rest and roll. These boards are available in various lengths. For making multiple organizers, I found an 8′ board to be the most economical choice. However, if you’re just starting with a few, a shorter length will suffice.
- 1/2″x2″ Pine Board: This piece is crucial for the front lip of your bottom shelf, ensuring cans don’t roll out prematurely. A 4′ piece of this pine board will yield enough material for about 8 dividers, making it a highly efficient purchase.
- Wood Glue: A strong wood glue, like Gorilla Wood Glue, is essential for a durable build. It creates robust joints that will stand the test of time.
- Finish Nails: These nails, used with a nail gun or hammer, will secure your pieces together quickly and efficiently, complementing the strength of the wood glue.
- Measuring Tape, Pencil, Safety Glasses, Ear Protection (if using power tools).
Precision Cuts: The Foundation of Your Organizer
Accurate cuts are key to a well-fitting and functional organizer. Take your time with these steps!
Side Pieces:
For each organizer, you will need two pieces of your 1/4″ plywood. These pieces will form the sides, and their unique shape facilitates the can rotation. Cut them precisely according to the diagram below. There will be a small, useful scrap piece from the middle shelf section of this cut – don’t discard it; we’ll use it later!
Marking for Shelves:
Before assembly, accurate marking is crucial. I marked both of my side pieces with a pencil to indicate where the shelves would be attached. This simple step makes aligning your shelf pieces incredibly easy and eliminates any guesswork when you’re nailing from the side.
I discovered a brilliant time-saving trick for this! Instead of measuring each time, I used a few scrap pieces cut to the exact dimensions of the shelves as templates. I would simply lay them down on the side piece, align my middle shelf template, and quickly trace its outline. This method ensures consistent placement across all your organizers and dramatically speeds up the marking process!
Shelf Pieces:
Next, prepare the cuts for your shelf pieces from the 1×12 board. These form the internal structure where your cans will rest and roll. Precision here ensures a snug fit and smooth rotation. Please refer to the diagram for specific dimensions. (Excuse my “shanty” handwriting on the blocks – but it gets the job done!)
Assembly: Bringing Your Organizer to Life
Attaching the First Side:
With your pieces cut and marked, it’s time for assembly. Apply a generous amount of Gorilla Wood Glue to the edges of your shelf pieces. Then, align them carefully with the pencil marks on one of your plywood side pieces. Secure them in place using finish nails. The pre-marked lines make this step incredibly simple – just nail directly into the marked shelf positions!
This step is straightforward and satisfying, especially when you see the structure beginning to take shape. The combination of wood glue and finish nails creates a surprisingly sturdy frame.
Attaching the Second Side:
Once the first side is secured, apply Gorilla Wood Glue to the exposed edges of the shelf pieces. Then, carefully align and attach your second plywood side piece, mirroring the first. Ensure all edges are flush and secure with finish nails, again guided by your pencil marks.
Finishing the Front: Adding the Can Stops
Now, to ensure your cans stay neatly in place and rotate correctly, we’ll add the front pieces.
Middle Shelf Front Piece:
Remember that small scrap piece from when you cut your side panels? This is where it comes in handy! Use it to cut your middle shelf front piece to the correct length. Apply a small amount of wood glue and nail it securely into place at the front edge of the middle shelf.
This small piece serves a vital function, creating a barrier that guides the cans down the ramp and prevents them from spilling out prematurely.
Bottom Shelf Front Piece:
For the bottom shelf’s front piece, which provides the final stop for your rotated cans, we use the 1/2″ x 2″ pine board. Each piece should be cut to 5.25″ long. Attach this securely with wood glue and finish nails.
Finishing Touches: Paint & The Power of Rotation
My favorite aspect of these DIY canned food organizers is undoubtedly their ingenious rotating mechanism. It’s a game-changer for pantry management! You simply load new cans from the opening at the top, and the design allows your older, soon-to-expire cans to automatically roll forward, rotating out from the bottom first. This “first-in, first-out” (FIFO) system is incredibly effective at preventing food waste and ensuring you always use the freshest ingredients. It’s truly a system to LOVE. And while you’re thinking about optimizing your canned goods storage, make sure to also check out our 12-Can Organizers for even more capacity options!
Now, for a few more inspiring shots of the finished product and our overall pantry transformation!
These organizers bring a sense of calm and order to what was once a chaotic space. No more digging for specific items or discovering forgotten cans past their prime!
Beyond Cans: Essential Pantry Organization Tools & Tips
I often get asked about where I found all the other fantastic storage goodies that complete my pantry’s organized look. A truly efficient pantry goes beyond just canned goods. Here’s a breakdown of my go-to items and some additional tips:
Airtight Containers: The Magic of SnapWare
I absolutely LOVE the SnapWare containers! They have been an absolute lifesaver for our family, especially with young children. They’re perfect for storing dry goods like pasta, rice, cereals, flour, and snacks. The airtight seal keeps food fresh longer, and perhaps even more importantly, they prevent those annoying open bags from spilling their contents EVERYWHERE. Plus, their clear design allows for at-a-glance identification of contents, making grocery list creation a breeze.
Smart Storage Solutions: Maximizing Every Inch
Here is a great little tip for making the most of your pantry space and keeping things easily accessible:
Consider investing in clear bins or tiered shelving to elevate smaller items and prevent them from getting lost in the back. Vertical space is often underutilized in pantries, so look for opportunities to stack or add risers.
DIY Chalkboard Labels: Functional & Stylish
To complete the organized look and ensure everyone in the family knows where everything belongs, I created my own chalkboard labels, and you can learn how HERE! They are wet erase, which means they are durable but can still be easily updated if contents change. I absolutely LOVE them for their rustic charm and practicality. Clear labeling is crucial for maintaining an organized system in the long run.
Maximizing Door Space: DIY Spice Rack & Foil Organizer
And for those of you who might have missed our innovative door organizers, they are truly game-changers for maximizing space in even the smallest pantries. Pantry doors often go unused, but they offer valuable real estate for slim storage solutions.
- The DIY Spice Rack can be found HERE! This project freed up significant shelf space and made finding spices incredibly easy.
- The DIY Foil and Baggie Holder can be found HERE! This keeps those often-clumsy boxes of wraps and bags neatly tucked away and easily accessible.
These door organizers prove that every inch of your pantry can be put to work! That’s all for now, people! Or at least, all the *new* organization for now. 😉
Your Journey to a Perfectly Organized Pantry Starts Now!
I sincerely hope this detailed guide to building your own DIY stackable canned food organizers and revamping your pantry inspires you to create a more functional and beautiful space in your own home. The satisfaction of a well-organized pantry is truly immense, simplifying meal prep, reducing waste, and making everyday life just a little bit easier. Thanks so much for stopping by and taking the time to read through our project!
We would absolutely love for you to share this post with your friends and family and pin it below to save it for your next DIY adventure! Your support means the world to us.
If you have any questions at all about the build, the materials, or pantry organization in general, please don’t hesitate to reach out in the comments below. We’re always happy to help!
~Whitney