
Welcome, fellow DIY enthusiasts! It’s always a great feeling when a beautiful weekend can be capped off with a fulfilling DIY project, isn’t it? Whether you’re bustling with family events or simply craving a creative outlet, finding time for a quick, impactful home decor upgrade is incredibly rewarding. Recently, after a lively weekend filled with a little league opening day and a delightful birthday celebration for my niece, I managed to carve out just 30 minutes for a project that had been on my mind for a while. The best part? It cost less than $20!
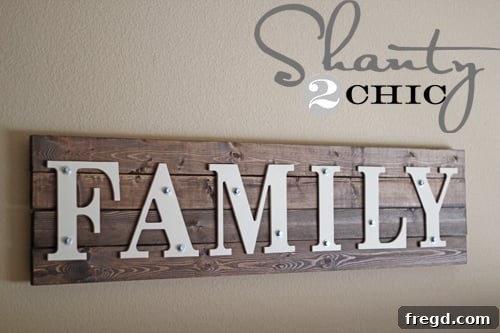
There’s nothing quite like transforming a blank space into a focal point, especially when it reflects the heart of your home. The expansive, somewhat intimidating empty wall above our Pottery Barn Inspired Storage System in our gameroom had been calling for attention. It was a prime candidate for a personalized touch, something that would add warmth, character, and a sense of belonging. This yearning for a meaningful accent piece is what sparked the creation of this stunning DIY Wooden Family Sign. It’s a project that combines rustic charm with an industrial edge, offering a unique blend that complements various decor styles.
Creating custom signs for your home is an excellent way to infuse personality and tell your family’s story. A “family” sign, in particular, serves as a constant reminder of what truly matters, making your living spaces feel more inviting and uniquely yours. This project isn’t just about filling a blank wall; it’s about crafting a piece of art that holds sentimental value, built with your own hands and tailored precisely to your home’s aesthetic.
Embarking on Your DIY Wooden Family Sign Journey
Before diving into any DIY project, a little preparation goes a long way. This project is designed to be straightforward and quick, making it perfect for beginners or those with limited time. However, ensuring you have all your materials ready and a clear workspace will make the process even smoother and more enjoyable. Let’s gather everything you’ll need to create your very own personalized family sign.
Essential Supplies for Your Rustic Industrial Sign
The beauty of this project lies in its simplicity and affordability. We’re talking about standard hardware store items combined with a touch of craft store charm. Here’s a detailed look at the materials required:
-
MDI Letters: I sourced these from Hobby Lobby. Look for sturdy, flat letters that are easy to paint and glue. The specific letters for “FAMILY” worked perfectly for my space. Keep an eye out for sales; I managed to snag mine for just $1.25 each after a discount. Consider the font and size carefully to ensure they fit your desired aesthetic and the dimensions of your wall space. MDI (Medium Density Fiberboard) letters are lightweight and offer a smooth surface for painting.
-
4 – 1×4 Furring Strips: These are incredibly budget-friendly and provide a great base for the sign. I purchased mine for around $1 each. You’ll need to cut them down to your desired length. For my sign, 58 inches was the perfect span, allowing ample space for the letters and a balanced look above the storage system. Furring strips often have a rustic, unfinished look, which is ideal for this project, but inspect them for major warps or cracks before purchasing.
-
11 – 3/8″x1″ Hex Lag Screws & 1 bag of 5/16″ Flat Washers: These hardware elements are key to achieving the desired industrial look. Hex lag screws are robust and visually appealing, while the washers add another layer of detail and help distribute pressure. You can find these in the nuts and bolts aisle of any hardware store. They were about $0.36 each for the screws and $2 for a bag of washers. Choosing galvanized or black finishes can further enhance the industrial aesthetic.
-
Rust-Oleum Heirloom White Spray Paint: This beautiful, soft white provides a perfect contrast against the dark stained wood, making your letters pop. Spray paint is ideal for quick and even coverage on the MDI letters. (Rust-Oleum Heirloom White)
-
Rust-Oleum Dark Walnut Stain: To give your furring strips that rich, rustic wood finish. Staining brings out the natural grain of the wood and complements the industrial hardware beautifully. (Rust-Oleum Dark Walnut Stain)
- Gorilla Glue Wood Glue: Essential for a strong, lasting bond when assembling the wood planks. (Gorilla Glue Wood Glue)
- Gorilla Glue Epoxy: For securely attaching the letters to the stained wooden sign. Epoxy provides an incredibly strong bond, ideal for various materials. (Gorilla Glue Epoxy)
- Scrap 1x2s: Used for bracing the back of your sign, providing structural integrity and a surface for mounting hardware.
- Tools: Nailer (or hammer and nails), drill with appropriate bits (for pre-drilling), measuring tape, pencil, safety glasses, and a wrench for the hex screws.
Step-by-Step Guide to Crafting Your Family Sign
Now that we have all our supplies, let’s roll up our sleeves and get started on this rewarding project. Remember, safety first! Always wear appropriate protective gear, especially when using power tools, and work in a well-ventilated area when painting or staining.
Step 1: Preparing Your Letters with a Fresh Coat of Paint
Begin by giving your MDI letters a crisp, clean finish. I opted for Rust-Oleum Heirloom White because its slightly off-white hue provides a soft contrast to the dark wood, enhancing readability and adding a touch of vintage elegance. Lay your letters out on a protected surface in a well-ventilated area. Apply several light, even coats of spray paint, allowing adequate drying time between each coat. This technique prevents drips and ensures a smooth, professional finish. Resist the urge to apply one thick coat, as this can lead to unevenness and longer drying times. While your letters are drying, you can move on to building the sign’s base, optimizing your crafting time.
Step 2: Constructing the Sturdy Wooden Base
This step forms the backbone of your sign. Take your four 1×4 furring strips, already cut to 58 inches. Lay them side by side, ensuring they are aligned and flush. Next, cut two or three pieces of scrap 1×2 wood to serve as cross braces on the back of the sign. These braces will hold your 1x4s together and provide structural stability. Apply Gorilla Glue Wood Glue generously along the contact points where the 1×2 braces will meet the 1×4 planks. Then, use your nailer (or hammer and nails) to securely attach the 1x2s to the back of the 1x4s, ensuring they span across all four planks. Make sure to space your braces evenly for maximum stability. If you plan to hang your sign on a wall, now is the ideal time to attach your chosen mounting brackets (e.g., D-rings, picture wire, or a French cleat) to the top brace on the back. Ensure these are securely fastened and rated for the weight of your finished sign. Allow the wood glue to dry completely according to the manufacturer’s instructions before moving on.
Step 3: Staining for that Perfect Rustic Finish
With the structure complete and the glue dry, it’s time to enhance the natural beauty of the wood. I chose Rust-Oleum Dark Walnut Stain for its rich, deep tone that perfectly complements a rustic or industrial aesthetic. Working in a well-ventilated area, apply the stain evenly across the entire front and sides of your wooden sign using a brush or a clean cloth. Allow the stain to penetrate for a few minutes, then wipe off any excess with a clean rag. For a deeper color, you can apply a second coat after the first has dried. The beauty of staining is that it highlights the wood grain, adding depth and character that paint often conceals. Ensure the stain is completely dry before proceeding to the next step, as residual moisture can affect the epoxy’s adhesion.
Step 4: Securely Attaching the Painted Letters
This is where your sign truly begins to take shape. First, lay out your painted letters on the stained wooden base to determine their precise placement and spacing. Use a measuring tape to ensure they are centered and evenly distributed. A good tip is to lightly mark the top and bottom edges of each letter with a pencil so you have a guide for adhesive application. I used Gorilla Glue Epoxy for this step because it forms an incredibly strong, permanent bond on painted and stained surfaces. Mix the epoxy according to package directions, then apply a thin, even layer to the back of each letter. Carefully place each letter onto your marked spots on the sign, pressing firmly for a few seconds. If possible, place weights on top of the letters or clamp them gently while the epoxy cures. This ensures maximum adhesion and prevents any shifting. Wipe away any excess epoxy that might seep out immediately with a damp cloth or cotton swab before it hardens. Allow the epoxy to fully set, typically several hours, before handling the sign extensively.
Step 5: The Finishing Touch – Adding Industrial Hex Screws
Now for the fun part that truly elevates the sign from simple wood art to a rustic industrial masterpiece! The galvanized hex screws provide that distinctive, rugged aesthetic. Begin by deciding on the placement of your screws. I opted for random spacing to enhance the organic, handcrafted feel, but you could also go for a symmetrical pattern. Using a pencil, mark the exact spots where you want each of the 11 hex screws to go. It’s crucial to pre-drill a pilot hole at each marked spot using a drill bit slightly smaller than the diameter of your screw’s shaft. This prevents the wood from splitting when the screws are tightened. Once the holes are drilled, place a 5/16″ flat washer over each pre-drilled hole, then insert a 3/8″x1″ hex lag screw. Use a wrench to carefully tighten each screw. Be firm but gentle; you want the screws to be snug and secure, but avoid overtightening, which can strip the wood or damage the washers. The combination of the dark stained wood, crisp white letters, and the metallic gleam of the hex screws creates a striking visual contrast that is both inviting and stylish.
The Final Reveal: A Personalized Masterpiece
And just like that, in approximately 30 minutes of active crafting time and for under $20, you’ve created a custom, heartwarming piece of home decor! The transformation is truly satisfying.
I absolutely adore how this sign now fills the formerly blank space above our Pottery Barn Inspired Storage System. It adds character, a personal touch, and instantly makes the gameroom feel more complete and homey. The rustic industrial vibe blends seamlessly with our existing decor, proving that you don’t need to spend a fortune to achieve a high-end look.
This project is a testament to the power of simple DIY: creating something beautiful and meaningful without breaking the bank or taking up your entire weekend. It’s perfect for adding charm to a living room, entryway, bedroom, or even a home office. Consider customizing the word to reflect your family name, a special date, or a favorite inspiring quote.
Inspiring Your Own Creative Decor
This project is a fantastic reminder that a little creativity and effort can go a long way in personalizing your living space. If you’re looking for affordable DIY projects that make a big impact, this DIY Wooden Family Sign is an absolute winner. It’s truly amazing what you can accomplish with some basic materials and a bit of inspiration. Give it a try, and don’t be afraid to experiment with different colors, words, or hardware to match your unique style!
If you loved this project and found inspiration in this tutorial, I would absolutely love for you to share it! Pins on Pinterest are always cherished and help spread the joy of DIY to more crafters. Thank you for joining me on this creative journey! ~Ashley