
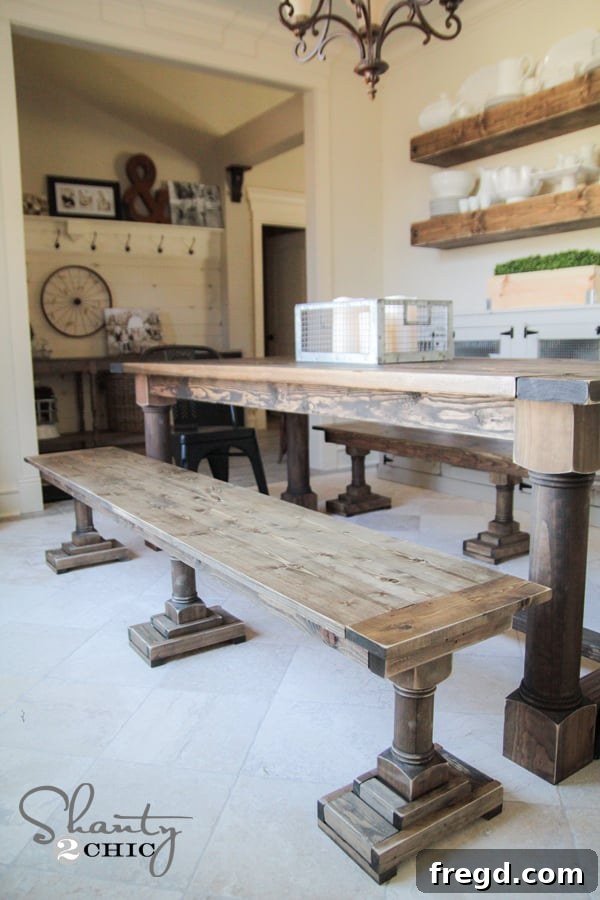
As you embark on a journey to revitalize your dining space, imagine the satisfaction of crafting a centerpiece that not only serves its purpose but also reflects your unique style and craftsmanship. For many of you following my home renovation endeavors, you know I’ve been diligently revamping my dining room, sharing every step and exciting development along the way. A few weeks ago, I proudly unveiled my new dining table, a testament to thoughtful design and functional elegance. Today, I’m thrilled to pull back the curtain on its perfect companions: my brand-new DIY Dining Benches!
Craft Your Own: The Ultimate DIY Dining Bench Project with Free Plans
Aren’t these triple-leg dining benches just captivating? They bring a refreshing blend of rustic charm and modern sophistication to the dining area. What I particularly love is how beautifully they complement the turned legs of our dining table without creating any visual conflict. The design feels cohesive and intentional, a true reflection of the vision I had for this space. Initially, I considered a full set of ten chairs, but with five lively kids under the age of twelve, a dining bench is an absolute game-changer. Benches offer unparalleled flexibility, allowing more little ones to squeeze in, creating a more casual and inviting atmosphere that’s perfect for family life. Plus, they’re incredibly durable and easier to manage with busy mealtimes!
For those eager to replicate this project, you’re in luck! I’m excited to share a comprehensive, step-by-step guide to building these DIY dining benches right here. And to make your woodworking journey even smoother, you can download the detailed, FREE printable plans for the DIY Triple Leg Bench by clicking HERE or by using the convenient button below. These plans are meticulously crafted to guide you through every cut and joint, ensuring a successful build.
Designing Your Dream Bench: Collaborating with Osborne Wood Products
The foundation of these stunning benches lies in their unique legs. For this crucial design element, I collaborated closely with Osborne Wood Products, a company renowned for its quality and craftsmanship. Their expertise allowed us to bring the vision for these distinctive legs to life, and I couldn’t be happier with the outcome. The triple-leg design not only provides exceptional stability but also adds a touch of bespoke elegance that elevates the entire dining room aesthetic. You can find these exact bench legs on Osborne’s website HERE or conveniently on Amazon HERE!
For my benches, I opted for knotty pine legs. This wood type offers a beautiful natural grain and character that adds warmth to the overall design. On Osborne’s site, these individual legs are priced at a very reasonable $17.99 each. Factoring in shipping for three legs to my location, which was approximately $20, the total cost for three legs came to about $75. This is an incredibly competitive price point for such high-quality, custom-designed legs, making the entire project remarkably affordable compared to purchasing a pre-made designer bench.
Step-by-Step Guide: Building Your DIY Dining Bench Legs
The construction of these benches begins with building out the sturdy base for each leg. This foundational step is crucial not only for the bench’s stability but also for achieving that polished, finished look. By carefully piecing together various boards, you’ll create a robust “foot” that provides excellent support and a visually appealing aesthetic.
Essential Tools and Materials:
- Ryobi 16G AirStrike Finish Nailer (recommended over a brad nailer for stronger hold)
- Gorilla Wood Glue (for durable, long-lasting joints)
- Measuring tape and pencil
- Miter saw or circular saw for precise cuts
- Kreg Jig K5 (for pocket hole joinery)
- Kreg Bar Clamp (for holding pieces securely)
- Ryobi 18V Right Angle Drill (for working in tight spaces)
Step 1: Preparing the Leg Base Supports
Begin by cutting 2×3 pieces to the exact width of your bench leg. Each individual bench leg will require two of these cuts. Precision here is key for a flush and stable attachment. Take your time to measure accurately before making any cuts.
Step 2: Attaching the Initial 2×3 Supports
Apply a generous amount of Gorilla Wood Glue to the edges of the 2×3 pieces. Then, firmly nail these pieces to the sides of the legs using 2-inch finish nails. The combination of wood glue and finish nails creates a powerful bond, essential for the structural integrity of your bench. Always ensure your pieces are flush before nailing.
Once these pieces are securely attached, each leg should begin to resemble the photo below, forming the initial framework for the foot of the bench.
Step 3: Measuring and Attaching 1×2 Supports
Before proceeding with the next cuts, it’s essential to measure the length between the previously attached 2×3 pieces. While our free plans provide dimensions, wood can vary slightly in width, making a fresh measurement imperative for a perfect fit. Once measured, cut two 1×2 pieces to this exact length.
Attach these 1×2 pieces to the leg using a combination of wood glue and finish nails. Ensure they are flush with the previously installed 2x3s, creating a seamless and strong connection.
With both 1x2s nailed in place, the leg assembly will now look like this, forming a robust and attractive lower section.
Step 4: Creating the Feet with Pocket Holes
The next crucial step involves adding two 2×3 pieces for each foot. These will be secured using pocket holes and pocket hole screws, a technique that provides incredibly strong and concealed joints. For this, I utilized my trusted Kreg Jig K5. To achieve the desired placement for the pocket holes on these specific pieces, I made a slight adjustment to the jig settings: I set the drill guide to 3/4-inch rather than the standard 1.5-inch, but kept the clamp of the jig at 1.5-inch. This unconventional approach worked perfectly, ensuring the pocket holes were optimally positioned for strength and aesthetics.
These adjusted settings allowed the pocket holes to be drilled accurately, remaining fully contained within the wood, as shown below.
Next, apply wood glue to the end of the foot piece that will attach to the leg, reinforcing the joint for maximum durability.
I found my new Kreg Bar Clamp to be an invaluable tool at this stage. It firmly held the pieces in perfect alignment while the screws were driven in, preventing any shifting and ensuring a precise assembly. I absolutely love this clamp for its reliability!
Secure these foot pieces using 2.5-inch pocket hole screws. Drive them in carefully to create a strong, hidden connection.
Once both feet are attached, the bottom of the bench leg will have this sturdy and integrated appearance.
Step 5: Adding the Side Pieces and Final Feet
The next pieces to be added are the 1×2 side pieces. As always, measure accurately before making your cuts to ensure a perfect fit. These pieces are attached using a combination of wood glue and finish nails, creating a clean, finished edge around the base.
Finally, complete these charming legs by adding the small feet. These are simply 1×2 pieces cut to fit snugly at the very bottom of the leg structure. Apply wood glue, then secure them with your Ryobi AirStrike Finish Nailer.
And just like that, you’ve successfully assembled one incredibly sturdy and stylish bench leg. If you’re building a pair of benches, you’ll repeat this process six times in total!
Building the Bench Top and Apron: Strength and Style
With the legs complete, it’s time to move on to the bench tops, an equally satisfying part of the build, thanks again to the efficiency of the Kreg Jig system.
Step 1: Constructing the Apron
Start by creating the apron, which forms the structural frame directly beneath the bench seat. This part utilizes 1.5-inch pocket holes and 2.5-inch pocket hole screws for robust, hidden joinery. Ensure you apply wood glue to all joints before screwing them together for maximum strength and longevity.
Once assembled, the outer frame of your apron should form a perfect rectangle, ready for the next supports.
Step 2: Adding Inner Leg Supports to the Apron
After completing the main apron structure, you’ll add smaller 1×2 pieces to the inside of the apron. These interior supports are essential for securely holding the bench legs in their final position. For these smaller pieces, use 3/4-inch pocket holes and 1.25-inch pocket hole screws. This creates a robust attachment point for the legs that will withstand daily use.
Attaching these inner supports can be a bit tricky due to the tight clearances. This is where specialized tools really shine. I found my Ryobi 18V right-angle drill, paired with a smaller 3-inch Kreg driver bit, to be absolutely indispensable. While these tools might not be used on every project, they are lifesavers when you encounter awkward angles and confined spaces like this. Having them handy makes all the difference for a smooth and efficient build.
Once installed, these middle supports will provide the necessary structure to cradle the bench legs perfectly.
Step 3: Assembling the Plank Top
Now for the most visible part of the bench: the plank top! This step involves joining several planks to create a solid, appealing seating surface. I used my Kreg Jig with 3/4-inch pocket holes and 1.25-inch pocket hole screws for this. A key decision here was *not* to use glue between the planks. While glue provides extra strength, for a plank top, it can lead to a messy staining process and can also restrict natural wood movement, potentially causing issues over time. The pocket hole screws alone provide ample strength and allow for a cleaner finish.
Begin by attaching the first three long planks together. You’ll drill pocket holes along one side of each of the outer planks. Then, use pocket screws to securely join these to the wider middle plank, creating a broad, stable surface.
Step 4: Attaching the Breadboards
Once the main planks are joined, it’s time to add the breadboards. These pieces cap off the ends of the plank top, providing a finished look and helping to prevent warping. Measure the exact width of your three assembled planks to determine the precise length for your breadboards. These are then attached by driving pocket hole screws from the ends of the three long planks directly into the breadboards. This creates a very strong and seamless connection.
Final Assembly and Finishing Touches
You’re almost there! With all the major components built, it’s time to bring everything together for the grand finale.
Step 1: Attaching the Plank Top to the Apron
Now, carefully align the completed plank top with the assembled apron. Apply wood glue generously to the top edges of the apron where it will meet the planks. Then, use finish nails driven through the top of the planks and down into the apron. This method provides a strong, hidden attachment that won’t compromise the aesthetic of your bench.
Step 2: Securing the Legs
The final structural step is setting the legs firmly in place. Apply wood glue to the top surface of each leg. Carefully position each leg into its designated spot within the apron’s inner supports. Once aligned, use 2-inch finish nails driven through the supports and the apron directly into each leg. This creates an incredibly secure connection. While I regrettably forgot to snap a picture of this exact step (a common “brain fart” during intense DIY moments!), rest assured, it’s a straightforward process: simply glue, align, and nail for a perfectly sturdy bench.
The Perfect Finish: Stain and Topcoat
A beautiful build deserves an equally beautiful finish. For these dining benches, I used the same stain that brought our DIY dining table to life, ensuring a cohesive and harmonious look across the entire dining set. This particular stain is Varathane wood stain in the color “Ash,” readily available at The Home Depot. I am absolutely enamored with its deep, almost black undertones, which surprisingly emerge despite it being a brown stain. It imparts a rich, sophisticated hue that truly enhances the wood’s natural grain. The best part? It typically only requires one coat and dries completely in under an hour, allowing you to move swiftly through your project.
To protect the surface and provide a smooth, durable finish, I used Varathane Triple Thick in Satin for the topcoat. This product is a personal favorite! It offers a subtle sheen—just enough to give the wood a smooth feel without looking overly glossy. What truly sets it apart is its ease of application; it dries incredibly quickly, usually within two hours, and remarkably, leaves virtually no visible brush strokes. The “Triple Thick” name isn’t just a marketing ploy; it truly delivers the thickness and protection of three coats in a single application, saving you significant time and effort. I’ve used it on several projects now, and I’m consistently impressed with the professional-grade results it provides.
Affordable Elegance: Cost-Effectiveness and Final Reveal
And there you have it! A magnificent triple-leg dining bench, custom-built with your own hands. By using white wood for all the boards, I managed to keep the lumber cost for each bench under an impressive $40. Combined with the cost of the custom Osborne legs, each bench can be built for approximately $115. This is an incredible saving when you compare it to the price tags of major brand benches of comparable quality and style. Not only are you saving money, but you’re also creating a unique piece of furniture that you simply won’t find anywhere else on the market. I am absolutely thrilled with the results and the progress we’re making in transforming the entire dining room into a space that truly reflects our family’s needs and aesthetic preferences.
Witnessing the Transformation: Your Dining Room Dreams Come True
Seeing the dining room come together with these DIY benches is incredibly rewarding. The space now feels more inviting, functional, and uniquely ours. Take a look at the stunning transformation!
Expand Your DIY Journey: More Inspiring Projects
If building these dining benches has sparked your DIY passion, there are plenty more projects to keep your creative momentum going! My dining room transformation involved several other custom-built pieces that perfectly complement these benches. Check out these other tutorials to continue furnishing your home with beautiful, handmade items:
DIY Turned Leg Dining Table Plans
DIY Sideboard Free Woodworking Plans
DIY Floating Shelves Plans