
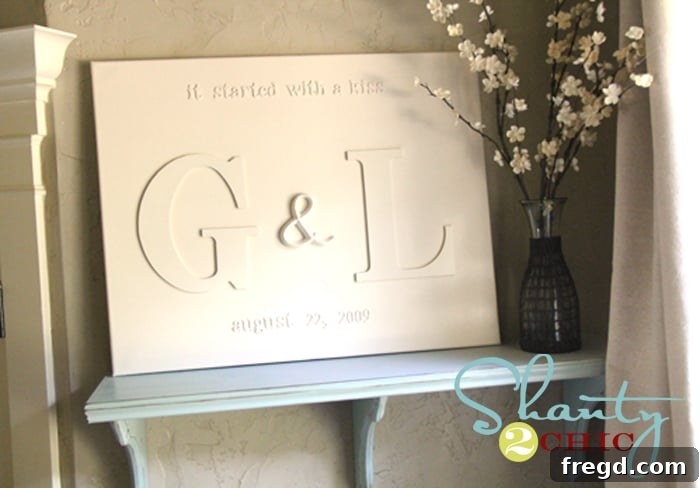
Crafting a Personalized Monogram Canvas: The Ultimate DIY Gift Guide
There’s an undeniable joy in creating something with your own hands, especially when it’s a thoughtful gift for a loved one. Today, I’m thrilled to share a project that turned out even better than I imagined – a beautiful, personalized monogram canvas that makes an ideal present for weddings, anniversaries, or simply “just because.” This unique piece of home decor adds a touch of bespoke elegance to any space, and the best part? It’s surprisingly simple and inexpensive to create!
The Inspiration Behind the Design: A Story of Love and Creativity
This particular project was inspired by a special occasion: my sister and brother-in-law’s second wedding anniversary. Celebrating milestones with personalized gifts adds a layer of sentiment that store-bought items often lack. I was so happy to see her beaming on her wedding day, a memory that still brings a smile to my face.
When my brother-in-law approached me for a little assistance with her anniversary gift, I knew exactly what to suggest. I had recently stumbled upon a stunning monogram canvas in an online boutique. While the design was captivating, the price tag was not. This sparked an idea: why not recreate it myself? This DIY approach promised not only significant savings but also the freedom to customize every detail. What began as a replica project quickly became a labor of love, proving that some of the best gifts are those crafted with personal effort and care. The entire process took just about an hour, and I absolutely adore the outcome. In fact, I’m already planning to make one for myself!
Gathering Your Crafting Essentials: A Smart Shopper’s Guide
One of the most appealing aspects of this project is the accessibility of the materials. You don’t need obscure or expensive supplies; everything required can typically be found at major craft stores. For this particular project, I found all my supplies at Hobby Lobby, which is a rare occurrence for some of my more eclectic crafts!
Essential Supplies List:
- 1 Canvas: I used an 18×28 inch canvas, which I purchased for around $10 thanks to a 50% off sale. The size of your canvas can be adjusted based on your desired display area and the length of your chosen text. Consider whether you want a landscape or portrait orientation for your design.
- Chipboard Letter Pack: Priced at approximately $5, these letter packs offer a variety of smaller letters perfect for crafting personalized phrases or dates. Look for packs with a good selection of fonts and sizes to give your canvas dynamic visual interest.
- Ampersand (&): I found a standalone ampersand for $1.99, though many chipboard packs also include one. An ampersand elegantly connects initials or names, making it a crucial design element for couples’ monograms.
- 2 Monogram Letters: These larger letters, typically found in the unfinished wood section of craft stores, were $1.99 each. Choosing unfinished wood allows you to paint them to perfectly match your desired aesthetic. Select the initials of the couple for a truly custom touch.
Smart Shopping Tip: Always look for sales and coupons! Craft stores frequently offer significant discounts, often 40-50% off single items or entire categories. Taking advantage of these deals can dramatically reduce the total cost of your project, making it even more budget-friendly. All my purchases were half-off, which is why the total cost for this project was incredibly affordable, making it a high-impact, low-cost gift idea.
Step-by-Step Guide: Bringing Your Monogram Canvas to Life
Creating this stunning monogram canvas is a straightforward process that even novice crafters can master. Follow these steps to achieve a professional-looking result.
Step 1: Planning Your Layout for Perfection
Before applying any adhesive, it’s crucial to plan your layout. A well-planned arrangement ensures your letters are perfectly straight and evenly spaced. I started by lightly marking lines on my canvas with a pencil and a ruler. These guidelines act as a visual reference, helping you maintain alignment and prevent your letters from appearing crooked or haphazard. Consider the overall balance and how the different elements will interact visually. Dry-laying your letters first allows you to experiment with spacing and arrangement before making anything permanent.
Step 2: Secure Your Main Monograms
Once your layout lines are in place, it’s time to attach the larger wooden monogram letters and the ampersand. For this, I used a hot glue gun. Hot glue is excellent for quick adhesion and provides a strong bond, making it ideal for securing larger, lightweight elements like these. Apply a generous, even layer of hot glue to the back of each letter, then carefully press it firmly onto the canvas, aligning it with your pencil marks. Hold each piece in place for a few seconds to ensure it adheres properly. Make sure to work relatively quickly as hot glue sets fast.
Step 3: Adding Personalized Text and Details
With the main monograms in place, you can now add the smaller chipboard letters to form your chosen sayings or dates. Whether it’s the couple’s full names, their wedding date, or a meaningful quote, these details truly personalize the canvas. Line up your chosen phrases, once again using your pencil lines as a guide for straightness. Apply hot glue to the back of each small letter and carefully attach them to the canvas. The beauty of chipboard letter packs is that they often come in various colors, but since the entire piece will be spray painted, the original color doesn’t matter. This allows you to use any leftover chipboard letters from previous projects, maximizing your supplies and creativity!
Step 4: The Preparation Phase: Flawless Finish Starts Here
Once all the letters and elements are securely glued to the canvas, it’s time for a critical, often overlooked step: preparing for paint. Before reaching for your spray paint, meticulously inspect your entire canvas for any stray hot glue strings. This is a crucial step that I learned the hard way! If left on the surface, these tiny glue strands will melt or create an uneven texture when spray painted, resulting in a less-than-perfect finish. Gently peel or rub off any visible strings. This attention to detail ensures a smooth, professional, and flawless painted surface.
Step 5: The Magic of Spray Paint: Transforming Your Canvas
Now for the fun part – painting! Choose a high-quality spray paint in your desired color and finish. For this project, I opted for a beloved white matte spray paint, which gives a clean, crisp, and slightly rustic appearance. Ensure you’re working in a well-ventilated area and protect your surroundings with a drop cloth. Apply the paint in light, even coats, holding the can about 6-10 inches away from the canvas and using a sweeping motion. Avoid spraying too much paint in one spot to prevent drips and pooling. I applied two coats, allowing ample drying time between each to ensure complete coverage and a durable finish. This step truly transforms the varied materials into a cohesive, elegant piece of art. How easy is that?
Displaying Your Masterpiece: Styling Your Home Decor
After the paint had completely dried, the final step was to stage the finished monogram canvas in my home to capture some beautiful photographs. This allowed me to see how it would look in a real-world setting and showcase its versatility as a decorative piece. The result was truly captivating! The canvas immediately elevated the space, adding a personalized and sophisticated touch.
A custom monogram canvas isn’t just a gift; it’s a statement piece that can enhance various areas of a home. Imagine it gracing a mantelpiece, serving as a focal point above a bed, or adding charm to an entryway console table. Its timeless design means it can seamlessly integrate into various decor styles, from modern farmhouse to classic traditional or even minimalist aesthetics. The clean lines and personalized text create visual interest and a sense of warmth.
The versatility of this DIY project extends beyond just its aesthetic appeal. It offers a unique opportunity to commemorate special dates, celebrate family names, or simply express individuality. The simplicity of the design, combined with its personal touch, makes it a truly cherished item. It’s perfect for adding a bespoke element to your own home decor, or for gifting to someone special who appreciates handmade artistry.
What do you think of the final look? I’m always amazed at how a few simple materials and a little creativity can transform into something so impactful. This project is a testament to the power of DIY – creating beautiful things doesn’t have to break the bank or take an excessive amount of time.
Every angle of this canvas speaks volumes about the thought and effort put into it, making it far more valuable than its monetary cost. It’s not just a decoration; it’s a conversation starter, a focal point, and a symbol of personal connection.
Why DIY? The Value of Handmade Gifts
I genuinely hope you like this project as much as I do! More importantly, my sister absolutely loves it. She called me last night, brimming with excitement, to tell me how much she adored her anniversary gift. Her genuine delight is truly the best reward for any DIY endeavor. This project perfectly embodies the essence of “my kind of shanty” – it was inexpensive, quick to make, yet it presents itself as anything but. It has that coveted handmade charm coupled with a sophisticated finish that often tricks people into thinking it was a high-end purchase. That’s the magic of DIY: creating beautiful, meaningful pieces without the hefty price tag.
Handmade gifts carry an emotional weight that mass-produced items simply cannot match. They convey thoughtfulness, effort, and a unique personal touch that makes the recipient feel truly special. This monogram canvas, for instance, isn’t just a decorative item; it’s a testament to a special bond, a unique celebration of love, and a reflection of cherished memories. It’s a gift that will undoubtedly be treasured for years to come, long after the anniversary cake is gone.
So, if you’re looking for a personalized, heartfelt, and budget-friendly gift idea, I highly encourage you to try making this monogram canvas. It’s a rewarding project that delivers significant impact with minimal investment. It’s a beautiful way to show someone you care, all while enjoying the creative process.
Thanks for stopping by and exploring this project with me! Have a wonderful and creative day!
~Whitney