
Elevate Your Closet: Building Custom Modular Storage Towers
Welcome back, fellow DIY enthusiasts! I’m thrilled to share the latest addition to my Modular Closet Storage System. If you followed along with my previous project, you know the satisfaction that comes from creating bespoke organizational solutions. This week, we’re tackling an incredibly versatile and functional component: custom storage towers designed to transform any closet space.
Transform Your Space with DIY Closet Storage Towers
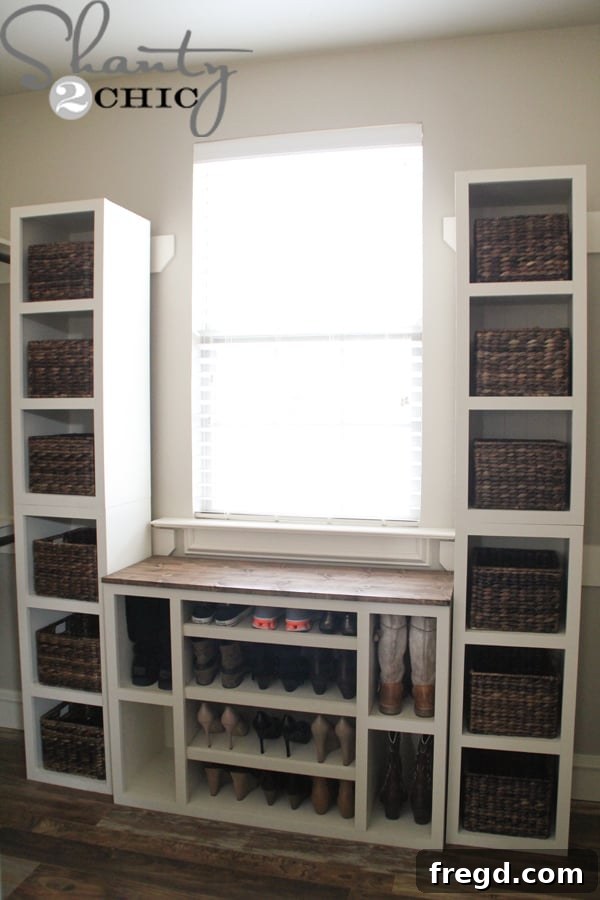
Closet organization is a game-changer, and these storage towers are a cornerstone of a truly efficient and beautiful closet. In this project, I built four sturdy towers, each measuring approximately 42 inches high, 15 inches wide, and 13 inches deep. Their modular design is what makes them truly exceptional: you can stack them vertically, arrange them side-by-side, or even flip them on their side to perfectly fit your unique closet layout and storage requirements. For my own closet, I strategically placed four of these towers to elegantly frame my window, maximizing both storage and aesthetic appeal.
Why settle for generic, one-size-fits-all closet solutions when you can craft custom storage that meets your exact needs? Building your own modular closet system offers numerous benefits. Beyond the significant cost savings compared to custom-built alternatives, you gain complete control over the design, dimensions, and finishes. This means your storage units will not only be perfectly sized for your space but will also reflect your personal style, contributing to a truly cohesive and inviting environment. Plus, there’s an immense sense of accomplishment that comes with stepping back and admiring a functional piece of furniture you built with your own hands.
Your DIY Journey Starts Here: Free Plans and Comprehensive Tutorial
To make this project as accessible as possible, I’ve created detailed, FREE plans that you can download and print instantly! Simply click on the image above or use THIS LINK to get your copy. These plans provide all the necessary cut lists, dimensions, and diagrams. But that’s not all – I’ve also put together a comprehensive step-by-step tutorial below, packed with photos and tips, to guide you through every stage of construction, ensuring a smooth and enjoyable building experience.
Essential Materials for Your Storage Towers
Choosing the right materials is crucial for durability and safety. For the main body and shelves of these sturdy plywood cabinets, I exclusively recommend and use Purebond Plywood. Our commitment to Purebond stems from its exceptional quality and, most importantly, its formaldehyde-free composition. This ensures a healthier indoor environment, free from harmful off-gassing, making it a responsible choice for any home project. You can delve deeper into why we took the Purebond Pledge and our philosophy on safe building materials HERE.
In addition to the plywood, you will also need 1×2 lumber for the face frames, which add a finished look and structural integrity. For the backing, I opted for a V-groove panel, offering a classic aesthetic, but various other panel options are available to suit your preference. Don’t forget wood glue and 1 1/4″ pocket hole screws for assembly, and if you plan to stack units, 2 1/2″ wood screws are essential.
Key Tools to Get the Job Done
Having the right tools can make all the difference in a woodworking project. Here’s what I used:
- Circular Saw with a Kreg Rip Cut: An absolute game-changer for ripping plywood.
- Miter Saw: For precise crosscuts on your lumber.
- Kreg Jig: Indispensable for creating strong, concealed pocket hole joints.
- Cordless Drill: For drilling pilot holes and driving screws.
- Measuring Tape, Pencil, and Carpenter’s Square: For accurate measurements and markings.
- 18 Gauge Brad Nailer (e.g., Ryobi Airstrike) or Hammer and Finish Nails: For attaching the face frame.
- Stapler (e.g., Airstrike Stapler) or Finish Nails: For securing the backing panel.
Step-by-Step Guide to Building Your Modular Storage Towers
Let’s get down to building! Follow these steps carefully, referring to the free plans for specific measurements and diagrams.
1. Accurate Plywood Cuts
The first step involves preparing your plywood. While you can often have the hardware store make all your major cuts, I prefer to get them to rip the large sheets into more manageable widths, then bring them home to make the remaining precise cuts myself. My go-to tools for this are the Kreg Rip Cut attached to my circular saw, and my miter saw. The Kreg Rip Cut is fantastic for achieving perfectly straight, consistent rips on plywood that’s too wide for a miter saw or when a table saw isn’t available or practical. It’s compact, affordable, and simplifies the process of getting accurate cuts every time. The blue guide simply runs along the edge of your plywood, ensuring a true line. For those without a Rip Cut, remember that most hardware stores offer a cutting service, which can be incredibly helpful.
Refer to your downloaded plans for the exact dimensions of each piece required for one tower. Carefully mark and cut your plywood according to these specifications. Precision here will ensure your tower assembles perfectly square.
2. Drilling Pocket Holes for Strong Joints
Pocket holes are essential for creating strong, durable, and discreet joints in your cabinet. Using my Kreg Jig, I drilled 1 1/4-inch pocket holes into the shelves. The exact placement and number of pocket holes will be clearly indicated in the free plans. Always ensure your Kreg Jig is set correctly for the thickness of your plywood to achieve optimal screw penetration and joint strength.
3. Assembling the Cabinet Body
With all your pieces cut and pocket holes drilled, it’s time to assemble the main cabinet structure. I started by joining the side panels to the bottom and top pieces, using 1 1/4-inch pocket hole screws and a generous application of wood glue. Wood glue provides extra bonding strength and helps to prevent racking, ensuring your cabinet remains solid and stable for years to come. Work carefully, ensuring all corners are square as you drive in the screws.
4. Crafting and Attaching the Face Frame
A face frame gives your storage tower a refined, built-in look and adds significant rigidity. I measured and cut the 1×2 lumber pieces for the face frame to fit the front of the cabinet. Before assembling the face frame itself, it’s critical to mark precisely where each shelf piece will align. This ensures a seamless transition between the cabinet interior and the face frame once attached.
Assemble the face frame components using 1 1/4-inch pocket hole screws and wood glue. Ensure all joints are tight and square for a professional finish. Once the face frame is assembled, you will attach it to the front of your cabinet. I used wood glue for a strong bond and then secured it with my 18-gauge Ryobi Airstrike nailer. If you don’t have a nailer, a hammer and finish nails will work perfectly, just be sure to countersink the nail heads for a smooth finish.
5. Adding the Backing Panel
I find it best to construct the main cabinet first, and then measure and cut the backing to fit precisely. This approach accounts for any minor variations in the frame. For this project, I chose a beautiful V-Groove panel, which adds a charming, traditional touch. However, there are many different panel options available at your local hardware store, allowing you to customize the look of your storage units.
To attach the backing, I used my Airstrike Stapler along with wood glue. The stapler provides a quick and secure attachment, preventing the backing from slipping, which can sometimes happen with finish nails alone. If you don’t have a stapler, finish nails will work; just be sure to apply ample wood glue to the edges for a strong, lasting bond.
Finishing Touches: Paint, Style, and Safe Installation
Once construction is complete, your storage towers are ready for their transformation! I applied two coats of Behr Cozy Cottage paint with an eggshell sheen, which provides a durable and elegant finish that complements my closet’s aesthetic. After the paint thoroughly dried, I moved the completed towers into my closet and added some charming baskets for a personalized and organized look.
Ensuring Stability and Safety in Your Modular Closet System
Safety is paramount, especially when creating custom storage solutions. If you choose to stack your storage towers, it is absolutely essential to securely attach them to one another. I achieved this by drilling 2 1/2-inch wood screws from the top of the bottom tower directly into the bottom of the top tower. This creates a single, stable unit, preventing any accidental tipping. For added security, particularly if you have children or are concerned about the units becoming “ladders,” I highly recommend attaching the entire assembly to the wall using “L” brackets. This ensures maximum stability and peace of mind.
A Note on Baskets and Sizing
To complete the look and functionality of my new storage towers, I sourced some lovely utility baskets from Pottery Barn. While they ultimately fit beautifully, I want to share a helpful tip: always double-check measurements! I purchased the 12-inch square by 8-inch high utility baskets based on their online specifications. Upon arrival, the tags on the baskets showed different dimensions, and my own measurements revealed yet another set of figures. Despite the discrepancy, they were on sale for a great price ($15 with free shipping!) and, happily, fit perfectly when oriented sideways. So, I decided to keep them. If you’re considering purchasing them, you can find them HERE, but be aware that the listed specifications might not be entirely accurate.
Expand Your Home Organization with More DIY
Phew! I’m absolutely loving the significant increase in storage in my closet. It truly feels as though my closet has expanded, all thanks to these custom-built pieces. This is just one more step in creating my ultimate modular closet system, and I have several more exciting additions planned. I can’t wait to share them with you as soon as they’re built!
Embarking on a DIY project like these modular storage towers is a rewarding experience that pays dividends in both functionality and personal satisfaction. Say goodbye to cluttered closets and hello to beautifully organized spaces tailored precisely to your needs. Download the free plans, gather your materials, and start building your dream closet today!
Thanks so much for stopping by and joining me on this creative journey!
~Ashley