
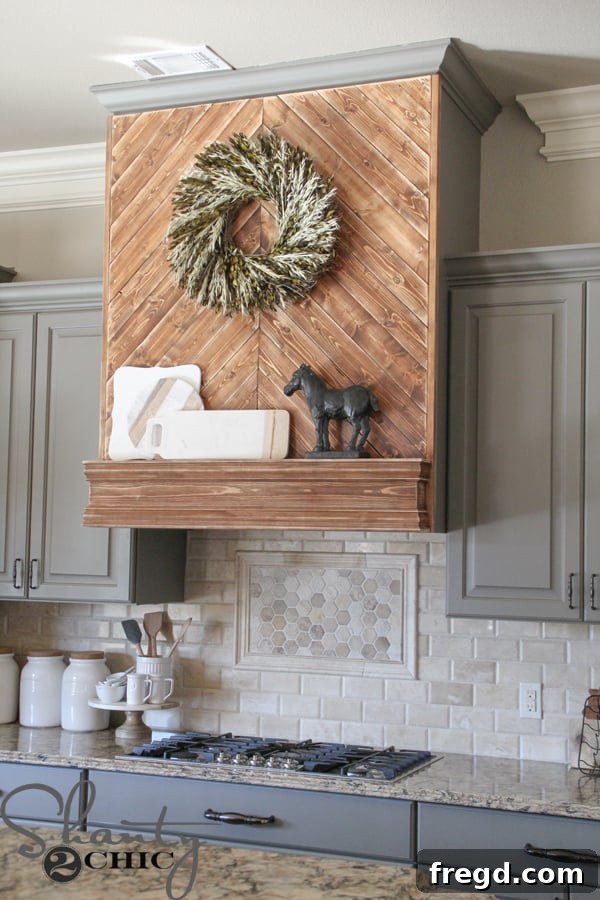
Transforming a house into a festive home, especially for cherished family traditions, brings immense joy. As Christmas Eve approaches, marked by the arrival of our lively extended family, I always find myself driven to complete new home projects. This year, my ultimate goal was to revitalize our kitchen with a stunning new vent hood. And now, she stands proudly, a true labor of love that elevates the entire heart of our home!
This project wasn’t just about functionality; it was about creating a beautiful focal point that harmonizes with our recently updated kitchen cabinets. Many of you might have caught a glimpse of this project and our newly painted cabinets during our live updates. The transformation has been incredible, breathing fresh life into a space we adore.
Our cabinets received a stunning coat of Anonymous by Sherwin Williams, a rich and sophisticated hue that instantly modernized the space. We entrusted this task to our exceptional painter, whose expertise in the DFW area is truly commendable. The deep, warm tones of the paint provide the perfect backdrop for the custom wooden vent hood, creating a cohesive and inviting atmosphere throughout the kitchen.
Since building our home, I’ve envisioned a more elegant solution for the area above our cooktop. The existing vent hood was simply hidden behind a generic cabinet box, which, while functional for concealing the bulky exhaust tube, lacked any aesthetic appeal. My heart truly desired a stylish mantel-style range hood, a design element that adds architectural interest and a touch of farmhouse charm. The original cabinet offered no functionality beyond concealment, and I knew a custom solution would dramatically improve the kitchen’s overall look. After much consideration and design planning, I landed on a concept that was not only simple to execute but also incredibly budget-friendly, costing approximately $100 in materials. This DIY vent hood makeover proves that significant impact doesn’t always require a hefty price tag.
Building Your Custom DIY Wood Vent Hood: A Step-by-Step Guide
This tutorial is designed as a flexible guide, allowing you to adapt the measurements to perfectly fit your unique kitchen space. The beauty of a DIY project lies in its customizability, so always measure your specific dimensions before making any cuts.
Step 1: Preparing the Plywood Backing
The foundation of our new vent hood began with a piece of 1/2″ Purebond Plywood. Purebond plywood is an excellent choice for interior projects due to its formaldehyde-free adhesive, making it a healthier option for your home. I carefully cut this panel to precisely fit flush over the face frame of my existing cabinet. The face frame, typically the 1×2 boards that your cabinet doors rest on, provides the structural integrity for mounting. Once cut, I drew a clear vertical line down the exact center point of the plywood piece. This centerline is crucial for ensuring perfect symmetry and alignment as we begin to add the decorative wood boards.
Step 2: Crafting the Decorative Wood Pattern
For the intricate design over the plywood, I selected 1×4 pine boards, often referred to as common board at your local hardware store like Home Depot. Pine is a fantastic material for DIY projects due to its affordability, workability, and ability to take stain beautifully. To create the striking chevron pattern, all angle cuts for this entire piece were made at a precise 45 degrees. As seen in the image, setting your miter saw’s handle to the 45-degree mark is the first essential step for consistent angles.
With the miter saw set, I made the first 45-degree cut on a 1×4 pine board. This initial piece will be the starting point of our decorative pattern. I then carefully aligned this freshly cut edge with the vertical center line I had previously drawn on the plywood backing. This ensures that our chevron pattern begins perfectly centered.
The goal is for the first two boards to meet at the bottom corner, effectively “splitting” it. So, for the second board, which will sit on the right side of the bottom corner, I marked precisely where it needed to be cut to align perfectly with the first board and the center line. Another precise 45-degree cut was made.
Before any permanent attachment, it’s always wise to perform a “dry fit.” I laid the first board onto the plywood backing in its intended position to ensure the fit was perfect and the angle was correct. This crucial step helps prevent mistakes and wasted material, a key principle in successful DIY woodworking projects.
Once satisfied with the dry fit, I applied a generous bead of wood glue to the back of the board. Wood glue provides a strong, long-lasting bond and significantly enhances the structural integrity of the entire piece, preventing any shifting or loosening over time.
To further secure the board, I used my reliable Ryobi 18 gauge brad nailer, firing 1-inch nails through the pine board into the plywood backing. The combination of wood glue and brad nails ensures a robust and durable attachment, holding the boards firmly in place while the glue cures.
The process for the second board mirrors the first. After marking its precise length, another 45-degree cut was made. This iterative approach ensures that each piece fits perfectly into the evolving chevron pattern.
It’s vital to visually confirm how the two boards will meet and split the corner. This attention to detail ensures a clean, professional-looking joint. Once marked and cut, the second board is ready for attachment.
The second board was then laid into its designated spot, adhering it with wood glue and securing it firmly with the brad nailer, just like the first. These initial two boards establish the foundational V-shape of our chevron design.
I continued this rhythmic process, working my way up and across the entire plywood panel. The key is to measure and cut each board individually as you progress, ensuring a snug and accurate fit for every piece. This methodical approach guarantees a stunning, seamless chevron pattern that becomes the heart of your custom range hood.
Upon reaching the top corners, a slight adjustment to the technique was necessary. Unlike the bottom, where two boards elegantly split the corner, the top corners often require a slightly different approach. The simple fix involves marking precisely where the corner meets the board and then making two, custom 45-degree cuts to ensure a perfect, custom fit for the corner. This flexibility is what makes DIY projects so rewarding.
Step 3: Preparing for the Finish
With all the pine boards meticulously attached, the vent hood cover was now ready for its finishing touches. The raw wood, with its intricate pattern, held the promise of a beautiful, rich hue that would tie the entire kitchen together. This stage marks a significant milestone in the DIY process, where the piece truly starts to come to life.
For the finish, I opted for Varathane Early American Stain, readily available at Home Depot. If you typically shop at Lowe’s, you’ll find a comparable shade under the Rust-Oleum brand. Early American is a fantastic choice for achieving a classic, warm, and inviting wood tone that beautifully complements a farmhouse or rustic modern aesthetic. Its depth and richness perfectly highlight the natural grain of the pine.
I applied a single, even coat of stain using a clean, lint-free cloth. After allowing the stain to penetrate the wood for approximately five minutes, I meticulously wiped off any excess with another clean cloth. This technique ensures an even saturation and prevents a blotchy appearance, bringing out the beautiful character of the wood grain while achieving that desired Early American hue.
Step 4: Installing the Vent Hood Cover
Installing the newly stained vent hood cover was definitely a two-person job, so I enlisted the help of my friend Whitney. A little sweet-talking, a skinny vanilla latte, and a playdate for the kids did the trick! The next day, she arrived with a second ladder, ready to lend a hand. While the installation process was a bit hands-on and didn’t allow for many photos, I can walk you through the key steps for this DIY kitchen upgrade.
Before mounting, I decided to distress the entire piece for a more authentic, aged look. My trusty Corner Cat sander, equipped with 80-grit sandpaper, was perfect for this task. I distressed it quite a bit, focusing on edges and corners to simulate natural wear and tear, giving the new wood a beautiful, time-worn character that beautifully complements the farmhouse aesthetic.
First, we carefully removed the existing cabinet doors and their hinges, exposing the interior of the cabinet while leaving the face frame intact. To securely attach the new wooden cover, we used 3-inch Spax screws. I drilled from the front of the newly crafted piece directly into the cabinet’s face frame, ensuring the screws also penetrated into the 3/4-inch sides of the cabinets for maximum stability. This robust mounting method ensures the vent hood remains firmly in place.
With the main plywood backing securely attached, the project was progressing beautifully! My initial plan involved building a new mantel to fit over the existing one, but as I delved deeper into the project, I realized this approach wouldn’t yield the clean, integrated look I desired. It became clear that removing the old mantel was essential for achieving a truly finished and professional aesthetic.
So, I dedicated an entire afternoon to figuring out how to remove the existing mantel without disturbing the entire vent hood mechanism. It was certainly a challenge, requiring some creative tool rigging and a good deal of persistence, but where there’s a will, there’s a way! I’m incredibly glad I invested the time, as its removal made a dramatic difference, allowing the new design to appear much more complete and custom-built, truly enhancing the kitchen’s appeal.
Step 5: Building and Attaching the New Mantel
Now, it was time to construct the new mantel, which would be the crowning glory of the vent hood. A crucial rule in woodworking and building is to always measure after previous components are in place, then cut and build accordingly. This ensures precise fit and avoids costly errors. I waited until the plywood cover was securely installed to take exact measurements for the mantel, guaranteeing a perfect custom fit.
I was thrilled to be able to use some plywood scrap for the mantel pieces, a move that saved both money and a trip to the hardware store. This highlights the immense value of owning a quality tool like my Ridgid table saw. While it represents a significant initial investment, its precision and power allow me to rip down otherwise unusable scraps into perfectly sized components, maximizing material efficiency and making it an invaluable asset for any serious DIYer or woodworker.
Here are the carefully prepared pieces for the mantel: a top and bottom piece, precisely ripped from plywood, which will be hidden within the frame. For the visible front, I used a 1×10 board, and two smaller 1×10 pieces were cut for the sides. It was imperative to keep this mantel relatively narrow to ensure it didn’t protrude awkwardly into the kitchen’s walkway. Using plywood for the top and bottom was a smart choice, as their rough edges would be concealed by the surrounding 1×10 frame, ensuring a clean and polished appearance from every angle.
For strong, hidden joints, I turned to my Kreg Jig (K5 model). I drilled 3/4-inch pocket holes into one side and both ends of the plywood top and bottom pieces. Additionally, 3/4-inch pocket holes were drilled into one end of each of the shorter 1×10 side pieces. Pocket hole joinery is an excellent technique for creating robust frames with concealed fasteners, giving a professional finish to your woodworking projects.
Before securing, I applied a generous amount of wood glue to the pocket hole ends of the short 1×10 side pieces. The glue not only strengthens the joint but also helps prevent any squeaks or movement over time, contributing to the overall durability of the mantel.
These side pieces were then firmly attached to the long 1×10 front piece using 1 1/4-inch pocket hole screws. The screws pull the joint tightly together, creating a solid and seamless corner connection, forming the primary frame of the mantel.
Next, the top plywood board was attached to the top of the 1×10 frame. The pocket holes drilled earlier allowed for a secure, flush attachment, completing the top structure of the mantel. At this point, the mantel starts to take its final shape, ready for installation.
At this stage, your mantel should resemble the image: a sturdy, three-sided box with the top and sides attached to the front piece. Note that there is no back panel, and the bottom piece is intentionally left off for now. This configuration is strategic, allowing for easier mounting of the mantel to the vent hood cover.
To attach the mantel to the bottom of the plywood cover, I again used 3-inch Spax screws, driven from underneath the mantel into the plywood. This is precisely why the bottom panel of the mantel was omitted at this stage – it allows for direct, strong attachment. For extra reinforcement and stability, I also drove screws from inside the cabinet box directly into the sides of the mantel, ensuring it’s robustly secured for years to come.
Once the mantel was firmly attached to the vent hood cover and cabinet, it was time to add the final structural piece. I used my 18 gauge nailer and wood glue to securely attach the bottom piece of the mantel. This completes the box structure, giving the mantel its full, finished form and providing a solid surface.
Step 6: Finishing Touches and Trim Work
To conceal the raw, unfinished edges of the plywood and give the entire vent hood a polished, integrated look, I attached 1×2 trim pieces. Using both wood glue and my 18 gauge nailer, I secured these 1x2s to both the cabinet face frame and the vent hood cover. The front edge of the 1×2 was carefully made flush with the surface of the vent hood cover, creating a seamless transition and a truly custom appearance. This step significantly elevates the perceived quality of the DIY project.
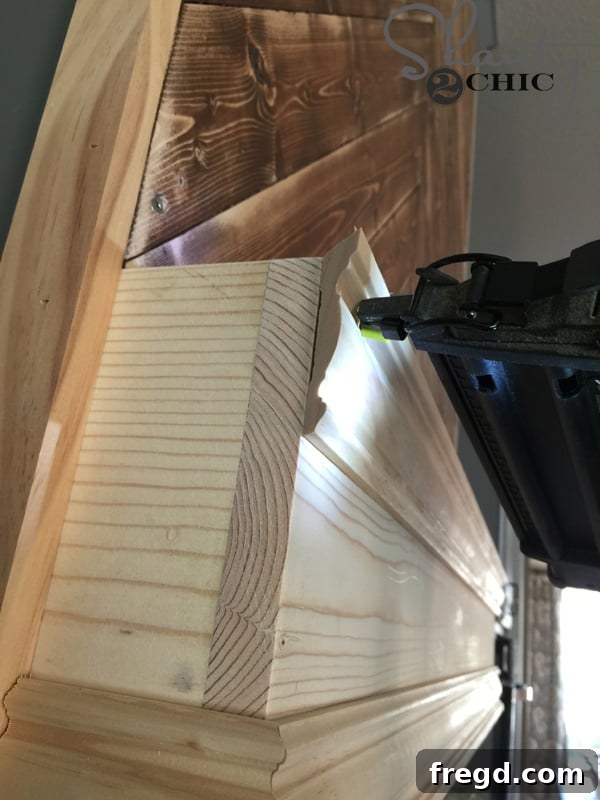
Now, for the decorative flourish! I attached 2 3/4-inch casing to both the bottom and top edges of the mantel. This elegant trim serves a dual purpose: it beautifully enhances the architectural detail of the mantel and ingeniously covers any unsightly nail holes from attaching the bottom piece. Using 3/4-inch brad nails and my brad nailer, I carefully measured and cut the casing to fit perfectly. I recommend starting with the front pieces, then moving to the sides, as the side pieces are often easier to ensure a square fit due to their simpler cuts.
With all the trim in place, the final step was to perfect the finish. I filled all visible nail holes with wood filler, ensuring a smooth and flawless surface. Once dried and lightly sanded, the entire piece received another coat of the same Varathane Early American stain, followed by a thorough distressing. This last distressing step helps blend the new filler and stain with the previously distressed wood, creating a cohesive, rustic, and beautifully aged aesthetic across the entire vent hood. And that, my friends, completes the transformation!
The Stunning Reveal: A Kitchen Transformed
I genuinely could not be happier with the final results of this DIY wood vent hood project. It has dramatically enhanced the aesthetic of my kitchen, providing a much-needed focal point and a strong design statement. Given that our kitchen flows seamlessly into the rest of our open-concept home, this transformation truly elevates the entire living space, imparting a cohesive and sophisticated charm. The absolute best part about having a custom mantel is its versatility; I can easily dress it up for each season and holiday, adding a personal touch that reflects the spirit of our home.
Shop the Look: Complementary Kitchen Decor & Elements
Curious about the other beautiful items featured in our newly refreshed kitchen? Here’s where you can find them to complete your own inspiring space!
- Marble Cheese Boards: Scalloped: Find Here; Wooden handle: Find Here; Round: HomeGoods
- Horse Decor: HomeGoods
- Wreath: HomeGoods
- Tile Backsplash: The Tile Shop (More info Here)
- Cambria Countertops: Details Here
- White Cookie Jars: Find Here
- Marble Cake Stand: Save On Crafts
- Salt and Pepper Shakers: At Home
- Wooden Utensils: Find Here
- Wooden Cow Cutting Board: World Market
- Wire Egg Crate: Harp Design Co.
- Metal Tin: Save On Crafts
- White Canisters in metal tin: Find Here
- Stools: HomeGoods