
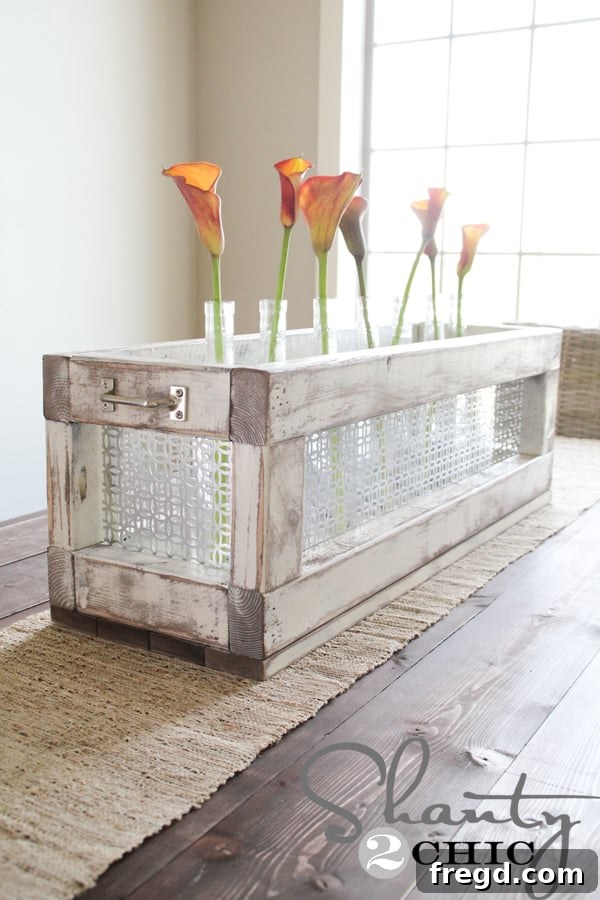
Welcome, fellow DIY enthusiasts! Are you searching for that perfect touch to elevate your dining space without breaking the bank? Look no further! Today, I’m thrilled to share an incredibly easy and budget-friendly DIY project that resulted in a stunning centerpiece – a charming rustic crate designed to hold your favorite wine bottles and fresh flowers. Crafted over a single weekend, this project costs around just $20 and adds a unique, personalized flair to any room. It’s the ideal way to infuse vintage farmhouse charm into your home decor, offering both aesthetic appeal and practical versatility. Get ready to transform your space with this simple yet impactful creation!
This project is perfect for beginners and seasoned DIYers alike, offering a quick turnaround and impressive results. The beauty of this handmade wine bottle crate lies in its adaptability; you can effortlessly change the look by swapping out flowers or even updating its finish. Whether you’re aiming for a cozy farmhouse feel, an industrial edge, or a touch of distressed elegance, this centerpiece serves as the ideal canvas. Let’s gather our tools and materials and dive into crafting this beautiful and versatile piece for your home!
Why Choose This DIY Wine Bottle Centerpiece?
Beyond its striking appearance, this DIY wine bottle centerpiece offers a multitude of benefits. It’s an exceptionally cost-effective alternative to store-bought decor, allowing you to achieve a high-end look on a modest budget. The combination of wood and metal introduces rich textures, while the distressed finish provides that coveted vintage appeal. Moreover, this crate isn’t limited to wine bottles; consider it a versatile holder for candles, seasonal foliage, herbs, or even remote controls. It’s a functional piece of art that can adapt to various decor themes and practical needs, making it a truly smart addition to your home.
Essential Tools and Materials for Your Rustic Crate
Before we begin, ensure you have all the necessary supplies. Gathering everything upfront will streamline your building process and make the experience much more enjoyable. For this rustic wine bottle centerpiece, we’ll be working with wood, metal, and various finishing products to achieve that signature distressed look. Remember, safety first! Always wear appropriate protective gear, such as safety glasses, when working with power tools.
Wood Components:
- 4 pieces of 2×3 wood @ 32″: These will form the main long rails of your crate.
- 4 pieces of 2×3 wood @ 7 1/4″: These will be used for the shorter end frames.
- 4 pieces of 2×3 wood @ 5″: These pieces are crucial for connecting the side frames.
- 4 pieces of 1×3 wood @ 32″: These will create the sturdy bottom of your crate.
- Note: While these dimensions perfectly suited my dining table, feel free to adjust them to fit your specific needs or desired size.
Hardware and Adhesives:
- 2″ pocket hole screws: Essential for strong, hidden joints in your wood frame.
- 1 1/4″ nails: For attaching the bottom planks securely.
- Elmer’s ProBond Wood Glue: Provides extra strength and stability to your assembled joints.
- Decorative pulls (optional): To add functional and aesthetic handles to the ends of your crate.
Finishing Supplies:
- Varathane Carrington Wood Stain: Used as the base coat for a deep, rich color.
- Rust-Oleum Heirloom White Paint: A classic, creamy white for the top coat that will beautifully distress.
- Clean cloths: For applying and wiping away stain.
- 80-grit sandpaper or sanding pad: For distressing to reveal the layers of stain and bare wood.
Metal Accents:
- Two decorative metal sheets: Purchased from craft stores like Hobby Lobby (look for sales!). Choose a pattern that complements your desired aesthetic.
Tools You’ll Need:
- Miter Saw or Circular Saw: For making precise wood cuts.
- Kreg Jig: Indispensable for creating strong, concealed pocket holes.
- Cordless Drill: For driving pocket hole screws.
- Ryobi Airstrike Nailer (or similar brad nailer): For quick and efficient nailing.
- Cordless Stapler: For securely attaching the metal sheets.
- Heavy-duty Scissors or Tin Snips: For cutting the metal sheets safely and accurately.
- Corner Cat Sander (or orbital sander): For achieving that perfectly distressed finish.
- Measuring Tape and Pencil: For accurate measurements and markings.
- Clamps: To hold pieces securely during assembly.
- Safety Glasses: Always protect your eyes!
Step-by-Step Guide: Crafting Your Rustic Wine Bottle Centerpiece
Step 1: Precision Cuts for Your Wood Components
The foundation of any great woodworking project starts with accurate cuts. Using your miter saw or circular saw, carefully cut all your wood pieces to the specified dimensions. Remember to measure twice and cut once! These dimensions are tailored for a versatile dining table centerpiece, but feel free to adjust them if you envision a different size or proportion. Having all your pieces ready before assembly ensures a smoother and more efficient building process. Lay them out and double-check your measurements against the cut list to avoid any surprises later on.
Step 2: Mastering Pocket Holes with Your Kreg Jig
Pocket holes are a fantastic way to create strong, concealed joints, giving your project a professional and clean finish. With your Kreg Jig, drill a 1 1/2″ pocket hole into each end of the four 5″ pieces. Ensure your Kreg Jig is set to the correct depth for your wood thickness (typically 1 1/2 inches for 2×3 lumber). Consistent hole placement is key here, as it will ensure your frame assembles squarely and securely. The Kreg Jig makes this process incredibly user-friendly, even for those new to woodworking.
Step 3: Crafting the Side Frames
Now, let’s begin assembling the initial structure of your crate. Take the 5″ pieces (the ones with the pocket holes) and attach them to the 32″ 2×3 pieces using 2″ pocket hole screws. This will form two identical side frames. It’s crucial to ensure these connections are square and tight. Use clamps to hold the pieces firmly in place while you drive the screws. This step establishes the long sides of your crate, providing stability and the basic silhouette of your centerpiece.
Step 4: The Unique Pre-Finishing Approach
Here’s where this project takes a slightly unconventional, but highly beneficial, turn. Instead of assembling the entire crate and then finishing it, we’re going to apply the stain and paint to the individual components (specifically the side frames and other loose wood pieces) *before* final assembly. This method ensures thorough coverage, especially in tight corners and crevices that would be difficult to reach once the crate is fully built. This proactive approach to finishing guarantees a professional-looking result and saves time and effort in the long run, contributing significantly to the distressed, layered look we aim to achieve.
Step 5: Staining for Depth and Character
To give our centerpiece a rich, underlying tone, apply a single coat of Varathane Carrington Wood Stain to every wood piece. Carrington offers a beautiful, warm base that will peek through the subsequent layers of paint and distressing. Simply wipe on a generous coat with a clean cloth, allow it to penetrate the wood for about 5 minutes, and then wipe off the excess with another clean cloth. This technique ensures an even application and prevents the stain from becoming too dark or blotchy. The wood grain will absorb the stain beautifully, setting the stage for our vintage aesthetic.
Step 6: Layering with Paint for a Distressed Canvas
Once your stain is dry, it’s time to apply the top coat. I chose Rust-Oleum Heirloom White, a popular choice for its soft, aged appearance that perfectly complements the rustic style. Apply two thin coats to all stained wood pieces, allowing adequate drying time between each coat. This creamy white provides a beautiful contrast to the dark stain, creating the perfect canvas for our distressing process. This layering technique is fundamental to achieving that authentic, time-worn look, allowing hints of the darker stain to emerge subtly.
Step 7: Customizing Your Metal Accents
While the paint dries, turn your attention to the decorative metal sheets. These will add an industrial chic touch to your rustic centerpiece. I found two sheets at Hobby Lobby during a 40% off sale, making this a very economical addition. Craft stores often have a fantastic selection of patterns, so choose one that speaks to your style! Carefully cut one sheet straight down the middle with heavy-duty scissors or tin snips. Because my crate is longer than the metal sheet, I cut the factory edge off of one side of the second sheet to prepare it for seamless extension. For the ends of the crate, cut a piece from the remaining sheet, ensuring the pattern aligns beautifully with the longer sections. This attention to detail will create a cohesive and professional look for your metal accents.
“/>
Step 8: Securely Attaching the Metal Inserts
With your metal pieces cut and ready, it’s time to attach them. Using your cordless stapler, carefully secure the metal sheets to the *inside* of the long side frames. Place approximately six staples evenly along each side to ensure a firm and lasting hold. Attaching the metal at this stage, before the full crate assembly, makes the process much easier and allows for precise placement. This step is crucial for integrating the metal detail seamlessly into your crate’s design, enhancing its rustic character.
Step 9: Bringing the Crate Together
Now that your side frames are stained, painted, and have their metal accents attached, it’s time for the final assembly of the main crate structure. Connect the two long side frames to the 7 1/4″ end pieces. Apply Elmer’s ProBond wood glue to the joining surfaces before securing them with 2″ nails using your Ryobi Airstrike Nailer. The glue provides extra reinforcement, making your crate incredibly sturdy. Once the main box is assembled and squared, you can then attach the smaller metal pieces to the short ends of the crate using your stapler, completing the metal detailing.
Step 10: Building a Sturdy Base
Flip your assembled crate over to attach the bottom. Position the four 1×3 boards across the bottom opening, ensuring they are evenly spaced and flush with the crate’s edges. Secure them in place using your Ryobi Nailer and 1 1/4″ nails. This step not only completes the structural integrity of your crate but also provides a stable foundation for your wine bottles and other decorative items. A well-built bottom ensures your centerpiece can safely hold its contents without shifting or wobbling.
Step 11: Achieving that Vintage Distressed Look
Now for the magical touch that brings out the true character of this piece: distressing! Grab your Corner Cat Sander (or any orbital sander) fitted with an 80-grit sanding pad. Gently sand the entire crate, focusing on edges, corners, and any areas that would naturally show wear and tear over time. As you sand, the Heirloom White paint will gradually wear away, allowing the rich Carrington stain and even the bare wood to peek through. This layering effect creates an authentic vintage, farmhouse style that gives your crate a wonderfully aged and unique appearance. The distressing adds depth and story to your creation.
Adding the Final Touches and Decorating Your Centerpiece
With the crate fully assembled and beautifully distressed, it’s time to personalize it! I added a decorative pull handle to each end, enhancing its rustic charm and making it easy to move. The true magic happens when you fill it: seven empty wine bottles fit perfectly inside. To complete the look, I dropped a single, vibrant flower into each bottle, creating a striking and fresh display. This arrangement offers an effortless way to introduce a rotating pop of color and seasonal beauty to your dining room, keeping your decor fresh and engaging throughout the year.
Beyond the Centerpiece: Expanding Your Decor
This wine bottle centerpiece is just one element of a larger vision for my dining room. I’m currently in the process of transforming the entire space, and this piece perfectly complements the aesthetic. Soon, I’ll be sharing the DIY benches I built to match my new dining table and the fabric I carefully selected for the curtains. Creating cohesive elements throughout your home not only enhances the overall design but also reflects your personal style and craftsmanship. Each project builds upon the last, contributing to a truly unique and inviting atmosphere.
If you loved this project, you might also be interested in my previous endeavor: building a magnificent Restoration Hardware Inspired Dining Table for only $110. It’s another fantastic example of achieving high-end looks on a DIY budget. Combining these projects creates a truly harmonious and custom dining area that is sure to impress.
Conclusion
And there you have it – a beautiful, rustic, and incredibly versatile DIY wine bottle centerpiece crafted with love and creativity! This project proves that stunning home decor doesn’t require a hefty price tag or extensive woodworking experience. With a little time and a few basic tools, you can create a unique piece that not only serves as a focal point but also expresses your personal style. I encourage you to try this project and make it your own by experimenting with different stains, paints, or metal patterns. It’s a rewarding experience that yields a gorgeous addition to your dining room or any space in your home. Thank you for joining me on this DIY journey!