
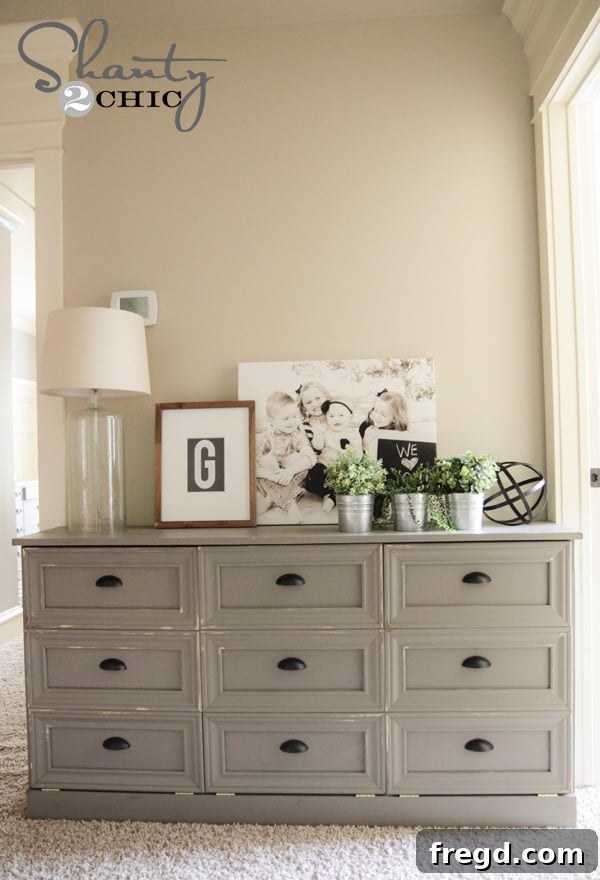
As a busy mom navigating the vibrant chaos of five wonderful children, one undeniable truth stands out in my daily life: laundry is a relentless force. While I cherish every moment with my growing family, I can confidently say that the mountains of dirty clothes are one aspect I will never pine for once the kids are grown. My mission, therefore, has been to discover ingenious methods to make this Sisyphean task not just bearable, but perhaps even a little enjoyable – or at the very least, far less of an eyesore. This quest for domestic harmony led me to conceive and construct what has quickly become one of my most cherished DIY projects to date: a custom laundry sorter dresser.
For years, a solitary, ever-overflowing laundry basket stood prominently in our upstairs hallway. It was a constant visual reminder of a chore that often felt insurmountable. I’d gaze at it, day in and day out, envisioning a solution that would seamlessly blend functionality with our home’s aesthetic. I needed something that could not only contain the burgeoning piles but also actively streamline the sorting process. This dream has now materialized into a sophisticated, multi-basket laundry dresser, transforming a former pain point into a practical and stylish organizational hub.
Craft Your Own DIY Laundry Sorter Dresser: A Step-by-Step Guide
Before we dive into the nitty-gritty of construction, I want to address a minor design consideration upfront. This dresser, intentionally designed for maximum utility, is quite long. In its current placement, it slightly nudges the doorframe of my son’s room. During the planning phase, I debated between a two-basket and a three-basket configuration. Ultimately, the allure of that third basket for enhanced sorting efficiency proved irresistible, leading me to sacrifice a few inches of hallway clearance for superior organization. The cornerstone of this project revolves around the specific dimensions of the baskets I selected, which I sourced affordably at Walmart for $7 each. For your convenience, similar baskets can also be found HERE on Amazon. While this design is optimized for these baskets, it’s flexible enough to accommodate others with slight adjustments. You’ll find a link to the comprehensive, free plans at the conclusion of this article, ready for you to download and begin your build!
DIY Laundry Basket Dresser: Essential Details and Construction Insights
Our journey begins with the foundational structure: the dresser box. For this crucial component, I opted for high-quality hardwood plywood, specifically endorsing Purebond Plywood. This choice wasn’t arbitrary; Purebond plywood offers a multitude of advantages that make it ideal for furniture construction, especially for projects demanding both durability and aesthetic appeal.
Many DIY enthusiasts and professional builders alike highly recommend Purebond, and for good reason. It delivers the luxurious appearance of expensive hardwood without the hefty price tag, making it an incredibly cost-effective solution for crafting beautiful furniture. Beyond its visual appeal and affordability, Purebond stands out for its environmental credentials. Proudly manufactured in the USA using sustainable resources, it’s also entirely formaldehyde-free. This ensures a healthier, safer working environment, free from harmful chemical emissions, a significant benefit for any indoor project. You can conveniently find Purebond plywood readily available at Home Depot.
To simplify the transportation and initial cutting process, I had Home Depot pre-rip my larger plywood sheets into more manageable sections. Once back in my workshop, all subsequent precision cuts were performed with my reliable Ridgid Miter Saw. Accurate measurements and clean cuts are paramount for a professional-looking finish, so take your time during this stage.
For joining the various components of the dresser, I utilized my trusted Kreg Jig to create robust pocket holes. Pocket hole joinery is a fantastic technique for its strength and concealed fasteners, resulting in a clean, professional appearance. As you’ll observe in the accompanying images, I strategically placed these holes to ensure maximum stability. My first step involved constructing the side frames, which are surprisingly straightforward. I drilled 3/4-inch pocket holes and secured the joints using 1.25-inch pocket hole screws. For an even stronger bond, I applied a bead of Gorilla Wood Glue to each joint before driving in the screws with my drill. This combination of glue and screws creates a virtually indestructible connection, essential for furniture that will see daily use.
The back panel of the dresser frame also utilizes Purebond Plywood, albeit a thinner 1/4-inch variety. When working with such delicate material, staples are generally preferred over brad nails. Nails have a tendency to pierce through thin plywood, compromising its integrity and potentially showing through on the finished surface. Staples, however, offer a wider grip, securely holding the material in place without perforation. I employed my Ryobi Airstrike cordless stapler for this task, appreciating its ease of use and the convenience of using the same 18V One+ battery that powers my other Ryobi tools, making it a seamless addition to my workshop setup.
Following the completion of the side frames and back panel, I moved on to preparing the base of the dresser. Similar to the side frames, I meticulously drilled pocket holes along the long sides of the base piece using my Kreg Jig, maintaining the consistent 3/4-inch hole size. Precision at this stage is crucial for ensuring the dresser sits level and has a sturdy foundation.
This image showcases the base of the dresser after all the necessary pocket holes were precisely added, ready for assembly into the main frame.
With the individual components of the dresser box prepared, the next exciting step was the full assembly. After meticulously planking the top surface for a refined finish, I securely attached all the elements. The beauty of pocket hole joinery truly shines here, as you can clearly see how all the pocket holes align perfectly, creating a robust and seamless structure. This methodical approach ensures that the entire dresser box is not only strong but also visually appealing, setting the stage for the next phase of the build. Taking the time to ensure everything is square and flush at this point will pay dividends in the final outcome.
Once the main dresser box was fully assembled and stable, my attention turned to creating the individual basket compartments – what I sometimes refer to as “doors” and other times “drawers.” The design for these components is remarkably simple yet highly effective, essentially comprising two pieces of plywood joined together with pocket holes. Each base piece is crafted to support a laundry basket and should resemble the structure depicted below, forming a sturdy tray for the baskets to rest within.
These base units are then securely attached to the larger door fronts, again utilizing 1.25-inch pocket hole screws for a strong and lasting connection. When attaching the side pieces to complete the drawer-like structure, I found it incredibly helpful to first nail them into place. This temporary fastening held the pieces steady and flush, making the subsequent task of driving in the pocket hole screws much easier and more accurate. This technique minimizes movement and ensures a clean, tight fit for each compartment.
At this stage, with the main frame and internal “drawer” structures complete, my custom laundry sorter dresser began to truly take shape. The front presented a clean, segmented appearance, ready for its decorative transformation. Meanwhile, the back revealed the solid construction and strategic placement of all the pocket hole joinery, a testament to the robust framework we had built. It’s always rewarding to see a project transition from individual components to a recognizable piece of furniture.
And here is a view of the back, demonstrating the structural integrity before the final finishing touches.
Now, for the trim! This is where your artistic vision truly comes into play, allowing you to personalize the dresser’s aesthetic. I wanted my dresser to mimic the look of individual drawers, so I meticulously crafted faux drawers using trim pieces. While this choice added a bit to the overall cost, the sophisticated, custom appearance it achieved was well worth the investment. Alternatively, for a simpler and more budget-friendly approach, you could merely frame around each dresser door. When applying the trim, I started flush with the bottom edge of each door. All my cuts were precisely angled at 45 degrees, ensuring clean, mitered corners that elevate the craftsmanship. This attention to detail creates a refined, built-in look.
Once the bottom trim was in place, I proceeded to attach the corresponding side pieces, carefully aligning them to maintain the crisp lines of the faux drawer fronts. Following this, I aligned the next ‘drawer’ section flush with the one just completed, systematically building up the tiered appearance. Upon completion, the trim should elegantly overhang the sides and top of each door by approximately 1/2 inch, creating a subtle yet impactful visual depth and dimension that truly makes this piece stand out.
During the trim installation for the second drawer, I admit I tried to rush the process. I neglected the age-old carpenter’s adage, “measure twice, cut once,” and as a result, I ended up having to remove every single piece of trim I’d just attached. Let’s just say a few “choice words” might have been uttered during that frustrating moment! This serves as a vital reminder: always measure each piece meticulously. Otherwise, you might find yourself with a handful of nails and a lot of rework, just like I did. Learn from my mistake and prioritize precision!
With all the trim expertly applied to each door, my dresser stood poised and ready for its transformative paint job. The structural build was complete, and now it was time for the aesthetic details that would truly bring it to life and match our home’s decor. But before any paint could touch the wood, a crucial step was required to ensure a flawless finish: filling and caulking. I carefully filled all nail holes with a high-quality patch and primer product, ensuring a perfectly smooth surface. Additionally, I meticulously caulked any less-than-perfect seams – and yes, there might have been a few of those! This meticulous preparation is essential for achieving a professional, seamless look, making all the hard work put into the build truly shine through.
For the paint color, I selected Sherwin-Williams Anonymous (SW-7046), a sophisticated hue that offers depth and character to the piece. This particular shade beautifully complements various interior styles, ensuring the dresser integrates seamlessly into its intended space. After the paint had thoroughly dried and cured, I employed my Corner Cat sander to lightly distress the edges and raised areas. This subtle distressing technique adds a touch of vintage charm and character, giving the brand-new piece a gently aged, lived-in feel that enhances its appeal. Once the distressing was complete, the dresser was finally ready for its hardware and hinges, bringing us closer to the finished product.
For the functional aspect of the doors, I opted for these sturdy hinges, conveniently purchased from Home Depot. Installing hinges can sometimes be a bit fiddly, so here’s a helpful tip: it’s incredibly beneficial to have an extra set of hands on this part of the project. A helper can hold the doors steadily in place while you meticulously attach the hinges, making the process much smoother and more accurate. I began by attaching each hinge securely to the main box of the dresser. And please, feel free to overlook my rather “creative” paint job in some of the less visible areas – my philosophy is to only perfect what the eyes can see!
Each individual opening within the dresser received two hinges, strategically placed to ensure optimal support and smooth operation for the tilting doors. Once these hinges were firmly affixed to the dresser’s frame, the next step involved preparing them for the doors. This entailed folding the hinges together, as demonstrated in the image, ensuring they were in the correct orientation to receive the door panel. This preparatory step is vital for seamless installation and proper door function.
With the hinges folded and ready, I carefully set each door into its respective opening, positioning it atop the prepared hinges. From the back of the dresser, I then opened each door and proceeded to attach the base of the door securely to the hinge. While there might be other methods for this step, this approach worked perfectly for me, allowing for precise alignment and firm attachment. It’s a bit of a dance, but with patience, each door will be perfectly mounted and ready for action. The final and incredibly satisfying step was adding the hardware. I absolutely fell in love with these charming cup pulls from Home Depot. While purchasing nine of them did contribute to the overall project cost, the elevated aesthetic they provide was well worth it. However, if you’re working with a tighter budget, you can easily opt for just three pulls – one for each door – to keep expenses lower without sacrificing functionality. The doors are designed to fold open completely to the floor, providing ample access to the laundry baskets. For added safety, especially with curious little ones around, I highly recommend installing small stop chains. These chains prevent the doors from opening fully and potentially becoming a play area, ensuring both the dresser’s longevity and the safety of your children. This thoughtful addition provides peace of mind while maintaining the dresser’s full utility.
And here it is, in all its finished glory! I truly adore this piece. It’s more than just a laundry sorter; it’s a testament to how a functional necessity can be transformed into a beautiful, integrated part of your home. No longer will overflowing baskets dominate our hallway. Instead, we have a stylish dresser that subtly conceals the mess, making laundry sorting a more organized and far less daunting task. The joy of seeing this project come to life, and the impact it has on our daily routine, is immeasurable. It proves that even the most mundane household chores can be approached with creativity and design, leading to solutions that enhance both practicality and pleasure.
What are your thoughts on this custom laundry sorter dresser? Do you think a functional and aesthetically pleasing solution like this could make your laundry routine any more appealing, or at least significantly less dreadful? Imagine the satisfaction of an organized hallway and a streamlined sorting process!
Let’s discuss the investment. I admit, this piece did involve a slightly higher cost than some of my other DIY projects, largely due to its substantial size and my decision to opt for more decorative hardware and trim. The raw wood itself came in at approximately $100. My chosen trim and the beautiful cup pulls added another $100 to the budget, bringing the total project cost to around $200. While this might seem like a considerable sum for a DIY, remember that custom furniture of this quality and functionality would easily cost significantly more if purchased retail. If budget is a primary concern, you can absolutely simplify the trim design and reduce the number of pulls to bring the cost down considerably. However, speaking from personal experience, I would have gladly paid even more for this custom laundry sorter because I genuinely love it so much! The long-term benefits of improved organization and a decluttered living space truly make it a worthwhile endeavor.
Ready to transform your laundry routine? To download and print the comprehensive, free plans for this DIY Laundry Basket Dresser, CLICK HERE!
Thank you so much for stopping by and taking the time to explore this project! I would be absolutely thrilled if you would share and PIN this project with all your friends and fellow DIY enthusiasts. Spreading the word helps others discover creative solutions for their homes.
Thanks a bunch, everyone!
Whitney