
Welcome, fellow DIY enthusiasts and parents!
I am beyond thrilled to share a special project that’s not only close to my heart but also incredibly practical for any household with budding artists. This Friday, the grand reveal of my son’s completely transformed desk awaits you, but before we get to the main event, I couldn’t resist offering a little sneak peek into one of the key organizational elements that ties his whole creative space together. It’s a solution that tackles one of the biggest challenges parents face: managing the beautiful chaos of children’s art supplies.
Every parent knows the boundless energy and imagination children pour into their art. From vibrant crayon masterpieces to imaginative paint splatters, kids love to create, often on just about any surface they can find – sometimes even including the furniture! While we adore their artistic spirit, keeping those supplies neatly organized and readily accessible can feel like a constant battle. That’s why I’m always on the lookout for fun, functional, and aesthetically pleasing ways to organize our home. This latest endeavor perfectly marries decoration with organization, and I’m excited to show you how effortlessly it came to life. Prepare to be inspired by a project that proves organization doesn’t have to be boring or break the bank. Here’s how we gave his art supplies a stylish new home:
If you’re searching for a DIY project that delivers maximum impact with minimal effort and expense, you’ve just struck gold! This might very well be the easiest and most budget-friendly tutorial I’ve ever put together. The results are charming, functional, and truly elevate the aesthetic of any child’s creative zone, making it a win-win for both parents and young artists. Get ready to say “Woohoo!” as you discover just how simple it is to achieve a beautifully organized art space.
The Foundation: Discovering Dollar-Friendly Treasures
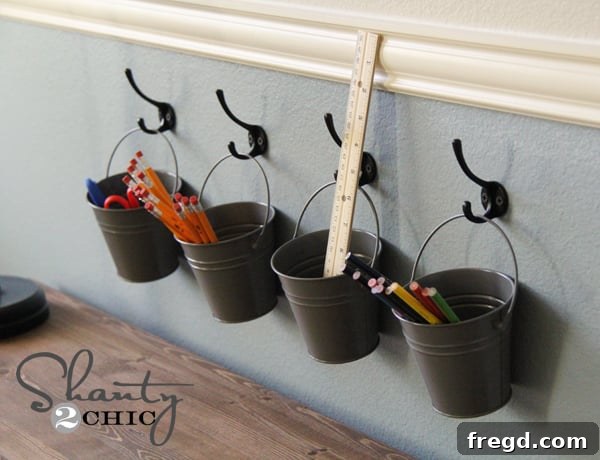
The secret to this project’s affordability begins with these fantastic buckets I stumbled upon in Target’s dollar section. Seriously, the dollar section is a treasure trove for DIY enthusiasts! I found these gems just this past week, and they had an abundance of them in a delightful array of colors. While the bright, primary colors are fun, I had a specific vision in mind to match my son’s room decor, which meant they needed a little transformation.
Not only are these buckets incredibly cute, but at just a dollar each, they are an absolute steal! The potential for personalization with such an inexpensive base is endless. These small plastic buckets are lightweight, durable, and the perfect size for holding crayons, markers, paintbrushes, and other essential art tools. Their uniform shape also makes them ideal for a cohesive wall display, bringing a sense of order to the often chaotic world of children’s crafts.
A Stylish Transformation: The Power of Spray Paint
While the vibrant hues of the original buckets were cheerful, they didn’t quite align with the more subdued and sophisticated palette I envisioned for my son’s room. Luckily, I knew exactly what product would deliver the perfect transformation, allowing me to customize their look to seamlessly blend with the existing decor. Enter the magic of spray paint!
For this project, I opted for Rust-Oleum Painter’s Touch spray paint in Granite. This particular shade provides a beautiful, sophisticated, and slightly textured finish that mimics the look of natural stone, instantly elevating the humble plastic buckets. Rust-Oleum is a fantastic brand known for its excellent coverage and durability, making it perfect for items that will see daily use by active little hands.
The transformation was quick and simple. I took the buckets outside, laid them on a protected surface, and gave each one a generous, even coat of the Granite spray paint. It’s always best to apply several light coats rather than one heavy one to avoid drips and ensure a smooth, professional finish. While the buckets were drying – which happened surprisingly fast thanks to modern spray paint formulas – I moved on to the next crucial step: attaching the hooks. This parallel process helped streamline the project, getting us closer to a fully organized art station in no time.
Secure & Stylish Hanging: Selecting and Installing Hooks
With our buckets transformed, the next step was to ensure they had a sturdy and attractive way to hang on the wall. Again, another fantastic find from a favorite crafting store helped keep this project well within budget. I discovered these adorable little black hooks at Hobby Lobby, and to my delight, they were half off! This brought their price down to a mere $1.50 apiece, proving that stylish organization doesn’t have to be expensive. The black finish of the hooks perfectly complements the new “granite” look of the buckets, adding a touch of industrial chic to the space. Woohoo for great deals!
Installation was straightforward. I used black drywall screws, which blend seamlessly with the hooks, and attached them directly to the wall. For those who might be concerned about the potential weight of the buckets once filled with art supplies, or if you’re working with plaster walls, I highly recommend using a wall anchor first. Anchors provide extra security and ensure your hooks can withstand the weight without damaging your walls. For a visually balanced and easily accessible setup, I hung all my hooks precisely 6 inches apart. This spacing allows ample room for each bucket and its contents, preventing a cluttered look and making it easy for little hands to grab and return supplies.
The Grand Reveal: A Place for Every Art Supply
With the hooks securely in place and the “granite” buckets perfectly dry, the most satisfying moment arrived: hanging our newly customized art supply holders. Watching them click into place transformed a bare wall into an organized, inspiring, and accessible art station. It’s truly amazing how a few simple and inexpensive components can come together to create such a cohesive and functional piece.
And that’s it! The entire process is incredibly simple, unbelievably cheap, but OH SO Cute! I absolutely adore how this project instantly adds character, texture, and a sense of thoughtful design to this corner of the room. Beyond the aesthetics, there’s a crucial practical benefit: all the art supplies are now perfectly out of reach of our little baby. This ensures a safe environment for everyone, allowing the older children to enjoy their creative time without worrying about the youngest getting into paints or markers. It’s a win-win for organization, style, and peace of mind.
Inspiring Creativity: More Views of the Organized Space
To truly appreciate the functionality and charm of this DIY art supply organizer, here are a few more glimpses from different angles. Notice how the “granite” finish adds a touch of sophistication, making these dollar-store finds look high-end. The wall-mounted design frees up valuable desk space, keeping the main work area clear for drawing, crafting, and other imaginative endeavors. This system encourages children to put away their supplies, fostering a sense of responsibility and ownership over their creative space. Easy access means more art, and less time searching for that elusive red crayon!
Anticipation Builds: The Complete Desk Makeover Coming Soon!
This wall-mounted art supply organizer is just one component of a much larger, exciting transformation. I am absolutely brimming with excitement to unveil the bottom half of these photos, showcasing the complete setup of my son’s new desk this Friday! I genuinely LOVE his new desk – it’s not just furniture, but a thoughtfully designed space that’s perfectly suited for his room and encourages endless hours of creativity and learning. In fact, it’s so perfect, I might just be tempted to “borrow” it for my own workspace! Stay tuned for the full tour, where all the elements of his inspiring creative corner will come together.
Join the Creative Journey
Thank you so much for stopping by and taking the time to explore this simple yet impactful DIY project. I hope it inspires you to look at everyday items with a fresh, creative eye and tackle your own organization challenges with a touch of personal flair. Creating functional and beautiful spaces for our children doesn’t have to be complicated or costly; sometimes, the best solutions are the most straightforward.
Have a wonderful and creative day!
~Whitney