
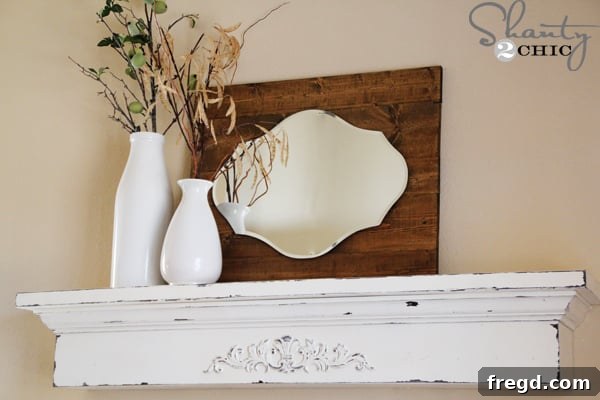
Welcome, DIY enthusiasts! Today, we’re thrilled to unveil a project that combines elegance with simplicity: a stunning DIY Floating Ledge. This versatile piece of home decor is more than just a shelf; it’s an opportunity to add character, functionality, and a touch of personalized charm to any room. We’ve been eager to tackle this particular build for some time, envisioning its potential to transform an empty wall into a captivating display. What we discovered was not only how incredibly easy it is to construct but also how budget-friendly it proved to be, costing just around $40!
Whether you’re looking to enhance your dining area, create a welcoming focal point in your entryway, or even give an existing fireplace mantel a sophisticated upgrade, this floating ledge is the perfect solution. Its clean lines and sturdy construction make it adaptable to various interior styles. The best part? This isn’t just a project for seasoned carpenters. It’s designed with beginners in mind, making it an ideal entry point into the rewarding world of woodworking. You’ll be amazed at what you can achieve with basic tools and a little guidance.
Why Build a Floating Ledge?
Floating shelves offer a sleek, minimalist look that complements modern, farmhouse, and traditional aesthetics alike. They provide valuable display space without the visual bulk of traditional shelving units. This specific design allows for robust construction, ensuring it can hold your treasured items securely. Plus, the satisfaction of building something beautiful and functional with your own hands is truly unparalleled. Let’s dive into the details and get ready to create your very own custom floating ledge.
Essential Materials and Tools for Your DIY Floating Ledge Project
Before embarking on any woodworking endeavor, a well-organized supply list is crucial. This not only streamlines your building process but also helps prevent last-minute trips to the hardware store. For this project, we’ve carefully selected materials that are readily available and cost-effective, ensuring you get a high-quality finish without breaking the bank. Here’s everything you’ll need to gather:
Supply List:
- 1 – 2×10 @ 8ft. (This forms the sturdy top and back foundation of your ledge.)
- 1 – 1×8 @ 6ft. (Used for the front and side structural pieces.)
- 1 – 1×6 @ 6ft. (This board will create the bottom shelf.)
- 1 – 2×4 @ 8ft. (Essential for the hidden wall cleat that supports the floating effect.)
- 1 – Wooden Scroll from Lowe’s (A decorative touch to enhance the aesthetic appeal.)
- 1 – 8ft. 2.5″ Crown Molding (Adds a classic, finished look to your ledge.)
- Gorilla Glue Wood Glue (Provides superior strength and durability at every joint.)
- Rust-Oleum Spray Paint in Espresso (Your base coat for a rich, deep undertone in a distressed finish.)
- Rust-Oleum Spray Paint in Heirloom White (The top coat, offering a beautiful, classic distressed look.)
- Vaseline (The secret ingredient for achieving an authentic distressed, chippy paint effect.)
- 120-grit sandpaper (For controlled distressing and smooth finishing.)
- Wood filler (To conceal nail holes and imperfections for a flawless surface.)
Recommended Tools:
While some tools are optional for specific steps, having the right equipment makes the process much smoother and more enjoyable:
- Miter Saw (or a Miter Box with a hand saw for precise cuts, especially for crown molding).
- Kreg Jig Pocket-Hole System (A game-changer for strong, concealed joinery).
- Cordless Drill (An invaluable tool for driving screws efficiently).
- Brad Nailer (For quickly attaching crown molding and other trim pieces).
- Tape Measure, Pencil, Safety Glasses, and Hearing Protection.
- Level (For accurate installation on the wall).
- Stud Finder (Critical for securely mounting the ledge to wall studs).
Step-by-Step Guide: Building Your Floating Ledge
Step 1: Making Your Precision Cuts
Accuracy in cutting is paramount for a professional-looking finish. Take your time with this step, measure twice, and cut once. For the main structural components of your floating ledge, you will need to cut the following pieces from your lumber:
- 1 – 2×10 @ 53.5″ (This will be the main top and back support of your ledge.)
- 1 – 1×8 @ 48″ (This piece forms the front of your ledge, providing depth.)
- 2 – 1×8 @ 5.5″ (These smaller pieces will serve as the side supports, connecting the front to the back.)
If you’re adjusting the overall length of your ledge, remember to proportionally adjust all these measurements to maintain the design’s integrity. Always ensure your cuts are straight and clean for the best fit.
Step 2: Drilling Pocket Holes with a Kreg Jig
The Kreg Jig system is a fantastic tool for creating strong, hidden joints, perfect for a clean aesthetic. Once all your lumber pieces are cut to size, it’s time to prepare them for assembly by drilling pocket holes. The beauty of pocket holes lies in their ability to draw wood pieces together tightly, creating durable connections without visible fasteners on the exterior surface.
Set up your Kreg Jig according to the thickness of your 1×8 boards. For the 5.5″ boards, drill pocket holes on one end of each piece. These holes will be used to attach them to the 48″ front board. For the 48″ board, drill pocket holes along both ends, which will later be used to secure it to the 2×10 main board and the side supports. Ensure your pocket holes are drilled cleanly and evenly spaced for maximum strength.
Pocket holes should be strategically drilled on the edges of the 5.5″ boards that will connect to the longer 48″ front board. This ensures a clean look from the exterior.
Similarly, create pocket holes along the ends of the 48″ board. These will be crucial for connecting the front panel to the side pieces and ultimately to the main 2×10 backing.
Step 3: Assembling the Ledge Frame with Wood Glue
Before you insert any screws, a crucial step for long-lasting durability is applying wood glue to every joint. Wood glue creates an incredibly strong bond, often stronger than the wood itself, and works in conjunction with screws to prevent any movement or separation over time.
Apply a liberal, even layer of Gorilla Wood Glue to the end grain of the 5.5″ side boards before positioning them against the 48″ front board. Once the glue is applied, bring the pieces together, ensuring they are flush and square. Then, use 1 1/4″ pocket hole screws to firmly secure the 5.5″ boards to the 48″ board. A cordless drill makes this task quick and efficient, saving you time and effort.
A reliable cordless drill is indispensable for any DIY project. If you’re considering an upgrade or your first purchase, we wholeheartedly recommend a model like the Ryobi 18-Volt Lithium. Its power and portability make driving screws a breeze.
With glue applied, carefully align the 5.5″ side pieces with the 48″ front board. Drive the 1 1/4″ pocket hole screws through the pre-drilled holes, creating a solid, rectangular frame that forms the front and sides of your floating ledge. This foundational assembly needs to be robust, as it will bear the weight of your decorations.
Step 4: Preparing and Attaching the Bottom Shelf
With the initial frame assembled, it’s time to incorporate the bottom shelf, which will sit within the structure you’ve just created. This shelf adds another layer of stability and completes the enclosed look of the ledge.
Take your 1×6 board. This piece needs to fit snugly between the two 5.5″ side supports. While an approximate measurement is 46.5″, it is always best practice to measure the actual interior distance of your assembled frame before making the final cut. This accounts for any slight variations in your previous cuts or assembly. Once cut, drill two pocket holes at each end of this 1×6 board. Important: Set this piece aside for now; do NOT attach it yet!
Now, take the U-shaped assembly (the 48″ front board with the two 5.5″ side pieces attached) and align it with the 2×10 main backboard. The open end of your U-shape should be flush with one edge of the 2×10. Apply wood glue along the contact surfaces, then use 1 1/4″ pocket hole screws to firmly attach the U-shaped frame to the 2×10, creating a robust, open-backed box structure.
Once the main frame is securely fastened to the 2×10 backboard, you can now carefully insert the pre-cut 1×6 bottom shelf piece. Apply wood glue to the edges where it meets the 5.5″ side boards and the 48″ front board. Then, drive 1 1/4″ pocket hole screws through the pre-drilled holes at its ends into the 5.5″ side boards, completing the enclosed structure of your ledge.
With the 1×6 bottom board now attached, the primary structure of your floating ledge is complete. This carefully planned assembly ensures maximum strength and a clean finish without visible fasteners on the exterior surfaces.
Step 5: Adding Elegant Crown Molding
Crown molding is a classic architectural detail that instantly elevates the look of any project, giving it a sophisticated, finished touch. For this floating ledge, it adds depth and character.
While a Kobalt 12″ sliding compound-miter saw offers precision and ease for cutting crown molding, it’s not a requirement for this project. Don’t let the lack of a specialized saw deter you! A simple miter box with a hand saw can achieve equally impressive results for both the crown molding and the straight cuts on your other boards. The key is understanding how to correctly position the crown molding in the miter box to get the proper angle for inside and outside corners. Typically, for external corners, you’ll cut at a 45-degree angle. Practice on a scrap piece first to get a feel for it.
Once cut, attach the crown molding pieces to the top edges of your ledge using a brad nailer. A Ryobi 18-Volt Brad Nailer is an excellent tool for this, allowing for quick and secure fastening with minimal visible holes.
After nailing, you may notice small nail holes or slight gaps where the crown molding meets the wood. This is where wood filler comes to the rescue. For any nails that aren’t perfectly flush, a nail set tool can gently push them below the surface without damaging the molding.
This handy little tool, combined with a hammer, will allow you to precisely set finishing nails below the surface, preventing dings or damage to your newly installed crown. Fill these tiny indentations with wood filler, smooth it out, and allow it to dry completely. A multi-pack of nail sets can be found at most hardware stores.
Once all the crown molding pieces are firmly attached, go over any seams, nail holes, or minor imperfections with wood filler. Apply sparingly, smooth with your finger or a putty knife, and then sand lightly once dry. This step creates a seamless appearance, preparing your ledge for painting.
Step 6: Adding a Decorative Wooden Scroll
A simple decorative scroll can add a touch of antique charm and intricate detail to your floating ledge, transforming it from functional to fabulous. This small addition can make a significant visual impact.
Decorative wooden scrolls are easily found at most home improvement stores like Lowe’s, often for around $6. They come in various sizes and designs, so you can choose one that best fits your aesthetic. We found that the $6 option was the perfect size for our ledge, offering just the right amount of embellishment without overwhelming the design.
To attach the scroll, simply apply a small amount of Gorilla Wood Glue to the backside of the scroll. Carefully center it on the front of your ledge, typically beneath the crown molding. Press firmly and allow the glue to dry completely. You might want to use painter’s tape to hold it in place while the glue sets, ensuring it doesn’t shift.
Step 7: Achieving a Distressed Finish with Vaseline
Once the glue on your decorative scroll has dried and all wood filler has been sanded smooth, it’s time for the exciting part: painting! We chose a popular distressed finish technique using Vaseline to create that desirable “chippy” and aged look. This method is incredibly easy and yields beautiful results, as seen on our beloved Vintage Bench project.
This technique requires two contrasting paint colors. Start with your base coat. We used Rust-Oleum Espresso spray paint for a rich, dark underlayer. Apply one even coat over the entire ledge, ensuring good coverage. Allow this first layer to dry completely according to the manufacturer’s instructions.
A single, thorough coat of your base color is all you need. This will be the color that peeks through to create the distressed effect.
Once the espresso base coat is dry, take a small amount of Vaseline and lightly rub a very thin layer over the areas where you want the brown paint to show through. Focus on the edges, corners, and any areas that would naturally show wear and tear over time. Don’t forget to apply it generously over the decorative wooden scroll to highlight its details. You can also dab it randomly on flat surfaces for a more organic distressed look. The Vaseline acts as a resist, preventing the top coat from adhering.
You don’t need to wait for the Vaseline to dry. Immediately proceed to apply your final top coat. We selected Rust-Oleum Heirloom White spray paint for its soft, elegant finish, which beautifully contrasts with the Espresso base.
Apply two even coats of Heirloom White, ensuring full coverage over the entire ledge, including the areas where Vaseline was applied. Allow the final coats of paint to dry thoroughly, ideally for 24-48 hours, to ensure optimal curing and durability. Rushing this step can lead to a less effective distressing process.
Once completely dry, it’s time for the magic of distressing! Take your 120-grit sandpaper and gently rub it over the areas where you applied Vaseline. You’ll quickly notice how easily the top layer of Heirloom White paint rubs away, revealing the rich Espresso color underneath. This creates that coveted “chippy” and aged look. Continue sanding until you achieve your desired level of distress. It’s an incredibly satisfying process that truly brings the piece to life!
Step 8: Securely Hanging Your Floating Ledge
Now that your beautifully crafted and painted floating ledge is complete, it’s time to install it securely on your wall. The key to a truly “floating” shelf is a robust and hidden mounting system. This method utilizes a wood cleat, ensuring your ledge is both sturdy and level.
Remember the 2×4 you purchased? Cut it approximately one inch shorter than the length of your 1×6 bottom board (which was roughly 46.5″, so cut your 2×4 to about 45.5″). This specific length ensures the cleat remains hidden once the ledge is installed. Next, determine the exact desired hanging location for your ledge on the wall. Use a stud finder to locate the wall studs within this area. Mark these stud locations with a pencil. Using 3″ wood screws, attach the 2×4 cleat horizontally to the wall, driving the screws directly into the center of the studs. For a 45.5″ cleat, you should be able to secure it with at least 3-4 screws for maximum stability.
With the 2×4 cleat firmly in place, carefully slide the open back of your finished floating ledge over the cleat. The interior of the ledge is designed to fit snugly around the cleat, creating the seamless “floating” effect. Once the ledge is positioned and level, drive 3″ screws down from the top surface of the ledge directly into the 2×4 cleat. We found that placing screws approximately 3/4″ in from the back edge of the top board worked perfectly, providing a secure hold without being visible from the front or sides. Take your time to ensure the ledge is perfectly level before final tightening.
Your DIY Floating Ledge is Complete!
Congratulations! You’ve successfully built your very own beautiful and sturdy floating ledge. Now comes the most enjoyable part: decorating it! This versatile piece will provide a stylish platform for your favorite books, plants, artwork, and decorative accents. Take a step back and admire your handiwork – a custom piece of furniture created with your own hands.
I am absolutely delighted with how my new Floating Ledge turned out! The distressed finish adds so much character, making it look like a treasured antique. It has truly transformed my dining/entry area. Now I’m already envisioning one for every room! Where will you choose to hang your floating ledge? What unique finish will you give it to match your home’s style? The possibilities are endless!
For decorating ideas, consider adding varying heights of objects. The tall, white vase pictured was a fantastic find at Target, while the shorter one came from HomeGoods. The mirror above the ledge was another fun DIY project, and I’ll be sharing that tutorial with you very soon!
If you’re inspired by this Floating Ledge project, we’d be incredibly grateful if you shared it by pinning it to your Pinterest boards! Your support helps us continue to create and share more exciting DIY tutorials.
Thank you for stopping by and happy building! ~Ashley 🙂