
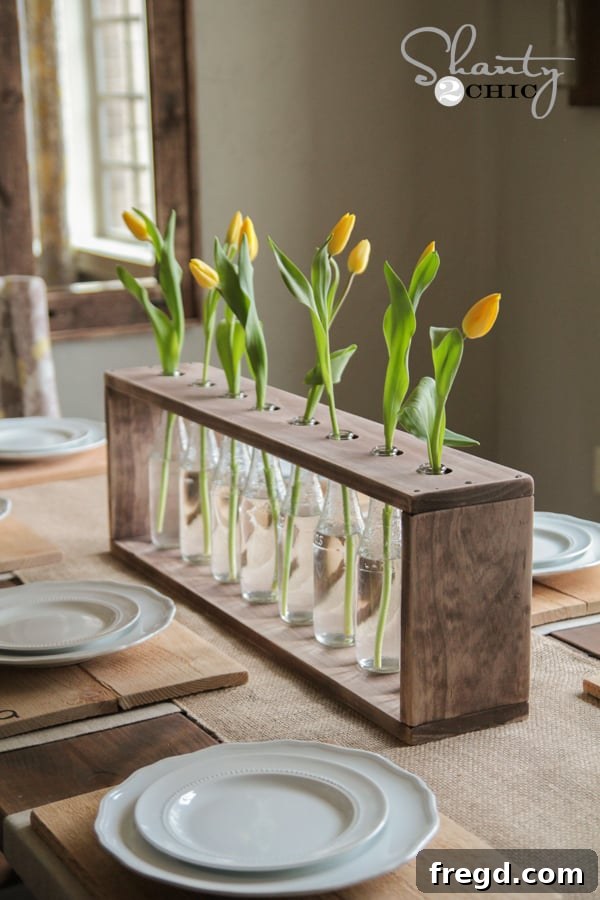
DIY Glass Bottle & Wood Vase: Craft a Beautiful, Budget-Friendly Centerpiece
Transform ordinary materials into an extraordinary piece of home decor with this inspiring DIY Glass Bottle and Wood Vase project. Perfect for beginners and incredibly budget-friendly, this project allows you to create a unique centerpiece that adds charm and character to any space. Whether you’re looking to enhance your dining table, adorn a mantel, or gift a handmade item, this comprehensive tutorial will guide you through every simple step. Best of all, it comes with free printable plans from the renowned DIY experts at Shanty2Chic, ensuring a smooth and enjoyable crafting experience from start to finish.
This engaging project is surprisingly quick to complete, often taking less than an hour for the woodworking phase itself. The real magic happens as you personalize it with your choice of finish and bottles, truly making it your own. It’s not just about building; it’s about creating something meaningful and sustainable. Get ready to dive into a rewarding DIY journey that culminates in a stunning, custom-made vase.
Table of Contents
Why Build a DIY Glass Bottle & Wood Vase?
In an age where mass-produced items often lack personal touch, creating something with your own hands offers immense satisfaction and a unique connection to your home decor. This DIY bottle vase project is more than just a craft; it’s an opportunity to embrace sustainable living by repurposing glass bottles that might otherwise be discarded. Not only does it help reduce waste, but it also allows for complete customization, making it an eco-friendly and stylish choice. Imagine a centerpiece that perfectly matches your home’s aesthetic, whether you lean towards rustic farmhouse, minimalist modern, or eclectic shabby chic. This project is incredibly versatile, making it suitable for various decor styles and personal tastes.
Furthermore, this project serves as an excellent entry point into basic woodworking, teaching fundamental skills like precise measuring, accurate cutting, safe drilling, and effective finishing techniques. All of this can be achieved without requiring extensive prior experience or an arsenal of expensive tools. The process is designed to be accessible and enjoyable, boosting your confidence in DIY projects. The end result is not just a functional vase but a charming, handmade piece of art that serves as a conversation starter and a testament to your creativity and resourcefulness. It’s a rewarding way to add warmth, character, and a touch of individuality to any room.
Materials and Tools You’ll Need
One of the most appealing aspects of this DIY vase is its simplicity and affordability. Most materials can be found at your local hardware store or even recycled from your home, and the tools required are common for any budding DIY enthusiast. Gathering everything beforehand ensures a smooth and uninterrupted crafting session.
- Wood Board: You’ll need one 1 x 6 x 8 Pine or Whitewood Board. Pine and whitewood are excellent choices due to their affordability, widespread availability, and ease of cutting and drilling. They take stain beautifully, providing a classic look. For a different aesthetic, you could consider reclaimed wood for an even more rustic feel, or a harder wood like oak or maple for increased durability and a distinct grain pattern, though these will require more effort to cut and drill. Remember that a “1×6” board typically has actual dimensions of 3/4 inch thick by 5 1/2 inches wide.
- Forstner Bit: A 1 3/8″ Ryobi Forstner Bit (or a comparable brand). Forstner bits are specifically designed to create clean, precise, flat-bottomed holes, which are crucial for the bottles to sit securely and evenly without wobbling. The 1 3/8-inch size is ideal for standard soda bottles.
- Drill: Any standard electric drill will suffice. An 18V cordless drill offers the convenience of portability and freedom from power outlets, but a corded drill works equally well. For the utmost precision and perfectly perpendicular holes, especially if you plan to make many of these, a drill press would be an invaluable asset.
- Brad Nailer: A brad nailer significantly speeds up the assembly process and creates strong, neat joints with minimal visible fasteners. A cordless model, such as the Ryobi AirStrike, is particularly convenient as it operates without the need for an air compressor and cumbersome hoses, allowing for greater mobility in your workspace.
- Wood Glue: High-quality wood glue is essential for creating robust and lasting joints. It provides a bonding strength that complements the nails, making your vase incredibly sturdy and durable for years to come.
- Glass Bottles: Eight soda bottles are required for this project. The original design successfully utilized Jarritos bottles from Target, known for their appealing shape and ease of cleaning. Feel free to experiment with different types of bottles—small wine bottles, vintage soda bottles, or even decorative glass containers—just ensure you adjust your Forstner bit size and overall vase dimensions to accommodate them. Thoroughly clean and dry all bottles before integrating them into your vase.
- Measuring Tape and Pencil: Absolutely crucial for accurate measurements and precise marking of your cuts and drill points. “Measure twice, cut once” is the golden rule here.
- Clamps: Essential tools for securely holding your wood pieces in place while cutting, drilling, and gluing. Clamps ensure stability, precision, and most importantly, safety during operation.
- Safety Gear: Always prioritize safety. Wear safety glasses when operating any power tools to protect your eyes from flying debris. Hearing protection is also recommended when using noisy saws.
- Finishing Supplies: Your choice of wood stain (e.g., Varathane Wood Stain) or paint, appropriate brushes or rags for application, and sandpaper (e.g., 80-grit for distressing, finer grits for smoothing before staining).
Step-by-Step Guide: Crafting Your Vase
Let’s break down the construction process into easy-to-follow steps, ensuring that even novice woodworkers can achieve a beautiful and functional vase. Precision in measuring and cutting will be key to a professional-looking finish, so take your time and double-check your work at each stage.
Step 1: Precision Cuts for Your Wooden Base
Your first task is to prepare the wooden components that will form the sturdy base of your vase. Using the recommended 1 x 6 x 8 pine or whitewood board, you will need to cut four distinct pieces. A miter saw is the ideal tool for making clean, square, and accurate cross-cuts, which are fundamental for ensuring your vase assembles perfectly without gaps. If a miter saw isn’t available, a circular saw equipped with a straight edge guide or even a sharp handsaw paired with a miter box can achieve satisfactory results with a bit more patience and careful technique.
The required dimensions for the four pieces are as follows:
- Top Piece: Cut one piece to 30 inches in length. This will be the panel where your bottles will rest.
- Bottom Piece: Cut one piece to 30 inches in length. This forms the solid base of your vase.
- Side Pieces (x2): Cut two pieces, each 8.25 inches in length. These will connect the top and bottom pieces, forming the sides of your vase.
These specific dimensions are carefully chosen to perfectly accommodate the Jarritos soda bottles used in the original project. If you’ve decided to use different bottles with varying heights, it’s crucial to adjust the length of your side pieces accordingly. A practical guideline is to cut the side pieces approximately 1/2 inch shorter than the height of your chosen bottles. This ensures that the bottles sit slightly proud of the side panels when placed in the vase, creating an aesthetically pleasing presentation and easy access for cleaning or refilling. Always adhere to the woodworking adage: “Measure twice, cut once” to avoid errors and conserve materials. Remember to wear your safety glasses when operating any cutting tools.
Step 2: Drilling Perfect Bottle Openings
With your wood pieces accurately cut, the next crucial step involves drilling the precise openings that will cradle your glass bottles. This stage is critical for both the functionality and the aesthetic appeal of your finished vase. You will only be drilling holes into the top 30-inch piece of wood, as this is where the bottles will be inserted.
For this task, a 1 3/8-inch Forstner bit is highly recommended. Forstner bits are superior for creating clean, perfectly round, and flat-bottomed holes without splintering, which is essential for ensuring the bottles sit securely and uniformly within the wooden frame. These specialized bits are readily available at major hardware stores, such as Home Depot, where you can often find them sold individually or as part of a versatile set suitable for various woodworking projects.
Before you begin drilling, it is paramount to firmly clamp the 30-inch top piece to a sturdy workbench or, ideally, a scrap piece of wood. Clamping prevents the workpiece from shifting during drilling, significantly enhancing both safety and the accuracy of your holes. Utilize your drill, preferably an 18V cordless model for its convenience and maneuverability, to carefully create the eight required openings.
For consistent and visually appealing spacing, meticulously mark the center of each hole. Start by measuring 2.5 inches from one end of the 30-inch board to pinpoint the center of your first hole. All subsequent holes should then be drilled with their centers precisely spaced 3.5 inches apart from each other. This methodical layout will guarantee an even distribution and a balanced, professional appearance for all eight bottles. Drill slowly and steadily, allowing the Forstner bit to cut cleanly through the wood. Periodically lift the bit to clear wood chips, which helps prevent overheating, reduces friction, and ensures a cleaner cut. Remember to keep your safety glasses on throughout this step.
Step 3: Assembling Your Vase Structure
Now comes the satisfying part: bringing your precisely cut and drilled wooden pieces together to form the complete vase structure. This assembly step is made significantly easier, faster, and more efficient with the use of a brad nailer. Its ability to quickly create strong joints with minimal visible fasteners makes it a favorite tool among DIY enthusiasts. The original project specifically highlights the immense convenience of a cordless brad nailer, which often shares batteries with other power tools like drills, completely eliminating the hassle of air compressors and cumbersome hoses. This makes your workspace tidier and allows for greater mobility.
Begin the assembly process by attaching the two 8.25-inch side pieces to the 30-inch bottom piece. Before you reach for the nailer, apply a thin, consistent bead of high-quality wood glue along each seam where the pieces will join. Wood glue is absolutely essential here; it provides incredible strength and permanence to the joint, making your vase robust and exceptionally durable. Align the side pieces flush with the ends of the bottom piece, ensuring square corners. Once positioned correctly, use your brad nailer to secure them in place. Aim for several nails along each joint for optimal holding power and stability.
Once the side pieces are securely attached to the bottom, it’s time to add the final piece: the top panel with the pre-drilled holes. Apply another thin, even line of wood glue to the top edges of the two side pieces. Carefully position the top 30-inch board, ensuring it is perfectly aligned with the bottom piece and precisely flush with the side panels. Once correctly aligned, use your brad nailer to fasten the top board firmly in place, firing nails through the top piece into the side pieces below. Allow adequate time for the wood glue to dry completely and cure according to the manufacturer’s instructions before proceeding to the finishing steps. This drying time is crucial for the vase’s structural integrity.
With all components now assembled, you’ll witness your vase taking its final, recognizable shape! It’s an incredibly satisfying moment to see the raw wood pieces transform into a functional and beautiful structure ready for its aesthetic enhancements.
Step 4: Finishing Touches and Personalization
The finishing stage is where your vase truly comes to life and reflects your personal style, transforming the raw wood into a polished piece of decor. You have a wide array of options, from stains to paints, to achieve your desired aesthetic. The original project opted for a beautiful wood stain, which highlights the natural grain of the wood.
If you choose to stain your vase, select a high-quality wood stain (such as this stain, as recommended by Shanty2Chic, known for its quick-drying properties and rich color). Apply the stain evenly with a brush, foam applicator, or a clean lint-free cloth, always moving in the direction of the wood grain. Allow the stain to penetrate for a few minutes; generally, the longer it sits, the darker and more saturated the finish will be. After the desired penetration, use a clean rag or an old t-shirt to thoroughly wipe off any excess stain. This particular stain is highly praised for its efficiency, often requiring only one coat and drying in under an hour, which significantly speeds up the project timeline. Always work in a well-ventilated area and meticulously follow the manufacturer’s instructions for drying times, recoating, and proper disposal of rags.
For those who prefer a “shanty” or distressed, vintage appearance, consider incorporating a sanding step after your chosen finish has dried. Once the stain or paint is completely dry and cured, use a sander (a detail sander like a Ryobi Corner Cat Sander is excellent for this) with 80-grit sandpaper. Lightly sand over the entire piece, focusing on edges, corners, and flat surfaces that would naturally show wear over time. This technique thoughtfully creates a beautiful, aged patina that adds depth, texture, and character, imparting a truly unique, weathered charm to your vase that tells a story.
Beyond staining and distressing, other finishing options abound. You could paint your vase with chalk paint for a soft, matte finish, or use a durable latex paint for a vibrant splash of color. Applying a clear wax can add protection and a subtle sheen, while a polyurethane topcoat will provide maximum durability and a glossy finish, perfect for high-traffic areas. The choice of finish is entirely yours, limited only by your imagination and the style you wish to achieve for your home decor.
Adding Your Bottles and Styling Your Creation
Once your wooden vase base is completely dry and beautifully finished, the moment arrives to add the glass bottles and truly bring your centerpiece to life! The original project masterfully utilized Jarritos soda bottles, which are conveniently found at stores like Target. These particular bottles often boast vibrant colors and an inherently appealing vintage aesthetic, making them ideal candidates for repurposing into charming decorative elements. After enjoying the delicious beverages, it’s crucial to ensure that all bottles are thoroughly cleaned and completely dried before carefully placing them into the pre-drilled openings in your wooden base.
Now for the most creative and enjoyable part: styling your newly crafted vase! Whether you choose fresh-cut flowers, elegant artificial blooms, whimsical decorative branches, or even dried grasses, your new vase is perfectly ready to display them with grace and charm. The original creator opted for fresh tulips, which look absolutely stunning nestled within each bottle, adding a pop of color and natural beauty. Consider selecting seasonal flowers to create a rotating display that reflects the time of year, or use a thoughtful mix of greenery and smaller blossoms for a charming, rustic arrangement that complements your interior.
For an extra touch of unique character and visual interest, small decorative elements can be easily incorporated. The original project, for instance, included a few black furniture tacks strategically placed on the top surface. These tacks are purely for aesthetic enhancement and do not contribute to the structural integrity of the vase, but they add a delightful “fun touch” and subtly enhance the rustic or industrial appeal. Think about wrapping jute twine around the neck of a few bottles, adding small decorative beads, or even attaching personalized labels to each bottle for a truly bespoke look.
This project’s incredible versatility allows for endless creative expression. Place your finished DIY Glass Bottle and Wood Vase as a striking centerpiece on your dining table, a welcoming accent on an entryway console, a unique decor piece on a bookshelf, or even adorning a kitchen island. Its simple elegance and customizable nature mean it will effortlessly complement a wide range of interior design styles, from cozy farmhouse and rugged industrial to minimalist modern and even bohemian chic. Considering it’s crafted from an affordable wood board and repurposed bottles, the transformation into such a stylish, unique, and budget-friendly decor item is truly impressive and deeply satisfying.
Tips for Success and Common Pitfalls
Even with a relatively straightforward project like this, a few extra tips and an awareness of common pitfalls can make your DIY experience much smoother and ensure your finished product is even better.
- Measure Accurately: This cannot be stressed enough. Small inaccuracies in your cuts or the placement of your drilled holes can lead to bottles that wobble, an uneven vase structure, or frustrating assembly challenges. Always use a reliable measuring tape and mark your measurements clearly with a sharp pencil.
- Prioritize Safety: Always wear appropriate safety glasses when operating any power tools. If you’re using a miter saw or circular saw, ensure all safety guards are correctly in place, and always keep your hands a safe distance from the blade. When drilling, especially with larger bits, securely clamp your workpiece to prevent it from moving unexpectedly.
- Wood Choice Considerations: Pine and whitewood are excellent and forgiving choices for beginners due to their softness and ease of working. If you opt for a harder wood, such as oak or maple, be prepared for more resistance when cutting and drilling, and ensure your saw blades and drill bits are sharp and suitable for hardwood.
- Optimizing Drilling Technique: When using a Forstner bit, apply steady, even pressure. If your drill has variable speed settings, start at a slower speed to prevent the bit from “walking” across the wood surface, and gradually increase the speed as the bit establishes its cut. For exceptionally clean holes, particularly to prevent tear-out on the underside of your top panel, place a sacrificial piece of scrap wood directly beneath your workpiece before drilling all the way through.
- Effective Glue Application: Avoid the temptation to use too much wood glue. A thin, even bead applied to the joining surfaces provides maximum bonding strength. Any excess glue that squeezes out during assembly should be promptly wiped away with a damp cloth before it dries, as dried glue can create an undesirable barrier that prevents wood stain from absorbing evenly, leaving lighter patches.
- Ensuring Finishing Uniformity: Before committing to your chosen finish on the entire vase, always test it on a small, inconspicuous area or, even better, a scrap piece of the same wood you used. This allows you to accurately predict the final color and experiment with application techniques to achieve your desired look. When staining, apply the product evenly and wipe off excess thoroughly to ensure a consistent and streak-free finish.
- Bottle Fit Check: Before applying any glue or permanently assembling the entire structure, it’s wise to perform a “dry fit” of your bottles into the drilled holes of the top piece. This ensures they fit snugly but can still be easily inserted and removed for convenient cleaning or refilling.
- Maintenance and Care: To ensure your beautiful wood vase remains in excellent condition for years, avoid prolonged exposure to excessive moisture. If water spills on the wood, wipe it up immediately. For general cleaning, a lightly damp cloth is usually sufficient. Over time, you might consider reapplying a fresh coat of your chosen finish or a protective wax to refresh the wood’s appearance and enhance its longevity.
By keeping these practical tips in mind, you’ll not only successfully create a stunning DIY Glass Bottle and Wood Vase but also gain invaluable woodworking experience and confidence that will serve you well in future creative endeavors. Enjoy the process and the beautiful outcome!
Download Your Free Printable Plans
Ready to transform your creative vision into a tangible centerpiece? To make this project even more accessible and straightforward, our friends at Shanty2Chic have generously provided a comprehensive set of free printable plans. These plans offer detailed measurements, clear cutting lists, and helpful diagrams, serving as your reliable guide throughout the entire construction process. Don’t hesitate to download them and keep them handy at your workbench while you bring your wooden bottle vase to life.
CLICK HERE OR THE IMAGE BELOW TO DOWNLOAD THE FREE PRINTABLE PLANS
We genuinely hope you enjoy the rewarding experience of building your very own DIY Glass Bottle and Wood Vase. This project is a fantastic and budget-friendly way to add a deeply personal and stylish touch to your home decor, or to create a heartfelt handmade gift. We’d absolutely love to see your finished creations and how you’ve personalized them! Please feel free to share this project with your friends, family, and fellow DIY enthusiasts, inspiring even more people to create something beautiful with their hands.
Happy crafting and have an awesome week filled with creativity!
~Whitney