
Unleash the Fun: DIY Nerf Dart Board with an Educational Twist
Every parent knows the scene: those ubiquitous Nerf darts seemingly materializing in the most unexpected places. If you’re a parent of energetic boys (or girls!), you’re likely familiar with the delightful chaos that comes with a collection of foam blasters and countless darts. I certainly am, and that’s precisely why my latest DIY project brings such a wide grin to my face. It’s not just about creating something; it’s about reclaiming order, fostering creativity, and adding a dash of learning to playtime.
Have you ever discovered Nerf darts stuck to your pristine windows, like these?
Or perhaps in even more adventurous spots, like your ceiling fan?
Yes, you read that right. The ceiling fan! My boys have impressively good aim, a fact that often leads to darts landing in gravity-defying locations. While their marksmanship is admirable, the constant retrieval and the general disarray of darts scattered across every surface can be a real challenge for parents trying to maintain a semblance of tidiness. The desire for a dedicated, fun, and perhaps even educational landing zone for these foam projectiles became the driving force behind this project.
The Solution: A Custom DIY Nerf Dart Board
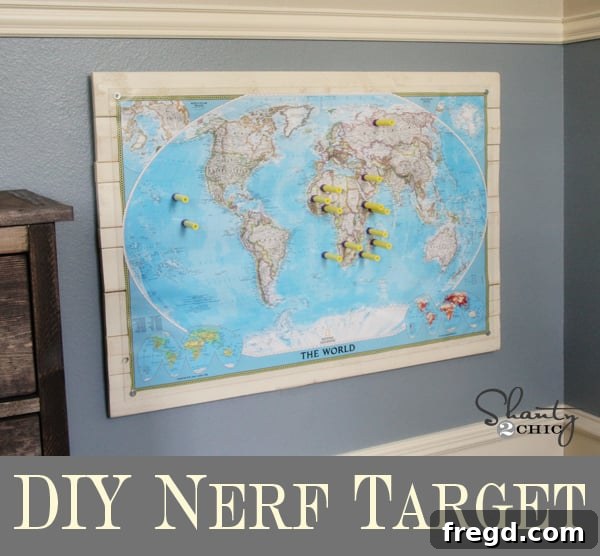
In a determined effort to give these energetic darts a proper, designated home, I embarked on creating a custom dart board for my son’s room. The goal was to build something functional, durable, and aesthetically pleasing that would not only serve as a target but also add a unique touch to his personal space. And let me tell you, the outcome exceeded my expectations!
You might be wondering about the world map. A map for a dart board? It might seem a little unconventional at first glance, but there’s a brilliant reason behind this choice, and I’ll dive into that in just a moment. This project proved to be incredibly rewarding, offering a perfect blend of creativity, practicality, and educational value. It’s a wonderful way to repurpose materials, personalize a child’s room, and tackle the universal problem of scattered Nerf darts.
Crafting the Foundation: Building the Wooden Frame
One of the best parts about this project is how quickly it comes together, especially if you have some basic woodworking skills and a few scrap pieces of wood lying around. For the sturdy wooden board that forms the base of this dart target, I utilized leftover pieces of 1×2 and 1×3 lumber. This is a fantastic opportunity to reduce waste and give new life to materials that might otherwise go unused. The construction method I employed for the frame is actually quite similar to how I crafted my popular wood LOVE sign that hangs above my couch. If you’re curious about the exact joinery and structural integrity, that tutorial provides a comprehensive guide.
Here’s a sneak peek at the back of the frame, giving you an idea of the simple yet robust construction:
For a complete, step-by-step breakdown on constructing the wooden base, including detailed diagrams and tips, you can refer to the full tutorial for my wood LOVE sign here. It demonstrates how to assemble scrap pieces into a solid, appealing foundation for various DIY projects.
Adding Character: The Paint Finish
After assembling the sturdy wooden frame, it was time to add some personality with paint. Given that I’ve stained nearly every other wooden piece in my son’s room, I opted for a painted finish for this dart board to create a nice contrast and add a fresh look. I used the same sophisticated color as the trim in his room – a beautiful Valspar shade called Ivory Lace. This ensures the dart board seamlessly integrates into the room’s existing color scheme while still standing out as a focal point.
To achieve a rustic and slightly weathered aesthetic, I chose a dry-brushing technique, primarily along the edges of the wooden planks. This method allows some of the natural wood grain to show through, creating a charming, somewhat messy yet intentional, aged appearance. The slight imperfections and visible wood texture enhance the handmade feel of the dart board, making it truly unique and adding depth to its design.
The Genius Twist: A World Map Target
Now, let’s address the most exciting and unique aspect of this Nerf dart board: the world map. The inspiration for this element came directly from my son’s interests. He has a genuine fascination with globes and thoroughly enjoys educational games like “Stack the Countries,” which combines geography with fun challenges. Crucially, like most boys his age, he also absolutely loves to shoot *everything* with his Nerf blasters.
I realized this was an incredible opportunity to combine two of his passions into one engaging activity. By transforming a world map into a dart target, we could create an interactive learning tool that makes practicing geography both exciting and dynamic. Imagine him aiming for specific countries, continents, or oceans, all while having a blast! It’s a brilliant way for him to learn about different places, practice reading country names, and even develop a sense of global awareness, all under the guise of playful target practice. It’s truly a winning combination: education meets entertainment.
Finding the perfect map poster was surprisingly easy; I sourced mine from Amazon, but you could honestly use any large poster or printed image that appeals to your child. The key is to select a design that is visually engaging and durable enough to withstand being covered. Once I had the map, I carefully laid it flat and centered it perfectly on the prepared wooden board, ensuring all edges were aligned for a professional finish.
The Protective Shield: Plexiglass Application
To protect the map from constant dart impact and to provide a smooth, dart-friendly surface, I opted for plexiglass. This material is an excellent choice for several reasons: it’s not overly expensive, it’s lightweight, and it offers excellent durability. A fantastic bonus was that my local Lowe’s store offered free cutting services, so I was able to get the plexiglass cut to the precise dimensions of my wooden board without any extra cost.
Once I had the plexiglass sheet perfectly sized, the next step was to prepare it for mounting. I used my trusty drill to carefully make a hole in each of the four corners of the plexiglass sheet. This process requires a steady hand and appropriate drill bits for plexiglass to prevent cracking. Ensuring these holes are evenly spaced and positioned correctly is crucial for securing the cover flush against the map and wooden board.
With the holes drilled, the final step was to secure the plexiglass to the wooden board. I used wood screws combined with washers for this task. The washers are important as they help distribute the pressure of the screw head over a wider area, preventing the plexiglass from cracking and ensuring a snug, secure fit. This method firmly holds the map in place, protecting it from damage while providing a resilient surface for the Nerf darts to stick to. The transparency of the plexiglass allows the vibrant details of the world map to shine through, making it an engaging target.
Installation and Enjoyment: Mounting the Dart Board
And that’s really all there is to it! Once the plexiglass was securely attached, the custom Nerf dart board was complete and ready for its grand debut. To mount it safely and securely on the wall in my son’s room, I used a couple of sawtooth hangers. These are incredibly easy to install on the back of the wooden frame and make hanging a breeze, allowing for quick adjustments to ensure the board is perfectly level.
The transformation in his room was instant. What was once a collection of scattered darts now has a dedicated, engaging, and visually appealing target. It not only helps with organization but also adds a fantastic element of fun and learning to his play space. This DIY project truly elevates a simple activity into something more meaningful and impactful for a child’s development.
The real joy, of course, comes from seeing it in action. My son was absolutely thrilled with his new personalized dart board. It provides endless hours of entertainment, allowing him to practice his aim without the darts ending up in unexpected corners of the house. The map adds an extra layer of challenge and educational engagement, turning every shot into a mini-geography lesson.
And yes, the darts stick perfectly to the plexiglass, just as intended! It’s durable, easy to clean, and provides a satisfying “thwack” when hit. This ensures that the dart board remains a primary target, diverting darts from windows, fans, and unsuspecting household items.
Witnessing his focused determination and the sheer enjoyment he gets from aiming at the world map is truly priceless. It’s more than just a dart board; it’s a canvas for adventure, learning, and imaginative play right in his own room.
A Double Win: Happy Kids, Happy Parents
He’s definitely a happy camper with his new custom Nerf target. In fact, I have two very happy customers now!
They might be a little camera shy, but their smiles tell the whole story. This project wasn’t just about making a dart board; it was about creating a dedicated, safe, and stimulating space for play, while also discreetly integrating learning opportunities. It’s a testament to how DIY projects can address practical parenting challenges with creative and engaging solutions.
Share the Fun & Stay Connected!
Thank you so much for stopping by and checking out this exciting DIY Nerf dart board project! If you’re a parent struggling with the pervasive presence of Nerf darts across every conceivable surface in your home, constantly pulling them off windows, furniture, and even the ceiling, then this project might be your saving grace.
I would absolutely love for you to share this idea with any other “mommies (or daddies!) going bonkers” in their quest for dart organization and engaging playtime solutions. Let’s spread the word and help more families create fun, functional, and educational play spaces for their children. You can easily share this post on your favorite social media platforms or directly with friends and family who could benefit from this creative DIY idea.
Do you have your own creative solutions for organizing Nerf darts or unique DIY projects for kids’ rooms? I’d love to hear your ideas and experiences in the comments below! Your insights could inspire the next great project.
Have a wonderful and creative day!
~Whitney