
From Craigslist Find to Nursery Charm: A Vintage Trunk’s Inspiring Transformation Story
There’s an undeniable rush that comes with uncovering a hidden gem, especially when it’s found through channels like Craigslist. The thrill of the hunt, the strategic negotiation, and the sheer satisfaction of bringing a forgotten piece back to life is an experience many DIY enthusiasts cherish. For me, the journey from spotting a potential treasure online to giving it a vibrant new purpose is truly exhilarating. It’s not just about saving money; it’s about seeing the inherent beauty and potential in something overlooked, and then pouring creativity into making it uniquely yours. This particular story is about one such remarkable find – an old trunk that embarked on a fascinating journey, from a forgotten piece to a cherished focal point in a beloved nursery.
The Allure of Vintage: Unearthing a Craigslist Treasure
This magnificent old trunk stands out as one of my all-time favorite Craigslist discoveries. There’s a certain magic in acquiring pre-loved furniture; each piece carries a story, a history that adds character and depth to any home. The process itself is part of the adventure. You scroll through endless listings, hoping to catch a glimpse of that perfect item that resonates with your vision. Once you find it, there’s the excitement of sending that first inquiry, confirming its availability, and then the delightful dance of bargaining to secure it at a great price. This whole experience, from the initial search to the final pickup, is a total adrenaline rush for any dedicated DIYer or vintage enthusiast. It’s a testament to the fact that you don’t always need to buy new to achieve stunning home decor. Often, the most unique and charming pieces are those that have patiently awaited a second chance.
Before its ultimate transformation, this trunk boasted a classic, somewhat worn appeal. It was a blank canvas brimming with potential, just waiting for a creative touch to bring out its best. Its sturdy build and generous size hinted at its versatility, making it an ideal candidate for a variety of uses within a home. The slight imperfections, the faded finish, all contributed to its vintage charm, promising an even richer story once it was given a new lease on life. Finding such a piece isn’t just about buying furniture; it’s about investing in a project, a future vision, and the satisfaction of personalizing your living space.
From Living Room Centerpiece to a New Calling: The Evolution of a Trunk
For nearly two years, this magnificent trunk proudly held its place in our living room, serving as a robust coffee table. It was a piece I adored for its unique style and rustic elegance, injecting a dose of character into the space. I appreciated its visual weight and the historical charm it brought to the room, creating an instant focal point that spoke volumes about curated decor. However, as is often the case in family homes, aesthetic preferences can sometimes clash with practical needs. While I gravitated towards its charming visuals, my husband and our boys had a different perspective. Their primary concern was function, seeking surfaces that were easy to navigate around, simple to clean, and perhaps less “fragile” in the dynamic environment of a bustling household. They wanted open space and practical access, a stark contrast to my vision of curated style and vintage allure.
The inherent conflict between my desire for unique, stylish decor and their need for straightforward, practical furniture eventually led to a pivot. After almost two years, the men of the house finally had their way, and the search began for a new living room solution. But what became of my beloved trunk? This wasn’t the end of its story; it was merely the beginning of its next chapter. I knew its potential was far too great to let it go, and a new, more suitable purpose was already beginning to form in my mind. This decision perfectly illustrates the art of repurposing – recognizing that a piece of furniture might not fit one space or function but could be absolutely perfect for another. This flexibility is key to sustainable and creative home decorating, allowing pieces to evolve with your family’s needs and tastes.
The Vision for a Nursery: A Bright New Future as a Toy Box
The beauty of repurposing lies in its ability to transform. When the trunk’s tenure as a coffee table concluded, a wonderful new opportunity presented itself: the impending arrival of Tenley and the creation of her nursery. I immediately saw the trunk’s potential to become an integral, charming, and highly functional part of her new room. Its spacious interior was ideal for storing toys, blankets, or even out-of-season clothing, offering a stylish solution to keep clutter at bay in a space that would soon be filled with tiny treasures. The robust construction of the vintage trunk also meant it could withstand the playful energy of a child’s room, making it a durable and long-lasting storage solution.
The vision was clear: to give this vintage piece a complete makeover, ensuring it seamlessly blended with the soft, inviting aesthetic of a baby’s room. This meant moving away from its original dark, rustic finish and embracing a brighter, more playful palette. The goal was to transform it from a slightly masculine living room piece into a warm, welcoming addition to a child’s sanctuary, reflecting the joy and vibrancy associated with new beginnings. Repurposing not only saves money but also injects a unique, personal touch that mass-produced nursery furniture simply cannot replicate, making Tenley’s room truly one-of-a-kind.
The Art of Transformation: A Step-by-Step DIY Makeover Guide
Transforming this old trunk required more than just a coat of paint; it was a meticulous process of preparation, painting, and distressing to achieve the desired look. For anyone embarking on a similar DIY furniture makeover, paying attention to each step ensures a professional and lasting finish. Here’s how this vintage piece was given its stunning new lease on life:
1. Preparation is Key: Cleaning and Light Distressing for Adhesion
Before any paint could touch its surface, the trunk needed thorough cleaning. Years of use meant accumulated dust and grime had to be meticulously removed to ensure proper paint adhesion. A damp cloth and a mild cleaner were used to wipe down every surface, followed by a dry wipe to ensure it was completely dry. Once clean, the next crucial step was light distressing. Armed with my trusty 3M sanding block, I carefully scuffed areas of the trunk. This wasn’t about aggressive removal of the old finish, but rather creating subtle imperfections and providing a ‘key’ for the new paint to adhere to. This light sanding technique also allows for a natural, aged look to peek through once the new paint is applied and further distressed, adding character without sacrificing durability. This preparatory phase is often overlooked but is absolutely essential for a professional and long-lasting finish on any DIY furniture project, preventing chipping and ensuring a smooth base.
2. Embracing Color: The Perfect Shade of Yellow with Rust-Oleum
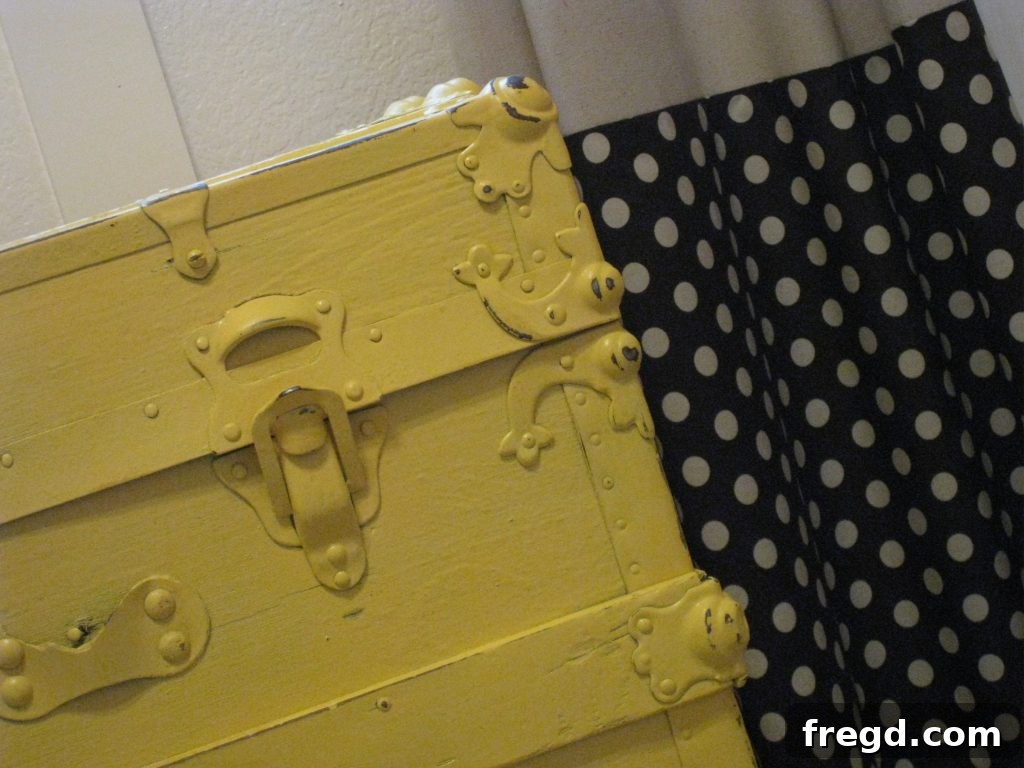
For the nursery, I envisioned a color that was cheerful, bright, and utterly delightful. My absolute favorite yellow, Rust-Oleum Summer Squash, was the perfect choice. This vibrant, sunny hue instantly injects warmth and playfulness, making it ideal for a child’s room. Yellow is known for its ability to uplift spirits and create an inviting atmosphere, perfect for a little one’s sanctuary. I used two cans of this fantastic spray paint to ensure complete, even coverage over the entire trunk. When painting, especially with spray paint, it’s vital to apply several thin coats rather than one thick one. This prevents drips, allows for better adhesion, and ensures a smooth, professional-looking finish. Each coat was allowed adequate drying time between applications, building up the color gradually until the trunk was beautifully enveloped in its new, cheerful shade. The transformation in color alone was remarkable, breathing fresh life into the old wood and metal and setting the stage for its new role.
3. The Art of Distressing: Adding Authentic Vintage Charm
With the yellow paint thoroughly dried, the final touch was to distress the trunk, a technique that adds an authentic, time-worn character. Using the same 3M sanding block, I lightly sanded along the edges, corners, and raised details – areas where natural wear and tear would typically occur over years of use. This subtle abrasion allowed glimpses of the original, darker finish to show through, creating a beautiful contrast and enhancing the vintage appeal. The art of distressing isn’t about damaging the piece, but rather highlighting its history and giving it a soft, lived-in look that complements the cozy atmosphere of a nursery. This step truly elevated the trunk from a simple painted piece to a thoughtfully curated item with depth and personality, making it a unique statement piece rather than just a storage container.
The Grand Reveal: A Perfect Addition to Tenley’s Nursery
The completed trunk, now radiating a joyful Summer Squash yellow with just the right amount of distressed charm, found its perfect home in Tenley’s nursery. It wasn’t merely a piece of furniture; it was a lovingly transformed treasure, ready to serve a new purpose. The bright yellow brings a cheerful pop of color to the room, seamlessly integrating with the nursery’s theme and adding a touch of whimsy and warmth that is both inviting and stimulating for a growing child.
I envisioned this trunk making the perfect toy box, and it absolutely does. Its robust construction can withstand the daily adventures of childhood, while its ample storage capacity ensures that toys, books, and blankets have a designated, stylish place. This eliminates clutter, making the nursery a serene and organized space, which is a blessing for any parent. Beyond its practicality, its unique vintage character ensures the nursery has a distinctive, personalized feel that store-bought furniture often lacks. It’s a piece with a story, now woven into the fabric of a new family’s life.
The beauty of this project lies not just in the aesthetic outcome, but in the story it tells. It’s a reminder that with a little imagination and effort, old items can be given a completely new lease of life, fulfilling new functions and adding immense character to a home. This trunk now stands as a testament to the power of DIY and the joy of creating something truly special and meaningful. It fits the nursery theme beautifully, creating a harmonious and inviting atmosphere that Tenley will surely grow to love and cherish for years to come. This creative storage solution is a prime example of sustainable decorating.
And speaking of new beginnings, the living room also received its own refresh. The replacement for the trunk is another exciting story for another post, but rest assured, it too perfectly complements our evolving style and functional needs. This continuous cycle of updating and repurposing is what makes a house truly feel like a home, reflecting our journey, creativity, and ever-changing personal tastes. It’s about crafting spaces that resonate with who we are and how we live.
Join the DIY Community: Share Your Transformations!
Now that you’ve seen one inspiring transformation, we’re eager to hear about your own creative endeavors! Do you have projects waiting in the wings, or perhaps some fantastic “without your hubby’s” creations you’re proud of? The DIY community thrives on shared inspiration and the celebration of individual craftsmanship. It’s truly amazing to see the ingenuity and resourcefulness everyone brings to their homes, transforming ordinary items into extraordinary pieces.
We absolutely can’t wait to see what incredible projects you, our fellow DIY enthusiasts, have been working on this month! Whether it’s a small refresh or a major overhaul, every effort to personalize and enhance your living space is worth celebrating. Sharing your projects not only gives you a chance to show off your hard work but also inspires others to pick up a paintbrush or a sanding block. So, gather your photos and prepare to inspire others. Join our community and link up your latest transformations with us this coming Thursday, April 7th. Let’s celebrate the joy of creating, repurposing, and making our homes truly our own, one DIY project at a time!