
Transform Your Home with DIY Mason Jar Apothecary Jars: A Step-by-Step Vintage Decor Tutorial
Oh, hello fellow crafters and home decor enthusiasts! I am absolutely thrilled to share a project with you today that brought me so much joy to create. This DIY Mason Jar Apothecary Jar tutorial is not only incredibly fun but also results in stunning, personalized decor pieces that I’m sure you’ll love making for your own home or as thoughtful gifts. Get ready to unleash your creativity!
The inspiration for this charming craft struck me quite serendipitously. A while back, during a weekend trip to Michael’s with my friend Ashley, I was checking out while she was flipping through a magazine. She excitedly called me over to show me an article featuring a lady who ingeniously crafted apothecary jars from simple mason jars. Immediately, my imagination took flight, and my crafting wheels started spinning!
While I regret that I didn’t catch the title of the magazine or the name of the inspiring artisan to give a proper shout-out, her innovative idea certainly lit a spark. Although my final apothecary jars took on a slightly different style, her vision was the catalyst for this wonderful project. It just goes to show how a small idea can blossom into something truly unique and personal.
What makes this project even better is its affordability and accessibility. You don’t need to break the bank to gather the supplies. I managed to find all the necessary components for my jars at Hobby Lobby, with the total cost coming in at under $8 per jar. This makes it an ideal budget-friendly decor upgrade or a fantastic option for crafting multiple gifts without extensive expense. Besides the main items, you’ll also need a small piece of burlap, which is a versatile and inexpensive material that adds a lovely rustic touch.
Join me as we embark on this delightful crafting journey to transform ordinary mason jars into elegant apothecary jars, perfect for adding a touch of vintage charm and personalized flair to any space!
Why DIY Apothecary Jars? Beyond Just Decoration
DIY apothecary jars offer more than just aesthetic appeal; they bring a host of benefits that make them a worthwhile crafting endeavor:
- Cost-Effective Elegance: Achieve a high-end, vintage look without the designer price tag. Repurposing inexpensive items like mason jars and dollar store candlesticks keeps the budget low.
- Personalized Home Decor: Tailor your jars to perfectly match your home’s aesthetic. Choose paint colors, distressing levels, and embellishments that reflect your unique style, whether it’s farmhouse, shabby chic, or rustic.
- Unique & Thoughtful Gifts: Handmade gifts carry a special sentiment. Fill these personalized jars with treats, bath bombs, or small trinkets to create memorable presents for teachers, friends, or family members.
- Versatile Storage Solutions: Beyond their decorative function, these jars can be incredibly practical. Use them in bathrooms for cotton balls or Q-tips, in an office for paperclips, or in a craft room for buttons and beads.
- Eco-Friendly Crafting: Embrace sustainability by upcycling and repurposing materials. Giving new life to old items reduces waste and promotes mindful consumption.
- Creative Outlet & Stress Relief: Engaging in hands-on crafting is a fantastic way to unwind, express creativity, and achieve a sense of accomplishment.
Essential Supplies for Your Mason Jar Apothecary Jar Project
Before we dive into the creative process, let’s ensure you have all the necessary supplies on hand. Remember, most of these items can be found at local craft stores like Hobby Lobby or Michael’s, and often for very reasonable prices. Don’t be afraid to hunt for deals or use coupons!
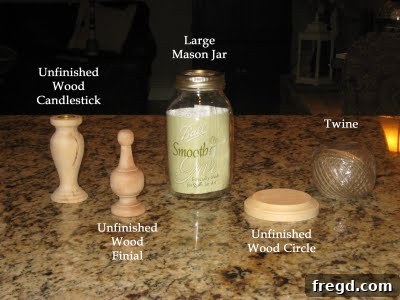
- Mason Jar: One standard-sized mason jar with its lid. Any size will work, but wider-mouth jars are often easier to fill and decorate.
- Wooden Circle Base: One wooden circle, approximately the same diameter as the base of your mason jar. This will provide a stable foundation.
- Wooden Candlestick: One wooden candlestick. Look for one with a classic shape that complements the vintage aesthetic. Thrift stores are great places to find unique ones!
- Wooden Finial: A decorative wooden finial. This will be the elegant topper for your jar lid, adding that authentic apothecary look.
- Strong Adhesive: Gorilla Glue or a similar heavy-duty craft adhesive (like E6000) for securing the candlestick to the wooden base and the jar to the candlestick.
- Hot Glue Gun & Glue Sticks: Essential for quickly attaching lighter elements like burlap and twine.
- Spray Paint: A can of Rustoleum American Accents Heirloom White spray paint (or your preferred color). This shade offers a beautiful, soft, aged look.
- Burlap Fabric: A small piece of burlap, roughly 5 inches by 5 inches, to cover the lid.
- Twine: Natural twine or decorative string for wrapping around the lid.
- Optional: Small Embellishment: A small pewter cross, charm, button, or other decorative item to tie onto the twine. (I found a pewter cross at Hobby Lobby for $2, adding a lovely detail.)
- Optional: Distressing Tools: Fine-grit sandpaper or a distressing tool to create a worn, antique finish.
- Optional: Glaze: Ralph Lauren Smoke Glaze (or similar antiquing glaze) to enhance the distressed look and add depth.
- Fillers: Whatever you choose to fill your finished apothecary jar with – shells, decorative stones, fairy lights, candies, coffee beans, potpourri, etc.
Gathering these items is the first exciting step in bringing your vision to life. Let’s get crafting!
Step-by-Step Guide to Crafting Your Mason Jar Apothecary Jar
Step 1: Preparing the Base – Gluing the Candlestick to the Wood Circle
Our first crucial step is to create a sturdy and balanced base for your apothecary jar. Begin by applying a generous amount of strong adhesive, such as Gorilla Glue, to the top center of your wooden circle. Carefully center your candlestick on top of the glue, ensuring it stands perfectly upright. The stability of your finished jar depends heavily on this initial connection.
Once the candlestick is in place, gently press down and then, to ensure a strong bond, place a heavy object, like a stack of books, on top of the candlestick. Allow this assembly to cure for at least 30 minutes, or even longer as per your glue’s instructions. A secure bond here prevents wobbling later and ensures your beautiful creation will stand tall and proud.
Step 2: Painting Your Decorative Pieces
Next, it’s time to add a fresh coat of paint to your finial and the candlestick (which is now securely attached to its wooden base). I opted for Rustoleum American Accents Heirloom White spray paint, a fantastic choice that provides a soft, antique white finish, perfect for that classic apothecary look. If you prefer a different aesthetic, feel free to choose any color that complements your home decor.
Before painting, ensure your pieces are clean and dry. Work in a well-ventilated area and use short, even strokes to apply light coats of paint. It’s always better to apply multiple thin coats rather than one thick one, which can lead to drips and uneven coverage. Allow adequate drying time between coats to achieve a smooth, professional finish. While these pieces are drying, you can move on to decorating the jar’s lid.
Step 3: Crafting the Decorative Lid – Burlap Application
Now, let’s turn our attention to the lid, transforming it into a charming, rustic accent. Take your small piece of burlap (mine was a 5-inch by 5-inch square, which offers enough overhang to wrap around the lid). Using your hot glue gun, apply a line of hot glue around the top edge of your mason jar lid and carefully center the burlap square on top, pressing down firmly to secure it. Make sure the burlap extends evenly over the sides.
Once the top is secure, work your way around the sides of the lid. Starting with one corner, apply a bead of hot glue to the underside of the burlap and firmly press it down against the side of the lid, smoothing it out as you go. Repeat this for all four corners, then fill in the gaps along the straight edges, ensuring the burlap is pulled taut for a neat finish. The rustic texture of the burlap instantly adds character and warmth.
Step 4: Adding Twine and Embellishments to the Lid
With the burlap firmly in place, it’s time to add another layer of rustic charm with twine. Take a piece of twine and begin wrapping it around the sides of the lid, just above the burlap. I wrapped mine a few times to create a thicker, more prominent band. To ensure everything stays neatly in place, apply a small dab of hot glue discreetly on the underside of the lid as you wrap, securing the beginning and end of the twine.
Once you’ve achieved your desired number of wraps, you have a couple of options: you can either simply tie a neat knot, or, for an extra touch of personalization, you can add a little something extra. This is where your creativity can truly shine. I decided to attach a small embellishment to mine.
Step 5: Attaching Your Chosen Embellishment (Optional)
For my apothecary jar, I found an adorable little pewter cross at Hobby Lobby for just $2. This small detail added a touch of elegance and a subtle nod to vintage aesthetics. I simply tied it onto the twine wrap, letting it dangle charmingly against the burlap. You could choose a small metal charm, a personalized tag, a miniature dried flower, or even a decorative button – anything that speaks to your style and adds that extra special touch. This step truly allows you to make the jar uniquely yours.
Step 6: Distressing for a Vintage Charm
With the paint on your candlestick and finial fully dry, it’s time to give them that coveted aged and distressed look. This step is key to achieving a truly vintage apothecary aesthetic. Gently take a piece of fine-grit sandpaper and lightly rub the edges and raised areas of your painted pieces. The goal is to reveal hints of the natural wood underneath, mimicking years of gentle wear and tear. Don’t overdo it; start subtle and add more distressing as desired.
To further enhance this antique charm, I also applied some Ralph Lauren Smoke Glaze. Glaze is a fantastic way to add depth, soften the white, and create a beautiful, time-worn patina. Apply it sparingly with a brush, then immediately wipe off the excess with a clean cloth, allowing the glaze to settle into crevices and corners, thus accentuating the distressed areas. This step truly brings out the character of your pieces and makes them feel like treasured heirlooms.
Step 7: Final Assembly – Bringing It All Together
We’re almost at the finish line! Now it’s time to bring all your beautifully crafted components together to form the complete apothecary jar. Take your mason jar and apply a strong bead of hot glue (or your heavy-duty adhesive for a more permanent bond) around the rim of the candlestick’s top. Carefully center the bottom of your mason jar onto the candlestick and press down firmly. Hold it in place for a few moments until the glue sets, ensuring a stable and upright attachment. Double-check that it’s centered before the glue completely dries.
Next, take your painted finial and apply hot glue to its base. Carefully center and press it onto the very top of your burlap-covered mason jar lid. This finial is the crowning glory, adding that distinctive, elegant touch that completes the classic apothecary jar look. Hold it steady until the glue cools and holds firmly. At this point, your jar is fully assembled and ready for its most exciting final step!
Personalizing and Filling Your Apothecary Jar
Now for the most delightful and creative part: filling your beautiful new apothecary jar! This is where you truly bring your creation to life and tailor it to your needs or gifting intentions. The possibilities are truly endless, allowing you to change the contents with seasons, holidays, or your mood.
Creative Filling Ideas:
- For Home Decor:
- Seasonal Displays: Fill with mini pumpkins and fall leaves for autumn, ornaments and fairy lights for winter, or colorful faux eggs for spring.
- Natural Elements: Pinecones, dried flowers, decorative moss, river rocks, or sand with shells (like I used!).
- Ambient Lighting: Tuck a strand of battery-operated fairy lights inside for a soft, magical glow.
- Potpourri: A fragrant mix of dried flowers and spices not only looks good but also smells wonderful.
- Decorative Balls: Small rattan balls, metallic spheres, or glass gems can add texture and color.
- For Practical Storage:
- Bathroom Essentials: Cotton balls, Q-tips, bath salts, or small soaps make for elegant bathroom storage.
- Office Supplies: Keep paperclips, rubber bands, or thumbtacks neatly organized and looking stylish on your desk.
- Kitchen Accents: If the lid seals well, you could store dried herbs, spices, or even small pasta shapes (though not truly airtight like a standard mason jar seal).
- Craft Room Organization: Buttons, beads, small spools of thread, or other tiny craft supplies.
- For Thoughtful Gifts:
- Teacher’s Delight: Discover her favorite candy, coffee beans, or gourmet tea bags and fill the jar. This way, she gets to enjoy a delicious treat AND a beautiful new apothecary jar for her classroom or home!
- Spa Day in a Jar: Layer with bath bombs, luxurious soaps, and a small hand cream.
- Baker’s Best: Fill with cookie mix ingredients (layered), miniature cookie cutters, or small sachets of vanilla beans.
- Gardener’s Goodies: Small seed packets, gardening gloves, or miniature tools.
- Coffee Lover’s Kit: Fill with gourmet coffee beans, small packets of specialty sugars, or miniature stirrers.
I chose some beautiful shells I already had, which were looking for a home, and they fit perfectly, creating a serene, coastal vibe. But as you can see, the options are truly limitless! Don’t hesitate to experiment and let your imagination guide you.
Tips for Success and Variations
To ensure your DIY apothecary jars turn out perfectly and to inspire even more creativity, here are some additional tips and variations:
- Choosing Your Glue Wisely: While hot glue is great for quick adherence of fabric and twine, for structural bonds like candlestick to wood base or jar to candlestick, invest in a strong, permanent adhesive like Gorilla Glue or E6000. Read the curing times carefully for maximum durability.
- Paint Perfection: Always clean your pieces thoroughly before painting to ensure good adhesion. For spray paint, work in light, even coats to avoid drips and achieve a smooth finish. If you’re going for a distressed look, remember you can always add more distressing, but you can’t easily take it away!
- Embrace Different Sizes: Don’t limit yourself to one size of mason jar! Create a collection of apothecary jars in varying heights and widths to add visual interest to a display. A large jar makes a grand statement, while smaller ones are perfect for tiny treasures.
- Explore Different Finishes: Instead of Heirloom White, consider matte black for a modern farmhouse look, a vibrant color for a pop of personality, or metallic spray paint for a glamorous touch. You can also experiment with chalk paint for a super matte, easy-to-distress finish.
- Lid Decor Alternatives: If burlap isn’t your style, consider using patterned fabric, decorative paper, or even painting the lid a contrasting color. Ribbons, lace, or braided jute can be used instead of twine for different textures and looks.
- Distressing Techniques: Beyond sandpaper, try using a dry brush with a darker paint color (like brown or grey) to lightly brush over edges, mimicking dirt or aged grime. Vaseline can also be applied to areas before painting, then wiped off after, to create a chipped paint effect.
- Themed Collections: Plan a theme for a set of jars. For example, a “kitchen herb” theme with different dried herbs, or a “beach house” theme with sand, shells, and sea glass.
- Safety First: When using hot glue, always exercise caution to avoid burns. When spray painting, work in a well-ventilated area and wear appropriate protective gear.
Conclusion: A Beautiful Creation Awaits!
And there you have it! A comprehensive guide to creating your very own charming and versatile DIY Mason Jar Apothecary Jars. This project, born from a spark of magazine inspiration, has proven to be incredibly rewarding – transforming simple, everyday items into elegant home decor pieces that exude vintage charm and personal flair.
From carefully gluing the base to adding those final, delicate embellishments, each step in this crafting journey allows for creativity and personalization. The joy of seeing your vision come to life, knowing you’ve crafted something beautiful and functional with your own hands, is truly unparalleled.
Whether you choose to fill your jars with delicate shells, fragrant potpourri, cozy fairy lights, or thoughtful gifts for loved ones, these apothecary jars are guaranteed to add a unique touch to any space. They’re more than just containers; they are a testament to the beauty of repurposing and the satisfaction of DIY.
I absolutely adored making these, and I am so excited for you to experience the same fun and satisfaction. I would be absolutely thrilled to see your unique creations! Please don’t hesitate to share photos or descriptions of your finished DIY apothecary jars in the comments below. Happy crafting!