
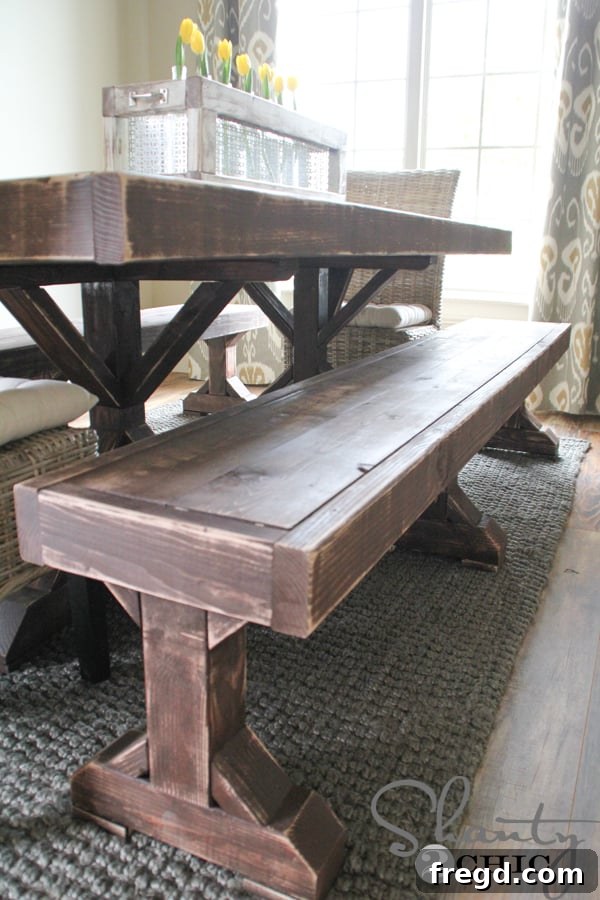
Welcome, DIY enthusiasts! Today, I am thrilled to share an exciting new addition to my dining room: the custom-built DIY dining benches. If you’ve been following along with my home projects, you’ll know that transforming spaces with handmade furniture is a true passion of mine. These benches are not just seating; they are a testament to affordable craftsmanship and personalized style, perfectly complementing the Restoration Hardware-inspired dining table I built for a mere $110.
Transform Your Dining Space with Custom DIY Benches
Creating a dining space that is both functional and aesthetically pleasing doesn’t have to break the bank. My recent project, a pair of custom dining benches, proves just that. These benches are a crucial part of the extensive furniture collection I’m crafting for our new home. Watching each room gradually come to life with pieces made with my own hands is incredibly rewarding. Not only are these benches incredibly easy to build, but they are also exceptionally budget-friendly. I managed to construct two robust and stylish benches for approximately $70, bringing the total cost of my entire dining set—including the impressive dining table—to an astonishing $180! This incredible saving highlights the power of DIY and the joy of creating something beautiful and functional without the hefty price tag.
Why Choose DIY Dining Benches? The Benefits of Building Your Own
The decision to build your own dining benches offers a multitude of benefits beyond just cost savings. Customization is at the forefront; you have complete control over dimensions, finishes, and the overall aesthetic to perfectly match your existing decor or complement a new theme. For instance, these benches were specifically designed to pair with my DIY dining table, ensuring a cohesive and harmonious look that would be challenging to achieve with off-the-shelf furniture. Moreover, the sense of accomplishment derived from building furniture yourself is unparalleled. Each meal shared around this table, seated on these benches, will carry the extra warmth of knowing it was made with effort and care. This approach also allows for higher quality materials than often found in mass-produced items within the same price bracket, meaning your furniture is not only beautiful but also built to last.
Get Started: Free Printable DIY Dining Bench Plans!
To help you embark on your own woodworking adventure, we’ve made the comprehensive printable plans for these dining benches absolutely FREE! These plans detail every cut, measurement, and step, making the process straightforward even for novice builders. You can access them directly by clicking HERE, or simply click on the image below to download your copy and begin planning your project today. Having a detailed plan in hand eliminates guesswork and ensures a smoother, more enjoyable building experience.
Step-by-Step Guide: How to Build Your Own Dining Benches
Beyond the plans, I’m excited to share a detailed walkthrough of my building process. This guide provides insights and tips that I discovered along the way, helping you navigate each stage with confidence. From selecting your wood to applying the final finish, I’ll break down how these sturdy and stylish benches came to life.
1. Constructing the Bench Tops: The Foundation of Your Seating
The first step in building these beautiful benches involves creating the tops. This segment of the project is surprisingly simple and sets the stage for the rest of the build. I carefully selected my lumber, ensuring each piece was straight and free of major defects, which is crucial for a flat and durable bench surface. Assembling the top involves joining several pieces of wood together, typically using wood glue and pocket hole screws for a strong, seamless bond. Once these pieces are secured, you’ll have a robust surface ready to become the heart of your bench.
With the bench tops completed, we’re already seeing the main seating surface take shape. This quick progress is incredibly motivating! It’s satisfying to watch flat pieces of wood transform into a functional component. Ensuring precise cuts and strong joins at this stage will guarantee a stable and long-lasting bench top, ready for daily use and family gatherings.
2. Crafting the Bench Legs: Stability and Style
Next up are the legs, which provide the essential support and contribute significantly to the bench’s overall aesthetic. After cutting the wood to the specified lengths, I drilled pocket holes into them. Pocket hole joinery is a fantastic technique for beginners and experienced woodworkers alike, offering strong, concealed joints that are perfect for furniture construction. It creates a clean look and provides exceptional stability. Precise drilling ensures that the screws will pull the pieces together tightly, forming a solid leg structure.
Following the legs, I moved on to cutting the feet. Don’t let the mention of angles intimidate you – these are genuinely simple! For each end of the foot piece, you’ll make a 45-degree angle cut on half of the width. This subtle detail elevates the look of the bench, giving it a more refined and finished appearance without requiring complex joinery skills. It’s a design element that adds a touch of sophistication, making the benches appear more custom and high-end.
These various angled pieces, both small and large, are what truly give these benches their unique character and charm. They add a custom, architectural detail that transforms a simple bench into a piece of furniture with personality, echoing the timeless designs often found in high-end stores. Laying them out before assembly helps visualize the final look and ensures all pieces are accounted for.
3. Assembling the Leg Bases: Bringing the Frame Together
With all the individual components cut, it’s time to bring them together. I attached the legs to the feet using a combination of strong wood glue and Kreg pocket screws. The wood glue provides an incredibly durable bond, while the pocket screws offer immediate clamping pressure and reinforce the joint permanently. This method creates a rock-solid base that will withstand years of use.
Next, I attached the smaller angle pieces, starting with wood glue for adhesion, then securing them with my brad nailer. A brad nailer is incredibly efficient for this type of decorative trim, creating small, almost invisible holes. If you don’t have a nailer, you can certainly achieve the same result using finishing nails, or by drilling pilot holes and using wood screws to prevent splitting the wood. The key is to ensure these decorative pieces are flush and firmly attached to enhance the bench’s aesthetic.
After securing the small angled pieces, I carefully flipped the entire structure upside down to attach the longer, upper angled pieces. These were fastened using the same method: wood glue for a lasting bond, followed by my brad nailer for quick and secure attachment. This strategic placement ensures that these decorative elements are properly aligned and contribute to the bench’s distinctive profile from all angles.
Finally, to protect both the bench and your floors, I added foot pads to the bottom of the legs. These were attached with wood glue and my nailer, providing a durable buffer. Foot pads are a small but important detail, preventing scratches and ensuring the bench sits evenly and silently on any surface. They also give the bench a more finished and professional look, enhancing its perceived quality.
4. Final Assembly: Uniting the Components
Once all the leg bases were fully assembled and robust, the final step in construction was to attach them securely to the underside of the bench tops. This was accomplished using a combination of wood glue and pocket hole screws, ensuring an incredibly strong and stable connection. For navigating tight spaces and easily driving the screws into the frame and braces, my right-angle drill proved to be an invaluable tool. It allowed me to work efficiently and achieve secure fastenings even in confined areas, guaranteeing the entire structure was perfectly aligned and rigid. This final assembly stage brings all your hard work together into a complete, functional piece of furniture.
And just like that, the main construction of the benches is complete! Seeing the fully assembled bench standing on its own is a moment of pure satisfaction. Now, it’s ready for the crucial finishing steps that will protect the wood and bring out its full beauty, aligning it perfectly with the desired aesthetic for your dining room.
The Finishing Touches: Staining, Distressing, and Protecting Your Masterpiece
The finishing process is where the true character of your DIY benches comes to life. To achieve a cohesive look with my dining table, I applied a single, even coat of Carrington stain to both benches. This particular stain provides a rich, warm tone that beautifully enhances the wood grain, creating that sought-after rustic yet elegant aesthetic. Applying stain evenly is key; I used a rag to wipe it on, ensuring full coverage before wiping off any excess to prevent blotchiness. This step not only adds color but also protects the wood from moisture and daily wear.
Once the stain had thoroughly dried, I moved on to distressing the benches. This technique is fantastic for adding a vintage, well-loved feel, mimicking the natural wear and tear of antique furniture. Using my favorite orbital sander, I lightly distressed the edges, corners, and flat surfaces of the benches. The goal is to gently remove some of the stain and expose bits of the raw wood underneath, creating subtle highlights and a textured appearance. This process adds depth and an authentic, aged look that perfectly complements the farmhouse-inspired style of the dining set.
After distressing, I carefully wiped down the benches with a damp cloth to remove all dust particles. This is a critical step before applying a protective topcoat, as any lingering dust can get trapped in the finish, leading to a rough surface. Finally, I applied two generous coats of polyurethane. Polyurethane is a durable clear coat that offers excellent protection against spills, scratches, and daily use—a necessity, especially for dining furniture that will experience heavy traffic from my kiddos! I paid special attention to the bench tops, ensuring a thick, even layer for maximum durability and easy cleaning. Each coat was allowed to dry completely before a light sanding and the application of the next, resulting in a smooth, resilient, and beautiful finish.
The Grand Reveal: A Cohesive and Inviting Dining Space
And there you have it! The benches were complete, marking a significant milestone in our dining room transformation. One of the greatest joys of DIY is how it allows us to allocate our budget more freely, investing in other elements that truly tie a room together. For instance, I discovered this gorgeous 6×9 Charcoal Basket Weave Jute Rug at World Market for around $150, which grounds the space beautifully. To complement the rustic charm of the benches, I found these amazing wicker chairs at Pier 1 for just $99 each, adding texture and warmth to the setup. Together, these pieces create an inviting and stylish dining area that feels both curated and comfortable, a perfect spot for family meals and entertaining guests.
I am absolutely loving how my dining room is progressing! While I still have several more projects envisioned for this space, I’m going to take a brief detour to tackle another room for now. Rest assured, I’ll be back soon to share more exciting DIY transformations and creative ideas with you!
Complete Your Home Transformation: Explore More DIY Projects
Thank you so much for joining me on this journey of building these DIY dining benches. It’s truly rewarding to create functional and beautiful pieces for our home, and I hope this guide inspires you to pick up your tools and start your own project. If you’re curious about other elements you’ve spotted in this room, or simply looking for more DIY inspiration, I’ve linked all the details below. From paint colors to flooring, and even decorative accents, you’ll find everything you need to recreate this look or inspire your next home improvement endeavor. Happy building!
-
The exact paint colors used on the walls
-
Detailed instructions on how to install the laminate flooring
-
The complete guide to building the Restoration Hardware-inspired dining table
-
Steps to creating your own stylish DIY Bar Cart
-
Crafting this unique DIY Wine Bottle Crate Centerpiece
-
Tutorial for elegant DIY Lined Window Panels
-
Creating stunning DIY Wall Art with a Pallet Design
-
Link to the exquisite Arturo 8-Light Rectangular Chandelier
~Ashley