
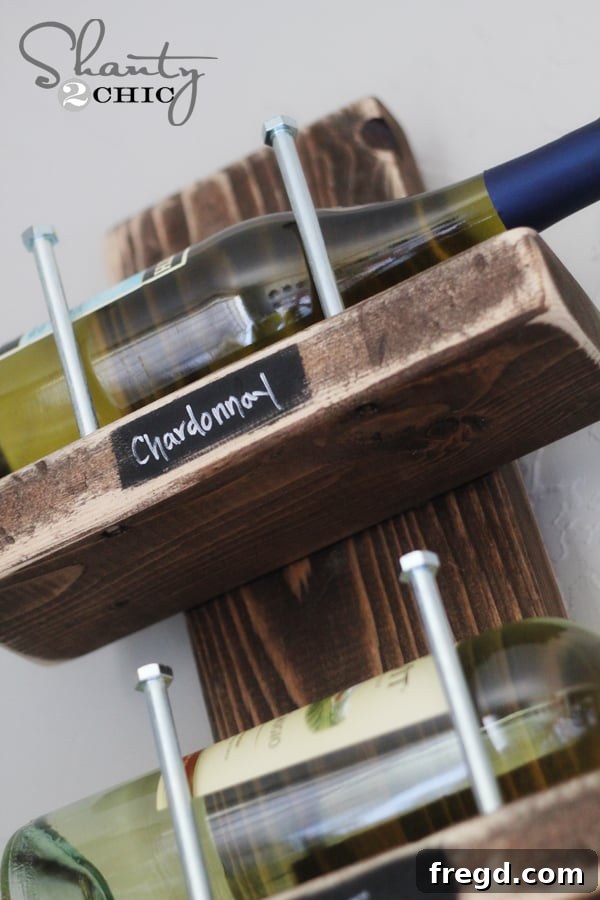
Craft Your Own Rustic Chic Wine Rack: An Affordable DIY Guide
Welcome, DIY enthusiasts! Get ready to embark on a truly satisfying project that marries functionality with farmhouse charm. We’re thrilled to share our step-by-step guide for building a stunning rustic chic wine rack. This project is not only incredibly rewarding but also remarkably budget-friendly, costing under $15 in materials. Imagine enhancing your home decor with a unique, handmade piece that neatly organizes your favorite wines and adds a touch of personalized elegance to any space. This DIY wall-mounted wine rack is a definite Shanty favorite, proving that stylish home upgrades don’t have to break the bank. Let’s dive into creating a beautiful and practical storage solution that will impress your guests and bring a cozy, inviting atmosphere to your home!
Why Build a DIY Wine Rack?
Beyond the incredible cost savings, crafting your own wine rack offers several compelling advantages. Firstly, it allows for complete customization. While we’re providing a guide for a rustic chic design, the principles can be adapted to suit any aesthetic, from modern minimalist to industrial farmhouse. Secondly, it’s an excellent entry-level woodworking project that builds confidence and introduces fundamental skills like cutting, sanding, and assembly. There’s immense pride in displaying a piece you’ve created with your own hands. This particular design is perfect for those who appreciate the warmth of natural wood and the timeless appeal of rustic decor. It’s a wonderful way to keep your wine bottles organized, accessible, and beautifully showcased, turning a simple storage item into a focal point of your kitchen, dining room, or living area.
Gather Your Materials: What You’ll Need
Before we begin, ensure you have all the necessary supplies. A quick trip to your local hardware store should cover everything, keeping our total cost impressively low. Choosing quality wood that is straight and free of major defects will make your project smoother and ensure a sturdier final product. Here’s a detailed list of what you’ll need for your budget-friendly wall-mounted wine rack:
- 1 – 2×6 board cut to 38 inches (This will be the main back support of your wine rack).
- 5 – 2×4 boards each cut to 10 inches (These will form the individual bottle cradles).
- 10 – 5/16 x 4 1/2 inch hex bolts (We found ours in the hardware aisle for about $.38 a piece, they add a fantastic industrial-rustic touch).
- 10 – 2 1/2 inch wood screws (For securely attaching the 2×4 pieces to the main 2×6).
- Wood glue (Such as Gorilla Wood Glue, for extra strength and stability in your joints).
- Finishing supplies (Stain, clear coat, brushes, rags – more on this later).
Having all your materials prepped and ready before you start will streamline the building process, making it more enjoyable and efficient.
Essential Tools for a Smooth Build
While this project is simple, having the right tools makes all the difference in achieving a professional finish and ensuring your safety. Here are the tools we recommend:
- Miter Saw: For precise and quick cuts on your lumber. This tool ensures all your pieces are perfectly square and sized.
- Corner Cat Sander (or orbital sander): Ideal for smoothing edges and corners, and for distressing.
- Cordless Drill: An indispensable tool for pre-drilling holes and driving screws effortlessly.
- Clamps: To hold your pieces securely in place while the glue dries and as you attach screws.
- Measuring Tape and Pencil: For accurate marking.
- Safety Glasses and Gloves: Always prioritize safety when working with power tools and wood.
Step 1: Precision Cutting Your Lumber
The first step in any woodworking project is accurate cutting. Using a miter saw makes this incredibly simple and quick, allowing you to achieve clean, straight cuts with minimal effort. Carefully measure and cut your wood pieces according to the supply list:
- One 2×6 board cut to 38 inches.
- Five 2×4 boards, each cut to 10 inches.
Take your time with these cuts, as precision here will ensure all your pieces fit together perfectly. If you don’t have a miter saw, a circular saw with a guide or even a hand saw can be used, though they may require more care to ensure square cuts. Always double-check your measurements before making any cuts to avoid waste.
Step 2: Sanding for Smoothness and Style
Before assembly, it’s crucial to sand all your wood pieces. This not only smooths out rough edges and prevents splinters but also prepares the wood beautifully for staining. We especially love to soften the corners and edges with our corner cat sander. This technique gives the wood a slightly worn, aged appearance, which perfectly complements the rustic chic aesthetic we’re aiming for. It’s a small detail that makes a big difference in the final look and feel of the piece.
Pay attention to all sides and ends of both your 2×6 and 2×4 pieces. The goal is to achieve a consistent smoothness. For the rustic look, a little rounding on the corners is ideal. This pre-assembly sanding makes the finishing process much easier and ensures a more refined final product.
Step 3: Marking for Precise Placement
Accurate marking is key to a symmetrical and functional wine rack. Lay your 38-inch 2×6 board flat. This will be the back panel of your wine rack. We will attach the five 10-inch 2×4 pieces to this board, creating the individual cradles for your wine bottles. To ensure even spacing and a visually appealing design, we recommend marking the placement for each 2×4 piece every 6 inches along the 2×6 board. Start from one end and measure 6 inches, then place a 2×4 piece, mark its top and bottom edges, then measure another 6 inches, and so on. Do this on both sides of the 2×6 board to ensure your marks are perfectly aligned.
This spacing is ideal for holding standard wine bottles securely without them touching or rattling. Use a pencil to make clear, visible lines. These marks will serve as guides for where each 2×4 cradle will be attached, ensuring everything is perfectly aligned and spaced for optimal wine storage.
Step 4: Pre-drilling Holes for Strength and Durability
Before permanently attaching your 2×4 pieces to the 2×6, you need to pre-drill holes. This step is crucial for two main reasons: it prevents the wood from splitting, especially when working close to the edges, and it makes driving the screws much easier and more secure. For each of your five 10-inch 2×4 pieces, drill two pilot holes. These holes should be placed near the top and front edge of each piece, approximately 1/4 inch from the edge. This placement ensures that the hex bolts (which you’ll add later) will be visible and provide a decorative accent.
Using a cordless drill for this task is incredibly convenient and efficient. We find a good quality cordless drill to be an absolute game-changer for any DIY project due to its portability and versatility. Select a drill bit that is slightly smaller in diameter than your wood screws to create a snug fit without forcing the wood apart.
Step 5: Gluing and Clamping for Robust Joints
Now it’s time to start assembling! For maximum durability and strength, we’re combining both wood glue and screws to attach the 2×4 cradles to the 2×6 back panel. Apply a generous line of Gorilla wood glue along the edge of a 2×4 piece that will be in contact with the 2×6. Then, carefully align the 2×4 with the marks you made on the 2×6 board. Once positioned, use clamps to hold the 2×4 firmly in place. This clamping action ensures a tight bond as the glue dries and prevents the pieces from shifting while you secure them with screws. Repeat this for all five 2×4 pieces.
Wood glue provides incredible sheer strength, making your joints far more resilient than screws alone. Allowing the glue to set for a short period before driving screws can also help prevent movement. Take your time to ensure each piece is perfectly aligned before clamping down.
Step 6: Securing the Cradles with Wood Screws
With your 2×4 pieces glued and clamped in place, it’s time to secure them permanently with wood screws. Using your cordless drill, pre-drill two small pilot holes through the back of the 2×6 board, into each 2×4 piece where they meet. These pilot holes should align with the center of your 2×4 pieces from the back. This prevents the wood from splitting when you drive the screws and ensures a clean, strong attachment.
Once the pilot holes are drilled, switch to a driver bit and insert your 2 1/2-inch wood screws through the back of the 2×6 and into each 2×4 cradle. Drive them in until they are flush with the surface of the 2×6. This double reinforcement (glue and screws) creates an incredibly sturdy structure capable of holding multiple wine bottles securely. Take a moment to admire the neat attachment points from the back.
Step 7: The Finishing Touches – Staining and Distressing
With all your boards securely attached, it’s time to bring out the rustic charm with your chosen finish. We absolutely adore Rust-Oleum Dark Walnut Stain for its rich, deep color that beautifully enhances the wood grain and perfectly complements a rustic aesthetic. Apply the stain evenly across the entire wine rack, following the grain of the wood. Use a brush or a clean rag, making sure to wipe off any excess stain after a few minutes to prevent a splotchy finish. Allow it to dry completely according to the manufacturer’s instructions.
Once the stain is dry, for that truly authentic worn and aged look, we go back over the edges and corners again with our Corner Cat sander. This light sanding technique removes some of the stain from the prominent edges, mimicking the natural wear and tear that furniture accrues over time. This distressing method creates beautiful highlights and depth, making your brand-new wine rack look like a cherished heirloom. It’s an optional step but highly recommended for achieving that perfect farmhouse or vintage feel.
Step 8: Personalization with Chalkboard Labels (Optional)
To add an extra layer of “shanty” chic and functionality, we decided to incorporate small chalkboard labels on the front of each wine cradle. This allows you to label your wine varieties, vintages, or simply add charming messages. To do this, simply tape off a small rectangular area on the front of each 2×4 piece using blue painter’s tape. Ensure the edges are crisp and clean. Then, apply chalkboard spray paint within the taped area. Once dry, carefully remove the tape to reveal neat, customizable chalkboard sections. This personalized touch not only enhances the rustic aesthetic but also provides a practical way to organize your wine collection. Feel free to skip this step if it doesn’t align with your desired look, but it truly adds a unique flair!
Step 9: Adding Decorative Hardware and Mounting Your Wine Rack
The final step in constructing your wine rack is to add the decorative hex bolts. Simply insert one 5/16 x 4 1/2 inch hex bolt into each of the pre-drilled holes you made earlier on the front of the 2×4 cradles. These bolts are primarily decorative, enhancing the industrial-rustic appeal, but they also offer a bit of extra stability. With the hex bolts in place, your wine rack is structurally complete and ready for installation.
When mounting your finished wine rack to the wall, safety is paramount. We strongly recommend locating wall studs and securely screwing your wine rack directly into them. This provides the most stable and safest mounting option, especially considering the weight of multiple wine bottles. If attaching to a stud isn’t possible, be sure to use appropriate heavy-duty wall anchors designed for the weight of your wine rack plus full bottles. Use a level to ensure your wine rack hangs perfectly straight for both aesthetics and stability. A properly mounted wine rack ensures your treasured bottles are safe and your beautiful DIY creation can be enjoyed for years to come.
Your Finished Rustic Chic Wine Rack!
And there you have it! Your very own handcrafted, rustic chic wine rack, ready to adorn your wall and store your favorite vintages. The transformation from simple lumber to a stylish and functional piece of home decor is incredibly satisfying. We absolutely adore how this project turned out and had so much fun building it together. This DIY wine rack is a testament to how creative vision and a few basic tools can result in something truly special and budget-friendly. It’s perfect for adding a touch of farmhouse charm to any space, from a cozy kitchen nook to a sophisticated dining room.