
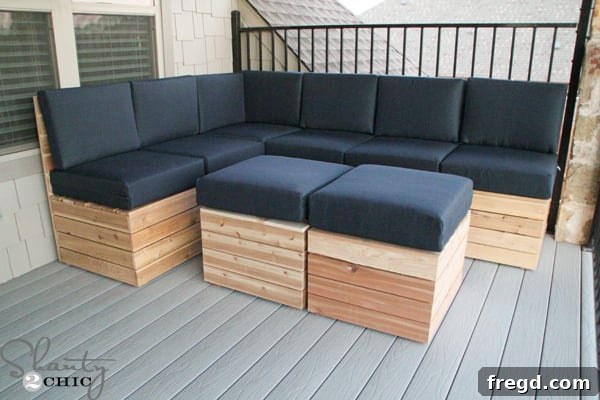
Welcome to our latest DIY adventure! For those of us living in Texas, the arrival of Fall signals the absolute best time to fully embrace the outdoors. One of the primary reasons we meticulously chose our home plans, particularly when building our house, was the inclusion of a spacious balcony. From the very beginning, I envisioned transforming this outdoor haven into a truly luxurious retreat, complete with a giant, supremely comfortable sectional sofa – the kind you often admire in high-end design magazines. Naturally, my ultimate goal was to construct this dream piece myself!
I am thrilled to announce that the project is now complete, just in time for the cooler weather that has finally settled in. This newly furnished space has rapidly become my absolute favorite spot to unwind, entertain, and simply enjoy the Texas autumn. The satisfaction of building something both beautiful and functional for my family’s outdoor living is immense.
Craft Your Perfect Outdoor Space: Introducing Our DIY Modular Outdoor Sectional
When designing this outdoor seating solution, I recognized that not every outdoor space is created equal. From expansive patios to cozy balconies, homeowners need flexible options. This understanding led me to conceptualize and build this modular sectional – a design that is not only incredibly versatile but also surprisingly easy to construct. At its core, each component is essentially a sturdy wooden box. This simple foundation allows for incredible customization: you can add a comfortable backrest, leave it as a versatile ottoman or coffee table, or utilize a dedicated corner piece to configure a true sectional sofa tailored to your exact needs.
Today, I am excited to share the detailed step-by-step tutorial for building the basic box seat, complete with instructions for the optional backrest. To make your building journey as smooth as possible, I’ve also prepared comprehensive, FREE printable plans that guide you through every cut and joint. You can access these invaluable plans by clicking HERE or by simply clicking on the image below. These free DIY outdoor sectional plans are your first step towards creating the custom outdoor living area you’ve always wanted.
For those looking to expand their modular outdoor sectional even further, the plans and tutorial for the corner piece are also available HERE. This comprehensive guide ensures you have all the resources needed to build a custom patio oasis.
Materials & Tools: Building Your Outdoor Retreat with Cedar Wood
Now, let’s roll up our sleeves and get into the construction phase! Given that this modular seating is specifically designed for outdoor use, my material of choice was cedar boards. Cedar is an exceptional lumber for exterior projects due to its natural resistance to rot, decay, and insect infestation, making it incredibly durable and long-lasting even in challenging weather conditions. Beyond its resilience, cedar boasts a beautiful natural aesthetic and a distinctive aroma that enhances any outdoor living space. While cedar might be a slightly higher investment initially, its longevity and low maintenance make it a cost-effective and sustainable choice for your DIY outdoor furniture projects. If cedar isn’t readily available or within your budget, pressure-treated pine or redwood are viable alternatives, though they may require different finishing considerations.
Essential Tools for a Smooth DIY Build
Having the right tools can make all the difference in a DIY project, transforming a potentially frustrating task into an enjoyable and efficient experience. To kick things off, I relied heavily on my Ryobi 18V miter saw to make all the necessary cuts. This particular saw is a fantastic asset for any DIYer, running on the same versatile 18V battery system as many other popular Ryobi tools. Its compact size means it’s incredibly portable, allowing you to easily move it around your workspace, even if that space is limited. I can attest to its portability and convenience; Whitney and I once famously (and discreetly!) used it on a hotel balcony during a class, proving its adaptability for various cutting needs.
Once all my cedar boards were precisely cut – ensuring accuracy is paramount for a professional-looking finish – the next step was to prepare them for assembly. I made all the 2×3 cuts required for the foundational boxes of my modular outdoor sectional. Precision at this stage saves a lot of headaches later on.
For strong and invisible joints, I turned to my Kreg Jig K5 to drill pocket holes. If you’re new to woodworking, a Kreg Jig is an invaluable tool that creates angled holes, allowing you to drive screws through one piece of wood into another, resulting in incredibly strong and hidden connections. The plans provide exact locations for these pocket holes, and you can also reference them in the cuts picture above. This technique is key to building a durable and clean-looking DIY outdoor sofa.
Step-by-Step Construction Guide: From Raw Wood to Sturdy Seating
Phase 1: Building the Basic Box Seat Frame
The foundation of each modular piece is a simple, robust box frame. I started by assembling the perimeter of the seat frame first, ensuring all corners were square and secure. Following this, I integrated the crucial center support piece. This not only adds significant structural integrity to the seat but also prevents sagging over time, especially when supporting cushions and multiple users. Using wood glue in addition to pocket screws will further enhance the strength and longevity of your outdoor furniture.
To finalize the seat frame, the last step was to securely attach the legs. This completes the basic structural box, which is the core of every modular component. With the frame assembled, the most challenging part of the build is already behind you – easy enough, right? Now, onto the aesthetically pleasing slats!
Phase 2: Adding the Slats – The Finish and Function
The slats are crucial not only for the visual appeal of your DIY outdoor sectional but also for its comfort and durability. I began by attaching the side slats first. To ensure consistent and professional-looking spacing between each slat, I utilized scrap 1/4″ pieces of wood as temporary spacers. This simple trick guarantees even gaps throughout, which is essential for both aesthetics and proper drainage, preventing water from pooling. Start by making the top slat flush with the 2×3 frame. I secured these slats using Gorilla Wood Glue, which provides excellent outdoor adhesion, and my Ryobi 18-gauge Airstrike Nailer, using 1 1/4″ nails. The nailer makes quick work of this step, providing a strong hold without needing to pre-drill.
Continue working your way down the side of the seat frame. Once you reach the bottom, you’ll find there’s approximately a 1/2″ gap between the last slat and the ground. This small gap is intentional, further aiding in drainage and preventing wood from sitting directly on damp surfaces.
Next, the front and back slats are straightforward to attach. No special spacers are needed here; simply align these slats flush with the side slats you just installed, apply wood glue, and nail them securely into place. This creates a cohesive and finished look around the base of your modular outdoor furniture.
Finally, it’s time for the top slats! I started by attaching the front and back top slats first. Ensure these are perfectly flush with the existing front and back frame elements. The goal here is to completely cover the underlying frame, creating a clean, seamless surface where only the top slats are visible. This step is critical for both the aesthetic appeal and the comfort of the seat.
I then used 3/4″ cedar scraps as spacers for the remaining top slats, maintaining consistent gaps across the seating surface. Attach these with wood glue and your nailer, making sure to also nail them into the central support beam for added stability. This completes the basic modular box, ready for use as an ottoman, coffee table, or as the base for a sofa. At this point, you have completed the fundamental seating boxes, perfectly functional as stand-alone units or as part of a larger arrangement. (Note: The corner box featured in some images is a different size, with plans to be shared soon!)
Here are the assembled boxes! They’re already looking great. At this stage, you have a choice: leave them as versatile, backless benches or ottomans, or proceed to add backrests for a more traditional sofa feel. I, for one, definitely opted for the added comfort of backrests!
Phase 3: The Optional Backrests – Elevating Comfort for Your DIY Outdoor Sofa
Adding backrests transforms a simple modular box into a comfortable sofa component, ideal for lounging and relaxation. I began by precisely cutting the posts that would form the structural uprights of the backrest. Accuracy here is important to ensure a sturdy and level backrest.
Next, I securely attached these posts to the back of each modular box. This was achieved using durable 2 1/2″ Spax screws, ensuring a very strong connection. The screws are strategically placed to drive directly into the 2×3 legs that are part of the internal box frame, maximizing stability and preventing any wobbling.
With the posts in place, I then proceeded to add the backrest slats. Starting from the top of the backrest, I attached each slat using wood glue and 1 1/4″ nails. Similar to the seat slats, I used 3/4″ spacers to ensure consistent gaps between the five slats, creating an even and visually appealing backrest. This design provides ample support and comfort, making your DIY outdoor sectional a truly inviting piece of furniture.
Finishing Touches: Protection, Personalization, and Cushion Comfort
Preserving Your Wood: The Importance of Varnish
That’s it for the construction! With the building complete, the final, crucial step is to protect your beautiful new DIY outdoor sectional from the elements. I was keen to preserve the stunning, natural look of the cedar wood, which is why I chose to apply two generous coats of Varathane Spar Varnish. Spar varnish is specifically designed for outdoor use, offering superior protection against UV rays, moisture, and temperature fluctuations. It forms a durable, flexible film that guards against cracking, peeling, and fading, ensuring your cedar furniture remains beautiful and functional for many seasons to come. For a different aesthetic, you could also opt for outdoor stains to enhance the wood grain with color, or exterior paints for a bold, opaque finish. Whatever your choice, proper outdoor finishing is key to the longevity of your patio furniture.
Selecting the Perfect Outdoor Cushions
To truly complete the comfort and style of my DIY outdoor sectional, I found a fantastic deal on deep-seat cushions at target.com. By utilizing my Red Card, I not only saved an additional 5% off the sale price but also secured free shipping – a win-win! When designing these modular seats, I took cushion measurements into account, but the dimensions are fairly standard, meaning they should accommodate a wide variety of outdoor cushions. However, I strongly recommend double-checking the dimensions if you choose different cushions and adjusting the plans accordingly to ensure a perfect fit. You can view the specific cushions I purchased and found to be ideal HERE. Remember, investing in quality outdoor cushions made with weather-resistant fabrics will significantly enhance the comfort and longevity of your DIY outdoor sofa.
Endless Possibilities: Arranging Your Modular Outdoor Seating
The beauty of a modular outdoor sectional lies in its unparalleled versatility. Unlike fixed furniture pieces, these individual boxes can be rearranged and reconfigured in countless ways to suit your immediate needs, the size of your gathering, or simply your mood! Currently, I have mine set up with two boxes serving as a versatile coffee table, which can easily double as comfortable ottomans when extra footrests are needed.
Alternatively, they can be quickly reconfigured to create a luxurious chaise lounge end, perfect for stretching out and enjoying a sunny afternoon or a cool evening breeze on your patio.
Or perhaps this inviting setup, offering plenty of seating for a cozy conversation area!
And then there’s this flexible arrangement, showcasing even more possibilities!
You can even create a single, individual chaise lounge – or two – making this DIY outdoor furniture concept perfect even for smaller balconies or patios where space is at a premium.
The beauty of this modular design is that there are truly so many possibilities, even without incorporating the corner piece (whose plans are coming soon!). This DIY approach means you’re not limited by pre-set configurations; your outdoor living space can evolve with your needs.
I absolutely LOVE, LOVE, LOVE this renovated outdoor space now! The ability to easily rearrange the pieces means I can always refresh the look and feel whenever I desire a change. This modular outdoor seating performs beautifully both with and without cushions, adding to its versatility. Another fantastic benefit of this type of DIY patio furniture is its budget-friendly scalability: you can start by building a few pieces and gradually add more as your budget allows, transforming your backyard or balcony into a truly custom oasis over time. Make sure to check back next week, as I’ll be sharing the detailed plans for the corner piece to further expand your modular outdoor sectional possibilities!
Happy Building, and enjoy your stunning new outdoor living space!