
Good Morning, fellow DIY enthusiasts!
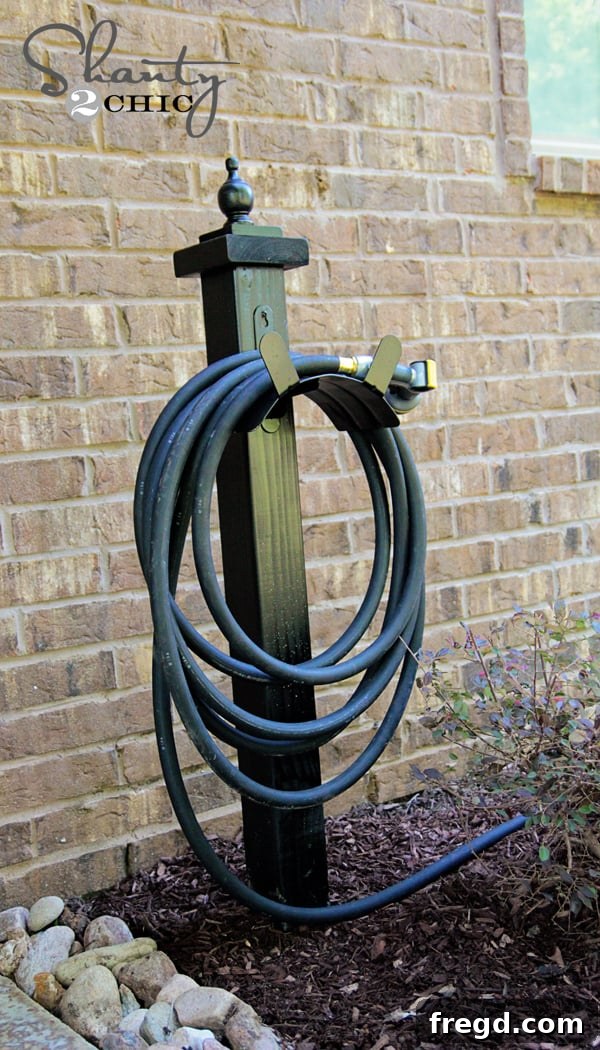
I trust you all enjoyed a wonderful weekend, perhaps even tackling a project or two from your own to-do lists. Here, we were blessed with absolutely stunning weather, which provided the perfect opportunity for me to check off one lingering item: a much-needed garden hose holder for our back patio. And let me tell you, the result is not just practical but incredibly charming!
You won’t believe how delightfully quaint this hose holder turned out, especially when you discover the total cost for this entire endeavor was a mere $15. Yes, fifteen dollars! Knowing that only makes it all the more adorable, doesn’t it?
Why a DIY Hose Holder? The Spark of Inspiration
Allow me to elaborate on the motivation behind diving into this specific project. Last week, I acquired some beautiful new pots for my back patio. For those of you who follow us on social media, I shared a peek at them on Instagram HERE. They truly elevate the space, adding vibrant splashes of green and color. Here’s a glimpse of what they look like:
I absolutely adore them, but I also know myself well enough to realize these lovely plants had about a 2% chance of thriving if I didn’t establish a quick and effortless watering system. If it’s not fast and easy, frankly, I just won’t do it consistently. And a tangled, haphazard hose isn’t exactly conducive to effortless watering.
Thus, the idea for a cute, functional, and easily accessible water hose holder was born. This project not only addresses the practical need for proper watering but also contributes to the overall aesthetic appeal and organization of the patio. A well-kept garden space not only looks better but also becomes a more enjoyable area for relaxation and entertainment.
Your Own Garden Hose Holder DIY: Quick, Easy, and Budget-Friendly
You’ll be amazed at how quickly this project comes together. I managed to assemble the entire hose holder in approximately 20 minutes, making it an incredibly satisfying DIY. It’s so straightforward, anyone can do it!
Materials and Tools You’ll Need:
Before we dive into the step-by-step process, let’s gather our materials and tools. One of the best aspects of this project is its affordability and the minimal number of supplies required:
- One 4x4x8′ pine board (available at any hardware store like Lowe’s)
- Two small pieces of scrap wood (optional, for decorative topping)
- One wood finial (from Lowe’s or Amazon)
- One wall-mount hose hook/holder (Walmart or Home Depot)
- Gorilla Wood Glue
- Exterior wood screws
- Exterior paint (e.g., Rust-Oleum Painter’s Touch in semi-gloss black)
- Drill with appropriate bit for finial
- Nailer (like a Ryobi AirStrike Battery Nailer)
- Shovel (for digging the hole)
- Rocks (for stabilization)
- Mulch (for aesthetics)
Step-by-Step Guide to Building Your Hose Holder:
1. Prepare Your Main Post
Begin with a standard 4x4x8′ pine board, which I purchased from Lowe’s for about $9. To make things easier, I highly recommend asking Lowe’s to cut the board in half for you right there in the store. This way, you’ll instantly have enough material to construct two hose holders! This is a fantastic opportunity to collaborate with a friend, building one for each of your gardens, or to create a second one for another part of your own yard, perhaps near a shed or a different planting area. The convenience of having your lumber pre-cut saves time and effort.
2. Add Decorative Top Pieces (Optional, but Recommended)
Next, you’ll need two small pieces of wood for the top. While you could technically skip this step and proceed directly to attaching the finial, I find that these additional wood pieces “beef up” the top of the post, giving it a more substantial and finished look. I was fortunate enough to find suitable pieces in my scrap pile, so check yours first! You only need two relatively small sections. This is a great way to use up leftover wood and add character without extra cost.
The first piece goes down onto the top of your 4×4 post:
Then, the second piece is placed directly on top of the first, creating a layered effect:
3. Secure the Top Pieces
To ensure these decorative pieces are firmly attached, I used Gorilla Wood Glue between each layer. This glue provides an incredibly strong bond, ideal for outdoor projects. For added stability and speed, I then used my Ryobi AirStrike Battery Nailer to secure the pieces together. This nailer is an absolute dream to use – it’s super easy, cordless, and surprisingly, my kids even enjoy helping me “build” with it, making it a fun family activity!
4. Install the Wood Finial
Now it’s time to add the finishing touch: the wood finial. Simply drill a pilot hole into the center of your top wood piece, ensuring it’s the correct size for your finial’s screw base.
I typically source my finials from Lowe’s. However, I know some of you have mentioned that your local Lowe’s might not stock them. Don’t worry! You can also find a wide variety of different wood finials on Amazon, offering many styles to match your garden aesthetic. Choose one that complements your outdoor décor.
Once the pilot hole is ready, simply screw the finial into place until it’s snug and secure. It instantly adds a touch of elegance and completeness to the post.
5. Attach the Hose Hook
For the actual hose holder component, I discovered a wall-mount hose hook for a fantastic $5 at Walmart. These are also readily available at Home Depot, typically for around $9. Look for a sturdy, weather-resistant option that can comfortably support the weight of your garden hose when coiled.
Using exterior wood screws, attach the hose hook to the side of your wooden post at a comfortable height. Make sure it’s firmly secured, as it will bear the weight of your hose. Position it so that the hose can be easily coiled and uncoiled without obstruction.
6. Paint or Finish for Protection and Style
With the structural components in place, the final step before installation is painting. This not only protects the wood from the elements, ensuring longevity, but also allows you to customize its appearance. I opted for two generous coats of Rust-Oleum Painter’s Touch in semi-gloss black. This choice provides a classic, sleek look that blends beautifully with most garden settings. Consider your own outdoor aesthetic – perhaps a vibrant color to make it pop, or a natural stain to highlight the wood grain. Always use exterior-grade paint or stain for maximum weather resistance.
7. Install in the Ground
Now for getting your newly crafted hose holder into its permanent spot! I was fortunate to have a willing assistant for this crucial step: my 7-year-old, who absolutely loves playing in the dirt. So, I happily delegated the task of digging an 18-inch deep hole exactly where I wanted the post to stand. Sometimes, those little helpers really do come in handy, don’t they? Hehe!
Once the hole was dug, I carefully placed the hose holder into it. To ensure it was perfectly stable and upright, I added a few rocks around the base before backfilling with dirt. This creates a solid foundation, preventing wobbling. Finally, I covered the disturbed soil with fresh mulch to seamlessly integrate it into the garden bed, making it look pristine once more. Simple, effective, and beautifully tidy!
The Finished Product: A Garden Essential
Here are a few more photographs of the completed project from various angles, showcasing its charm and functionality in the garden:
Benefits of This Simple DIY Project:
Beyond the obvious cost savings, creating your own hose holder offers numerous advantages:
- Enhanced Organization: No more tangled hoses creating tripping hazards or looking unsightly.
- Increased Convenience: Easy access to your hose means more consistent watering for your plants.
- Prolonged Hose Life: Storing your hose properly, rather than leaving it kinked or exposed to harsh sun, helps prevent wear and tear.
- Custom Aesthetic: You can choose paints, stains, and finials that perfectly complement your existing outdoor decor.
- Sense of Accomplishment: There’s nothing quite like the satisfaction of creating something beautiful and functional with your own hands.
Customization and Maintenance Tips:
Feel free to get creative with your hose holder! You could choose a vibrant paint color to make it a focal point, apply a rustic stain, or even add a small birdhouse or decorative planter to the top for extra flair. For maintenance, a fresh coat of exterior paint every couple of years will keep it looking great and further protect the wood from the elements.
I truly hope you love this project as much as I do! I’m pretty confident my new potted plants will appreciate the easy access to water too. This simple addition has transformed a chaotic corner of my patio into a picture of neatness and charm.
Thank you so much for stopping by and sharing in this DIY journey! Before you go, be sure to check out my new outdoor dining table that I crafted for just $85 – another budget-friendly project that delivers high-end results!
If you found this project inspiring, please consider sharing and pinning it below to help others discover this easy and affordable way to enhance their gardens. Your support means the world!
Thanks again for being such an amazing community!
~Whitney