
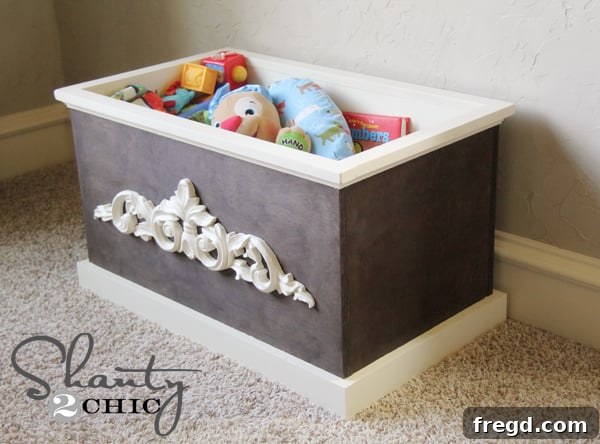
DIY Toy Box: Transforming Scrap Wood into Stylish, Sustainable Storage
Hey, fellow DIY enthusiasts and home organizers!
It was a whirlwind of “Project Organization” at my place last weekend, and I’m thrilled to report massive progress. Not only did I tackle some serious decluttering, but I also managed to breathe new life into my ever-growing pile of scrap wood. It’s truly amazing what you can create when you put your mind to it and commit to utilizing every last piece of material!
I had a substantial amount of Purebond Plywood left over from a previous project – specifically, the dresser I built for my son. Instead of letting these valuable remnants gather dust, I decided to embark on a new adventure: constructing a versatile toy box. But here’s the twist… this one was primarily for *me*! That’s right. While it will undoubtedly hold baby toys for now, its elegant design ensures it will serve as beautiful, functional storage for years to come, evolving with our needs. This project truly embodies the spirit of maximizing resources and creating lasting pieces for the home.
Curious to see the transformation? Here’s a sneak peek at the finished product. The journey from a stack of wood to this charming storage solution was incredibly rewarding.
The Motivation: Taming the Chaos with a DIY Storage Solution
As I briefly mentioned, my weekend was dedicated to organization. This particular DIY endeavor was a fantastic way to knock out two birds with one stone: significantly reducing my scrap pile and replacing a rather unappealing storage solution that had been residing in my room for far too long. There’s a profound satisfaction that comes with turning chaotic clutter into cohesive order, especially when it involves a hands-on project.
Before we dive into the creation, I must share the “before” state. Prepare yourselves for a moment of truth, because this is what I was dealing with. This image perfectly illustrates the kind of mess that fueled my organizational ambition. No judgment, please… Okay, maybe a little! 😉
Yes, it was indeed “bad.” A true doozie of a storage situation! But, I’m immensely proud to announce that the baby’s toys (and soon, many other items) now have some new, much more stylish digs. This DIY toy chest not only provides practical storage but also elevates the aesthetic of the space, a testament to the power of thoughtful design and a little bit of elbow grease.
Leveraging Proven Plans: Ana White’s Blueprint for Success
To construct this wooden toy box, I adapted Ana White’s fantastic plan for her open-top toy chest. Ana’s designs are renowned for being clear, beginner-friendly, and incredibly practical, making them a go-to resource for many DIY enthusiasts. I absolutely loved her original design, but I was determined to complete my version without spending any additional money on materials. This commitment meant I had to make a slight adjustment: I shortened the dimensions of the toy box just a bit to accommodate the exact amount of Purebond plywood scraps I had on hand. This flexibility is one of the great advantages of DIY – you can always tailor projects to fit your specific needs and available resources.
The Kreg Jig: An Indispensable Tool for Woodworking Projects
For the assembly of this sturdy wooden toy box, I once again relied on my incredibly awesome Kreg Jig®. Seriously, if you’re venturing into woodworking, especially projects involving plywood or solid wood panels, you absolutely *need* one of these in your workshop. The Kreg Jig system makes creating strong, invisible pocket hole joints incredibly easy and efficient, even for novice builders. It eliminates the need for complex joinery techniques and allows for quick, robust assembly.
For this specific build, I utilized 3/4″ pocket holes, which are perfect for securing the 3/4-inch thick Purebond plywood. My Kreg Jig settings were precisely calibrated to ensure perfect, tight-fitting joints. Precision in setting up your tools is key to achieving professional-looking results in any woodworking project.
Here’s a look at the Kreg Jig in action and the settings I used, ensuring optimal pocket hole placement and depth for secure connections:
Building the Foundation: Sides and Base of the DIY Toy Chest
Once the pocket holes were drilled into the various pieces of Purebond plywood, the assembly process became incredibly straightforward. First, I prepared the side panels of the toy box. These pieces, precisely cut to my adapted dimensions, form the structural integrity of the chest, defining its overall size and shape.
Here are the carefully prepared sides of my toy box, ready for assembly:
Next came the base – a crucial component that provides stability and support for everything stored within. Just like the sides, the base was cut from the same Purebond plywood, ensuring consistency and strength throughout the entire structure. With the pocket holes already drilled in the perimeter of the base, it was perfectly prepped for seamless integration with the side panels.
And here’s a clear view of my sturdy base piece, waiting to be joined:
I diligently followed Ana White’s step-by-step instructions to assemble the box. Her plans are exceptionally clear, detailing precisely how to connect each piece using the pocket hole joinery. This method is incredibly forgiving and results in a very robust structure, perfect for a toy box that needs to withstand daily use. The process involved attaching the side panels to the base, forming the initial open-top box.
Here’s how the assembly came together, showcasing the ease of building a custom wood box with the right tools and plans:
Adding Character: Staining and Painting for a Refined Look
With the structural assembly complete, it was time to move on to the fun part: finishing this baby with a beautiful stain and a complementary latex paint. The finishing touches are what truly transform a functional piece into a decorative element within your home.
First, I applied a generous coat of Rust-Oleum Ultimate Wood Stain in the rich, deep Kona shade. This particular stain is a personal favorite; it penetrates the wood beautifully, highlighting the natural grain of the Purebond plywood and providing a stunning, durable finish. The depth and warmth it adds are simply captivating. Applying stain correctly involves wiping it on evenly and then wiping off the excess, allowing the wood to absorb the pigment and reveal its inherent beauty. I absolutely LOVE the result – it’s a classic, sophisticated base for the entire toy chest.
For the trim pieces, I dipped back into my scrap bin, utilizing MDF scraps I already had. This is another fantastic way to keep costs down and make use of every last bit of material. Alternatively, you can easily find cheap furring strips at any hardware store for next to nothing, which work just as well for creating a simple yet elegant trim. The trim adds a lovely frame to the toy box, giving it a more finished and custom-built appearance.
Once the trim pieces were attached – I used a combination of wood glue and brad nails for a secure hold – I carefully taped off the stained box. This crucial step ensured clean lines between the stained body and the painted trim. Then, I applied a beautiful cream latex paint to all the trim pieces. The soft cream color provides a delightful contrast to the dark Kona stain, creating a charming two-tone effect that is both classic and inviting. It truly elevates the piece from a simple wooden box to a stylish piece of furniture.
The Final Flourish: Adding a Decorative Accent
My last step was to add a small wooden “scrolly” to the front of the toy box. I’m pretty sure these decorative appliqués have a more formal name, but “scrolly” perfectly captures their charming, ornate nature! You can easily find these types of embellishments at local craft stores like Hobby Lobby or home improvement centers like Lowe’s. They often have a wonderful selection of both wood and metal accents that can add a touch of personality and charm to any DIY furniture project, often at a very affordable price point.
Fortuitously, the “scrolly” I used was another treasure salvaged from my stash, leftover from a different project. This further reinforced my goal of spending no additional money and making the most of existing materials. I simply painted it with the same cream latex paint used for the trim, ensuring a cohesive look. Then, I attached it securely to the front of the toy box using a combination of wood glue and small nails. And that’s it! So simple, yet it adds such a lovely, refined touch. It’s definitely a little bit prettier and more elegant than the old clothes basket it replaced!
Oh, how I love working with scraps and seeing them transform into something beautiful and functional!
The Beautiful Transformation: A New Life for Scraps and Clutter
The journey from a messy pile of scraps and a cluttered room to this beautifully organized space has been incredibly satisfying. This DIY toy box is more than just a storage solution; it’s a testament to the power of resourceful crafting and the joy of creating something with your own hands. It proves that even leftover materials can be transformed into stunning, practical pieces for your home.
Behold the final results – a clean, organized, and aesthetically pleasing home for toys and more:
One of the best aspects of this DIY storage box is its versatility. I figure when it no longer needs to hold toys, it will make a fantastic blanket basket in the living room or a stylish repository for magazines and books. Its timeless design ensures it will remain a valuable and attractive piece of furniture for many years, adapting to different functions as needs change. This sustainable approach to home decor truly makes every effort worthwhile.
Share Your Scrap Success Stories!
So, what incredible creations have *you* made with your scrap wood or other leftover materials? I am always inspired by fellow DIYers and would absolutely love to hear about your clever projects and how you transform discarded bits into something wonderful!
Remember, if you’re feeling inspired to build your own, you can find the full tutorial on these easy, peasy boxes over at Ana-White.com! Her plans provide all the details you need to embark on your own successful woodworking adventure.
Thanks so much for stopping by and sharing in my DIY journey! Have a fantastic and productive week!
~Whitney