
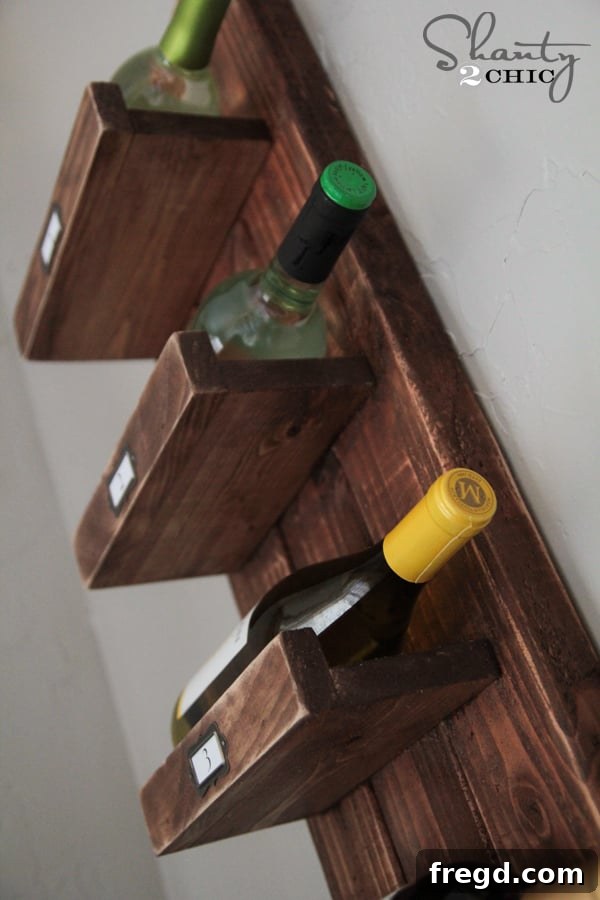
Welcome, fellow DIY enthusiasts, to a fantastic project that promises to add both charm and functionality to your home! We’re thrilled to share a delightful weekend build that will not only enhance your dining room or kitchen but also provide a stylish storage solution for your favorite wines. If you’ve been looking for a straightforward yet rewarding woodworking endeavor, our latest DIY Wood Wine Rack is exactly what you need. This project is designed to be accessible, even for those new to woodworking, making it a perfect introduction to using a Kreg Jig. Get ready to transform ordinary lumber into a beautiful, rustic wine display that will be a conversation starter!
Why invest in a generic store-bought wine rack when you can craft a custom piece that perfectly matches your home decor and personal style? Building your own wine rack offers immense satisfaction, allows for complete customization, and can be significantly more cost-effective. We recently decided it was time to upgrade our dining room’s wine storage. While our previous wine rack served its purpose well, we were ready for a fresh look and an even more charming design. The result? A stunning, easy-to-build wooden wine rack that looks absolutely adorable and is incredibly functional. Just take a look at how this new DIY wine rack turned out – we’re absolutely smitten!
Isn’t it just the cutest? We firmly believe every piece of home decor, especially something as delightful as a wine rack, should radiate charm and personality. This project delivers on that front without compromising on simplicity. It’s an exceptionally straightforward build, making it the ideal first-time Kreg Jig project for anyone who has been eager to try out this indispensable tool. If you haven’t yet experienced the magic of pocket-hole joinery, this is your perfect opportunity. We’ll walk you through every step, ensuring your success and helping you create a sturdy, beautiful piece of custom furniture. Let’s gather our materials and tools and embark on this exciting DIY journey!
Essential Materials for Your DIY Wood Wine Rack
Crafting this elegant wooden wine rack requires only a few basic materials, keeping the total cost surprisingly low. We’ve designed this project to be budget-friendly, and if you’re like us, you might even have some suitable wood scraps lying around your workshop, making this project practically free! Here’s a detailed list of what you’ll need to create your own:
Supply List:
- 1 – 2 x 4 x 10 board (This will form the robust back panel of your wine rack, providing structural integrity.)
- 1 – 1 x 4 x 8 pine or white wood board (These pieces will become the horizontal shelves where your wine bottles will rest.)
- 1 – 1 x 2 x 4 pine or white wood board (Used for the decorative front edge pieces that keep bottles securely in place.)
- Metal label holders (Optional, but highly recommended for an added touch of rustic charm and easy wine identification. We found ours at Michaels, but you can also find similar ones on Amazon.)
- Wood glue (For extra strength and durability in your joints.)
- 2.5″ pocket hole screws (To firmly connect the main frame pieces.)
- 1.25″ pocket hole screws (For attaching the thinner shelf pieces.)
- Small finish nails (If using metal label holders.)
- Varathane Wood Stain (We used American Walnut for a rich, classic finish.)
- Torx screws (For securely mounting the finished rack to your wall studs.)
The total cost for the wood alone for this project came in at less than $8, which is an incredible value for a custom-built piece of furniture! As mentioned, you might even discover you have enough suitable lumber in your scrap pile, allowing you to build this beauty for next to nothing. This makes it an incredibly rewarding and economical DIY endeavor.
Tools You’ll Need for This DIY Wine Rack Project
While the material list is lean, having the right tools makes all the difference in achieving professional-looking results with ease. This project is a fantastic showcase for some of our favorite power tools, especially the versatile Kreg Jig. Here’s what you’ll need:
- Kreg Jig K5 (An absolute game-changer for pocket-hole joinery. If you don’t have one, this project is a great reason to invest!)
- Ryobi Cordless Drill (Essential for drilling pocket holes and driving screws.)
- Ryobi Corner Cat Sander (Perfect for smoothing edges and distressing the finished piece.)
- Ryobi AirStrike Nail Gun (An incredible tool for quickly and neatly attaching the front trim pieces.)
- Stud Finder (Crucial for safely and securely mounting your heavy wine rack to the wall.)
- Impact Driver (Highly recommended for effortlessly driving large screws into studs.)
- Measuring Tape, Pencil, Safety Glasses, and Hearing Protection (Standard workshop essentials.)
Step-by-Step Guide: Building Your Custom Wooden Wine Rack
Step 1: Preparing the Main Frame Boards
Our DIY wine rack journey begins with preparing the foundational pieces. Take your 2x4x10 board, which will serve as the robust vertical back supports for your rack. Using a miter saw or circular saw, carefully cut this board into three equal pieces, each precisely 39 inches long. These three sturdy pieces will form the backbone of your wine rack, so accuracy in measurement and cutting is key for a level and stable finished product. Always double-check your measurements before making any cuts to ensure you have consistent lengths.
Step 2: Mastering Pocket Holes with the Kreg Jig
Now it’s time to introduce one of our favorite woodworking tools: the Kreg Jig! This device makes creating strong, invisible joints incredibly simple. For this project, we used the Kreg Jig K5, which is an absolute powerhouse. It’s user-friendly, incredibly efficient, and packed with features that make pocket-hole joinery a breeze, even for beginners. To prepare two of your 39-inch 2×4 boards, you’ll need to drill 1.5-inch pocket holes. Set your Kreg Jig to the 1.5-inch setting, which corresponds to the thickness of your 2×4 lumber. Position your wood securely in the jig and drill pocket holes approximately every 8 inches down one side of each of these two boards. These holes will be used to attach the main frame pieces together, forming a sturdy back panel for your wine rack.
Observe how the Kreg Jig is configured to the 1.5-inch setting on its side, ensuring the correct depth for our pocket holes. This detail is crucial for creating strong, flush joints. Once the jig is set, use your Ryobi cordless drill to create these precise pocket holes. The Kreg Jig guides your drill bit at the perfect angle, ensuring a consistent and reliable hole every time. You’ll quickly see why the Kreg Jig is considered a must-have tool for DIY furniture builders!
After drilling, you might want to slightly round the corners and smooth the edges of your 2x4s. We used our trusty Ryobi Corner Cat sander for this task. A light sanding not only makes the wood feel better to the touch but also prepares it beautifully for staining, giving your finished wine rack a more refined and professional appearance. This little detail can make a big difference in the overall aesthetic.
At this stage, your main back panel components should look like this, prepped and ready for assembly. The pocket holes are neatly drilled, and the edges are smoothed, setting the stage for the next exciting step in building your custom wine rack.
Step 3: Assembling the Back Panel
With your pocket holes drilled, it’s time to bring the main frame of your wine rack together. Take your two boards with pocket holes and position them on either side of the third, un-drilled 2×4 board. The pocket holes should face inwards, allowing you to drive screws from the outer boards into the central one. Use your drill, fitted with the Kreg driver attachment (which typically comes with your Kreg Jig), to attach these boards using 2.5-inch pocket hole screws. This creates an incredibly strong and stable back panel that will reliably support your wine collection.
Applying firm pressure, drive the screws until they are flush and secure. The Kreg system is renowned for creating exceptionally strong joints, and you’ll immediately notice the rigidity of your assembled back panel. This method ensures that your wine rack will stand the test of time and hold your bottles safely.
Once all three 2×4 pieces are securely attached with the pocket hole screws, your main frame assembly will resemble this. You now have a solid, robust foundation ready for the addition of the wine bottle shelves. The beauty of pocket-hole joinery is how neat and strong these connections are, providing a clean look from the front.
Step 4: Crafting the Wine Bottle Shelves
Next, we’ll create the individual shelves that will cradle your wine bottles. Take your 1×4 pine or white wood board and cut it into five pieces, each precisely 8.5 inches long. These will serve as the horizontal resting places for your wine. Just as with the main frame, we’ll use pocket holes for strong and hidden attachments, ensuring a clean and aesthetically pleasing finish for your wine rack shelves.
Since these 1×4 boards are thinner than the 2x4s, you’ll need to adjust your Kreg Jig settings. Change the setting to 3/4 inches to accommodate the thickness of your shelf wood. Drill pocket holes into one edge of each of your five 8.5-inch shelf pieces. These smaller pocket holes will ensure that your screws penetrate the shelf pieces correctly without splitting the wood, providing a secure and stable attachment point.
Before attaching each shelf, apply a thin line of wood glue along the edge where it will meet the main back panel. This extra step significantly strengthens the joint, making your wine rack even more durable. Then, using 1.25-inch pocket hole screws, attach each shelf to the main back panel, driving the screws through the pocket holes you just created. Ensure each shelf is flush and level before fully tightening the screws.
Here’s a closer look at a shelf after it has been securely attached. The pocket holes ensure a seamless connection, and the wood glue adds robust strength, creating a solid platform for your wine bottles. Repeat this process for all five shelves, paying close attention to their placement.
For consistent bottle storage and a balanced aesthetic, we spaced each shelf 6.5 inches apart. Start from the bottom or top and mark your measurements to ensure even spacing for all five shelves. This uniform spacing not only looks professional but also ensures that standard wine bottles fit comfortably. This careful planning contributes to the overall success and visual appeal of your DIY wine rack.
A side view reveals the neat attachment of the shelves and the overall structure taking shape. The design allows the bottles to rest securely, slightly angled, preventing corks from drying out. This practical design consideration is essential for proper wine storage.
Here’s a shot showing the pocket holes on the top of the wine rack once all the shelves are attached. You’ll notice these holes are visible from the top. We didn’t worry about filling these, as they will be conveniently covered by a wine bottle once the rack is in use. However, if you prefer a completely smooth finish, you can certainly fill them with wood putty before staining. It’s entirely a matter of personal preference!
Step 5: Adding the Decorative Front Edges
To complete the look and ensure your wine bottles are securely cradled, we’ll add the front edge pieces. For this step, take your 1×2 pine or white wood board and cut five pieces, each also 8.5 inches long. These slimmer pieces will be attached to the front edge of each shelf, providing a subtle lip that holds the bottles in place and adds a finished aesthetic to your custom wine rack.
Apply a thin, even line of wood glue to the front edge of each shelf piece. This step is vital for a strong and lasting bond, ensuring the front trim pieces remain firmly in place. Wood glue, combined with brad nails, creates an incredibly durable connection that will secure your wine bottles safely.
Now for a tool that makes quick work of this step: the Ryobi AirStrike nail gun. We absolutely love this cordless brad nailer – it’s incredibly easy to use and makes attaching these front pieces a joy. Position each 1×2 piece flush with the front of its corresponding shelf, and then use the nail gun to secure it in place with small brad nails. This tool is a true game-changer, making light work of what could otherwise be a tedious task with a hammer and nails. The AirStrike ensures a quick, clean, and professional finish with minimal effort, truly one of the most awesome tools for any DIY enthusiast.
Here’s a side view demonstrating how the front trim pieces are neatly attached, creating a subtle but effective barrier to prevent bottles from sliding forward. This attention to detail not only adds to the functionality but also enhances the overall aesthetic appeal of your DIY wine rack, giving it a polished, custom-made look.
Once all the front edge pieces are attached, your wine rack is fully assembled and structurally complete! It’s a fantastic feeling to see your project come together, transitioning from individual boards to a functional and beautiful piece of home decor. Now, the fun truly begins with the finishing touches.
Step 6: Finishing Touches – Staining, Distressing, and Labels
With the assembly complete, it’s time to add personality to your wine rack. We chose to stain ours using Varathane Stain from Home Depot in a beautiful shade called American Walnut. This stain is a personal favorite because it dries in under an hour and typically requires only one coat, making the finishing process incredibly quick and efficient. Its rich, deep color instantly elevates the look of the pine wood, giving it a warm, classic, and sophisticated appearance that complements various interior styles.
Once the stain had completely dried, we used our Ryobi Corner Cat sander again to lightly distress the edges of the wine rack. This technique adds a touch of rustic charm and character, making the new piece look like a beloved antique. Lightly sanding the corners and edges creates a worn, aged effect that beautifully enhances the warmth of the American Walnut stain. This step is entirely optional but highly recommended for those who appreciate a farmhouse or vintage aesthetic.
Finally, to add a personalized and practical touch, we attached metal label holders to the front of each shelf. These label holders are perfect for organizing your wine collection or simply adding a decorative flourish. We found ours at Michaels, but if you’re looking for an online option, we also recommend these on Amazon for their similar style and quality. Attaching them is simple: just use small finish nails, centering each holder on the front of its respective shelf. This adds a refined, library-like touch, making it easy to identify your favorite vintages at a glance.
Step 7: Securely Mounting Your Wine Rack to the Wall
Now for a crucial, albeit often overlooked, step: securely mounting your newly built wine rack to the wall. Because this is a substantial and heavy piece, especially once filled with bottles, it’s imperative to attach it directly into wall studs for maximum stability and safety. Attempting to hang it with drywall anchors alone is not recommended and could lead to your beautiful creation crashing down.
Your first step is to locate the wall studs. A reliable stud finder is your best friend here. This small, handheld tool simply glides along your wall and emits a beep or lights up when it detects the dense wood of a stud behind the drywall. This is the stud finder we regularly use, and it has never let us down. Mark the center of the studs where you intend to hang your wine rack.
Once you’ve identified your stud locations, hold the wine rack up to the wall and mark where these studs align with the back of the rack. Then, carefully pre-drill small pilot holes into the back of the wine rack at these marked spots. Pre-drilling prevents the wood from splitting when you drive the larger mounting screws and ensures a cleaner, easier installation. This step is particularly important when working with solid wood and large screws, contributing to the overall integrity of your mounting.
Next, align the pre-drilled holes in the wine rack with the marked stud locations on your wall. We used an impact driver to secure the wine rack to the wall with robust Torx screws. While you can certainly use your regular drill for this, an impact driver makes the job incredibly effortless. Its powerful, rotational force drives screws with minimal effort, making tasks like this feel like a breeze. This tool is remarkably strong and user-friendly, ensuring a secure and firm attachment of your wine rack to the wall studs. We recommend using at least three screws into separate studs to ensure maximum stability and safety for your beautiful new wine storage solution.
After securing our wine rack with three sturdy Torx screws directly into the wall studs, the installation was complete! The rack felt incredibly solid and secure, ready to hold a cherished collection of wines. It’s always a satisfying moment when a DIY project not only looks great but also performs its function flawlessly and safely. Now, step back and admire your handiwork!
The Grand Reveal: Your Stunning New Wine Rack!
Here she is, in all her finished glory! Our updated DIY wood wine rack, ready to grace your dining room or kitchen with its rustic charm and practical elegance. This project was not only fun and quick but also incredibly rewarding, proving that with a few tools and some determination, you can create beautiful and functional pieces for your home. We are absolutely thrilled with how this wine rack turned out – it’s cute, sturdy, and a perfect embodiment of custom home decor. Imagine it filled with your favorite vintages, adding a touch of personalized sophistication to your living space. We hope these images inspire you to embark on your own woodworking adventure this weekend!
What do you think of our new DIY wine rack? We are absolutely thrilled with its transformation and the character it adds to our dining space. We would be incredibly grateful if you could share this project with your friends and PIN it to your DIY boards! Your support helps us continue to create and share exciting new projects. Feel free to leave a comment below with your thoughts or questions – we love hearing from you!
Thank you so much for stopping by and joining us on this creative journey. We hope you enjoy tackling this super quick and easy weekend project, and that your new DIY wine rack brings you as much joy as it has brought us. Cheers to handmade beauty and creative endeavors!
~Whitney