
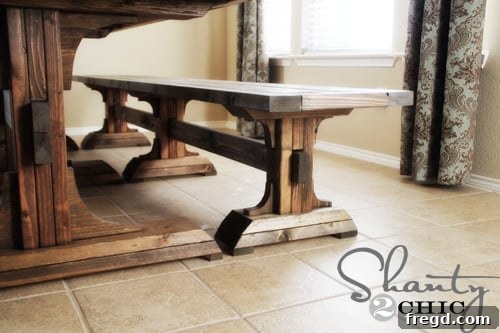
Building Your Dream Farmhouse Dining Set: DIY Triple Pedestal Benches to Match!
There’s an undeniable joy that comes from completing a big DIY project, especially one that transforms the heart of your home. For me, that joy is amplified a hundredfold because I now have perfectly matched benches to complement my magnificent Triple Pedestal Farmhouse Table! The vision of a cohesive, handcrafted dining space has finally become a reality, and the satisfaction is immeasurable. Stepping into the dining room now feels like entering a space truly made with love and dedication.
Why Choose DIY for Your Farmhouse Dining Furniture?
In a world dominated by mass-produced items, the allure of DIY furniture stands strong. Beyond the significant cost savings, building your own pieces offers an unmatched sense of accomplishment. You get to select the exact dimensions, choose the wood, and apply the finishes that perfectly align with your home’s aesthetic. This personalized approach ensures your furniture isn’t just functional, but also a true reflection of your style and effort. For a fraction of the retail price, you can create durable, beautiful pieces that tell a story, fostering a unique connection to your living space. There’s also the invaluable experience gained, learning new skills and conquering challenges along the way.
The Inspiration: Ana White’s Triple Pedestal Farmhouse Plans
This entire project, from the impressive dining table to these equally stunning benches, was made possible thanks to the incredible design and detailed instructions provided by Ana White. Her plans are renowned for being exceptionally clear, user-friendly, and geared towards empowering DIY enthusiasts of all skill levels. With her brilliant “Triple Pedestal Farmhouse Bench” plans, I was able to construct two robust, 9-foot benches for an astonishing total of just $90! It’s truly incredible how her designs transform what might seem like a complex build into an achievable weekend project for many. Her commitment to making beautiful furniture accessible through DIY is something truly commendable.
If you’re eager to embark on this project yourself, you can easily obtain the detailed plans for the Triple Pedestal Farmhouse Bench directly from Ana White’s website here. For those who are also eyeing the magnificent centerpiece, the Triple Pedestal Farmhouse Table Plans are available here. I encourage you to follow along with my build process below for practical tips and insights gained from personal experience.
Unveiling the Masterpiece: An Affordable Dining Experience
When you consider the full scope of this project – a grand triple pedestal farmhouse dining table paired with two expansive 9-foot benches – the total expenditure is simply astounding. The grand total for my entire dining set, including both the table and these fantastic benches, came to a mere $215! This figure stands in stark contrast to the thousands you might expect to pay for a similar high-quality, custom-look dining set from a retail store. This project truly exemplifies the power of DIY to deliver exceptional value without compromising on style or durability. It’s not just about saving money; it’s about investing your time and effort into creating something truly special for your home, something you’ll cherish for years to come.
Essential Tools for Your DIY Farmhouse Bench Project
While the plans from Ana White provide the roadmap, having the right tools makes the journey smoother and the result sturdier. Here are a few key players that were absolutely indispensable for this build:
The Indispensable Kreg Jig
It’s no exaggeration to say I couldn’t have achieved this level of craftsmanship and sturdiness without my Kreg Jig. This ingenious tool is a true lifesaver for any woodworking project, making furniture construction not only significantly easier but also incredibly robust. The Kreg Jig allows you to create strong, concealed pocket-hole joints quickly and accurately. These joints are famous for their ability to securely fasten wood pieces together, resulting in furniture that feels professionally built and can withstand years of daily use. For a dining set that will see a lot of activity, the Kreg Jig’s contribution to structural integrity is invaluable. It’s an investment that will undoubtedly pay for itself many times over through the sheer number of projects it enables you to tackle with confidence.
Reliable Wood Adhesion with Gorilla Wood Glue
For strong and lasting joints, especially in furniture that bears weight, a quality wood glue is paramount. I relied on Gorilla Wood Glue for assembling the various components, particularly the intricate pedestal legs. This glue provides an incredibly strong bond, enhancing the overall durability of the benches. When combined with screws and proper joinery techniques like pocket holes, wood glue acts as an additional layer of reinforcement, ensuring your furniture remains solid and stable for years. Applying glue to every joint is a small but crucial step that significantly contributes to the longevity and strength of your DIY pieces.
Other Key Tools
Beyond the Kreg Jig and Gorilla Glue, you’ll need a few other standard woodworking tools. A miter saw or circular saw with a straight edge is essential for precise cuts. A drill/driver will be necessary for pilot holes and driving screws. Measuring tapes, squares, and clamps are critical for accuracy and holding pieces in place while glue dries or screws are driven. Don’t forget sandpaper or an orbital sander for preparing your wood surfaces for staining and finishing – a smooth finish starts with proper sanding.
Step-by-Step: Crafting Your Own Triple Pedestal Farmhouse Benches
Building the Sturdy Pedestal Legs
The foundation of these magnificent benches lies in their robust pedestal legs. The construction steps for these legs are remarkably similar to those for the larger dining table, just scaled down in size. This consistency makes the process feel familiar and straightforward once you’ve tackled the table. Each leg assembly involves multiple pieces, carefully glued with Gorilla Wood Glue and then secured with screws, often utilizing pocket holes for a clean finish. Precision in cutting and assembly here is key, as these legs will bear the weight of the bench. Take your time, ensure everything is square, and let the glue cure properly before moving on to the next steps. The ease of this step felt like a piece of cake after the table!
Adding the Elegant Decorative Arches
The decorative arches are what truly elevate these benches from simple seating to statement pieces. While cutting and attaching 24 individual arches for two benches can feel a bit tedious, the effort is undeniably worth it. These arches provide that quintessential farmhouse charm and architectural interest that defines the triple pedestal style. They soften the otherwise linear design and add a touch of handcrafted elegance. Patience and careful cutting are required, but the process itself is straightforward. Once in place, you’ll immediately see how these seemingly small details make a monumental impact on the overall aesthetic, tying the benches perfectly to the table’s design.
Constructing the Durable Bench Seats
With the leg assemblies complete, attention turns to the bench seats themselves. This is where the Kreg Jig truly shines. The frames for the bench seats are constructed using pocket holes and screws, creating incredibly strong and stable rectangular structures. Once the outer frames are assembled, the interior panels for the seats are then built. It is crucial to measure and cut these panels as you go, rather than pre-cutting all pieces at once. This ensures the best possible accuracy and a snug fit. I highly recommend a “dry-fit” approach: assemble your panels within the frames without glue or screws first, making any necessary adjustments, before proceeding with the final attachment of all the boards. This simple step prevents frustrating misalignments and ensures a professional-looking finish.
Once the frames were completed, the process felt incredibly easy and satisfying. These foundational structures are the backbone of your bench seats, providing unwavering support and stability. The Kreg Jig makes quick work of this phase, transforming what could be a complex task into a streamlined and enjoyable part of the build.
After the frames, the process of adding the seat panels themselves also involved the Kreg Jig, ensuring every joint was solid. The dry-fitting process I mentioned earlier proved invaluable here, allowing for perfect alignment before any permanent fastening.
The Finishing Touch: Staining and Sealing for Lasting Beauty
With all the components expertly built, it’s time to bring them to life with the perfect finish. I chose to stain all the individual pieces before assembling the bench tops to the legs. This approach ensures complete coverage, especially in hard-to-reach areas, and results in a more professional and uniform finish.
Choosing the Perfect Stain: Rust-Oleum Early American
For both the table and the benches, I opted for one of my absolute favorite stains: Rust-Oleum’s Early American. This particular shade delivers a classic, warm, and inviting tone that perfectly embodies the farmhouse aesthetic. It’s a versatile color that highlights the natural grain of the wood beautifully. I applied the stain using a bristle brush, allowing it to penetrate the wood for approximately five minutes before wiping away the excess with a clean rag. It’s important to note that environmental factors, particularly temperature, can affect the stain’s set-time. In colder weather, you might need to allow a little longer before wiping to achieve the desired depth of color and ensure even absorption. Always test on a scrap piece of wood first to get a feel for the process and the desired shade.
Protecting Your Investment with Polyurethane
After the stain had thoroughly dried and cured, the next crucial step was to apply a protective topcoat. I followed up with a single coat of Rust-Oleum Polyurethane in a satin finish. Polyurethane is essential for any dining furniture, as it provides a durable barrier against spills, scratches, and everyday wear and tear. The satin finish offers a beautiful, subtle sheen that enhances the wood’s natural beauty without being overly glossy, perfectly complementing the rustic farmhouse style. Ensure adequate drying time between coats and before final assembly to allow the finish to harden completely, maximizing its protective qualities. This step is vital for ensuring your handmade furniture stands the test of time and remains beautiful for years to come.
Bringing It All Together: Final Assembly and Enjoyment
Once all the stained and sealed pieces were completely dry, it was time for the exciting final assembly. I brought the individual components into the house and carefully attached the bench seats to their respective pedestal legs. This last step is incredibly rewarding, as you witness your hours of hard work culminate into a magnificent, functional piece of furniture. Each bench instantly transforms into a substantial, elegant seating solution, perfectly proportioned and styled to match the dining table. The cohesive look of the complete dining set is truly breathtaking, creating an inviting focal point in the room. The anticipation builds as you carefully tighten the last screws, knowing that soon, this space will be filled with laughter and shared meals.
The Heart of Our Home: A Dining Set Built with Love (and Smart Plans!)
I am absolutely head over heels in love with my new dining set! With a little elbow grease, some dedication, and the brilliant plans from Ana White, I now possess a gorgeous, high-quality dining ensemble for an incredible total of just $215. This set comfortably accommodates our family of five, with ample room to spare for guests during gatherings. There’s nothing quite like having a dining area that not only looks fantastic but also perfectly serves the needs of your family and friends.
One of the greatest benefits of building our own sturdy, affordable furniture is the peace of mind it brings. My kids love to spread out their homework, art projects, and games on this expansive table and benches. I don’t have to worry about them potentially damaging an expensive retail piece, because this set was built for life and designed to be loved and used every single day. This project is a powerful testament that you absolutely do not need to pay exorbitant retail prices to have beautiful, well-built, and functional furniture in your home. It’s an investment in skill, savings, and satisfaction that truly pays dividends.
What’s Next on Your DIY Journey?
Inspired to create something amazing for your home? Building furniture can be a deeply rewarding experience, offering both practical benefits and immense personal satisfaction. What exciting project is currently at the top of your DIY building wish list? Share your dreams and let’s inspire each other to keep crafting and creating!
Thank You for Stopping By!
~Ashley