
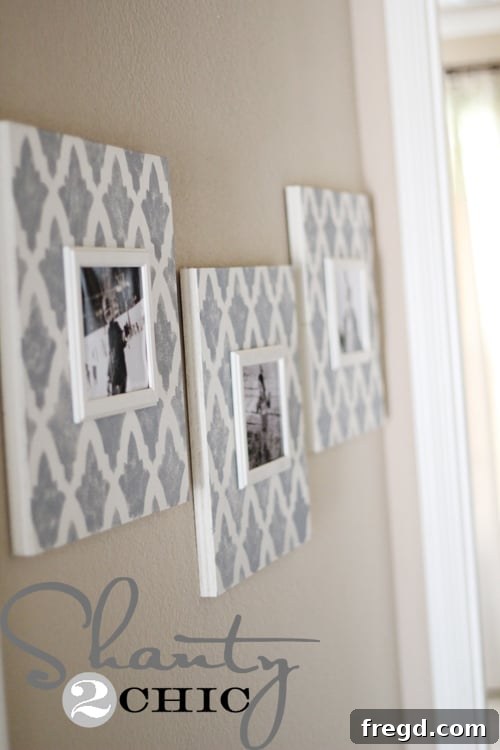
Transforming your living space doesn’t have to be an expensive or complicated endeavor. In fact, some of the most charming and personal home decor pieces are those you create yourself. Last week, I gave you a sneak peek of my stunning DIY Stenciled Photo Frames, and the response was incredible! Today, I’m thrilled to share the comprehensive, step-by-step tutorial that will guide you through crafting these beautiful, budget-friendly works of art for your own home. Get ready to unleash your inner artisan and create a personalized photo gallery wall that truly reflects your style!
You might be surprised to learn just how incredibly easy and affordable these custom frames are to make. Each frame costs roughly $5, making this an ideal project for anyone looking to add a touch of bespoke elegance to their decor without breaking the bank. The best part? These frames allow for easy photo changes, meaning your gallery wall can evolve with your memories. Whether you’re displaying cherished family moments, breathtaking travel snapshots, or inspiring artistic prints, these stenciled frames provide a chic and flexible solution.
Why Choose DIY Stenciled Photo Frames?
In a world of mass-produced decor, there’s something truly special about displaying items crafted with your own hands. DIY stenciled photo frames offer numerous advantages:
- Unbeatable Affordability: With materials costing around $5 per frame, you can create a stunning gallery wall for a fraction of the price of store-bought alternatives.
- Personalized Aesthetic: Choose your own stencil patterns, paint colors, and frame styles to perfectly match your existing home decor and personal taste. The design possibilities are virtually endless, allowing you to create something uniquely yours.
- Easy Customization: The design allows you to swap out photos with ease, ensuring your display always features your favorite and most current memories. This flexibility is a game-changer for dynamic home decor.
- Therapeutic Crafting: Engaging in a DIY project can be incredibly satisfying and therapeutic. The process of transforming simple materials into beautiful wall art offers a sense of accomplishment and creative fulfillment.
- Unique Wall Art: Beyond just holding photos, the stenciled boards themselves become captivating pieces of wall art, adding depth and texture to your display.
Gathering Your Materials: What You’ll Need
Before diving into the creative process, ensure you have all the necessary supplies on hand. Preparation is key to a smooth and enjoyable DIY experience.
- Wood Boards:
- Purebond Plywood Scraps (ideal): If you have leftover 3/4″ thick plywood from previous projects, this is a fantastic way to repurpose materials. I was fortunate to have Purebond plywood scraps, known for its eco-friendly, formaldehyde-free composition.
- MDF Panel (alternative): If scraps aren’t available, a 2×4 (3/4″ thick) MDF panel is an excellent, cost-effective substitute, typically costing around $12. MDF provides a smooth surface perfect for painting and stenciling.
- Cutting Tools (if cutting boards yourself): A table saw or circular saw.
- Sandpaper: Fine-grit sandpaper for smoothing edges.
- Spray Paint: Rust-Oleum Heirloom White (or your preferred color). This provides a lovely, even finish.
- Stencil:
- Cutting Edge Stencils Turkish Tulip: This particular design offers a beautiful, elegant pattern.
- Local Craft Store Stencil: Explore a wide variety of patterns available at your local craft supply store.
- DIY Stencil: If you own a Silhouette Cameo, you can create custom stencils using contact paper for a truly unique design.
- Acrylic Craft Paint: Americana Slate Grey (or a color that complements your spray paint and decor).
- Stencil Brush: Essential for the dry-brushing technique.
- Cheap Photo Frames: Look for inexpensive frames, preferably with simple backs that can be easily modified. Walmart often has great deals, like the ones I found for $0.95 each!
- Finishing Nails: Small nails for attaching the photo frames to the boards.
- Hammer: For nailing.
- Measuring Tape or Ruler: For precise cuts and placements.
- Pencil: For marking measurements.
- Saw Tooth Hangers: For mounting the finished art pieces on your wall.
- Wall Anchors and Screws: For secure wall installation.
Step-by-Step Tutorial: Crafting Your Stenciled Photo Frames
Let’s get started on bringing your vision to life!
Step 1: Preparing Your Wood Boards
The foundation of your stenciled photo frame wall art begins with carefully prepared wood boards. I cut my Purebond plywood scraps down to 13 3/4 x 15 3/4 inches. These dimensions provided a substantial backdrop for my frames and stencil design. If you don’t have access to woodworking tools, don’t worry! Most local hardware stores offer cutting services. Simply provide them with your desired dimensions, and they’ll make the precise cuts for you, often for a minimal fee or even free if you purchase the material from them. Once cut, take a moment to lightly sand all edges and surfaces of your boards. This step ensures a smooth, splinter-free finish that will accept paint beautifully and give your final product a professional look and feel.
Step 2: Priming and Painting the Boards
With your boards prepped, it’s time to add a base coat of color. I opted for Rust-Oleum Heirloom White spray paint, a personal favorite for its soft, elegant finish that lends itself perfectly to a shabby chic or farmhouse aesthetic. When spray painting, remember to work in a well-ventilated area, preferably outdoors or in a garage with open doors. Apply two light, even coats to the front and all sides of each board. Holding the can about 8-12 inches away, use sweeping motions to avoid drips and ensure uniform coverage. Allow adequate drying time between coats, typically 15-30 minutes, and a full cure (several hours or overnight) before proceeding to the stenciling step. This base layer will provide a beautiful canvas for your stencil design.
Step 3: The Art of Stenciling
Now for the fun part: adding your decorative stencil pattern! I used the gorgeous Turkish Tulip stencil from Cutting Edge Stencils, which I absolutely adore for its intricate yet classic design. If you’re using a different stencil, whether from a craft store or one you custom-made with a Silhouette Cameo and contact paper, the technique remains the same.
Position your stencil precisely on the board, ensuring it’s centered or aligned as desired. You can use painter’s tape to secure the stencil in place, preventing any shifting during painting. Using a stencil brush and Americana Slate Grey acrylic paint (or your chosen contrasting color), employ the dry-brush technique. This involves dabbing your brush into the paint, then blotting almost all of it off onto a paper towel or scrap piece of cardboard until the brush feels nearly dry. The key to successful stenciling with minimal bleed-through is to use very little paint. Then, gently dab the brush all over the stencil openings. Build up the color gradually with multiple thin layers rather than one thick application. This method creates crisp lines and a beautifully distressed or faded effect.
Once you’ve achieved your desired opacity, carefully lift the stencil. The crisp, beautiful pattern will reveal itself, adding a sophisticated touch to your wood board. I truly LOVE this pattern and how it transforms a simple board into a piece of art.
Step 4: Adapting Your Photo Frames
This next step is where your “serious DIY skills” come into play – just kidding, it’s incredibly simple! The goal is to prepare your inexpensive photo frames for hanging directly onto your stenciled board. I found these super cheap frames at Wal-Mart for only $0.95 each, which is an absolute steal! Can I get a WHOOP for that amazing find?
Flip each frame over to the back. The first modification involves carefully ripping off the stand at the hinge. Most cheap frames have a flimsy cardboard stand that can be easily detached. Next, locate the cardboard hanging bracket (the part with a small opening) and pull out its middle section. This modification allows the frame to hang flat against the board from a single finishing nail. This design is perfect for those who, like me, enjoy changing out photos frequently. If you prefer a more permanent solution and aren’t concerned with photo changes, you could use spray adhesive to attach your photos and then epoxy the entire frame to the board. However, for maximum flexibility, my method is the easiest and most practical solution I’ve found.
Step 5: Assembling Your Stenciled Photo Frames
With your frames modified, it’s time to integrate them with your beautifully stenciled boards. First, apply two coats of the Rust-Oleum Heirloom White spray paint to each frame, ensuring they match the base color of your boards. This creates a cohesive and polished look. Once the paint is dry, carefully measure and mark the placement for your finishing nails on each board. For my specific frames and board dimensions, I found that hammering a nail in 5 inches from the top edge and 8 inches from the left side worked perfectly. These measurements ensure your frames hang centrally and uniformly on the stenciled backdrop. Double-check your measurements to confirm the placement works well for the size of your frames and the overall aesthetic you’re aiming for. Gently hang your frames onto these nails, making sure they are level and secure.
Step 6: Hanging Your Masterpiece
Your stunning DIY stenciled photo frames are now ready to adorn your walls! To ensure a secure and long-lasting display, nail large saw tooth hangers to the backs of your assembled art pieces. For wall installation, I recommend anchoring screws directly into your wall, especially if your pieces are substantial or you plan to hang multiple frames to create a gallery wall. Use a level to ensure your frames are hung straight and consider mapping out your gallery wall arrangement on the floor first to visualize the layout before making any holes in your wall. This final step brings all your hard work together, creating a captivating focal point in any room.
This project was so quick and easy, and the results are incredibly rewarding. I LOVE, LOVE, LOVE that I can change out the pictures whenever I want, keeping my decor fresh and updated without any hassle. It took me about an hour to make all three frames, and at just $5 each, it’s an undeniable win-win situation for stylish, personalized, and affordable home decor!
Tips for Success
- Practice Makes Perfect: If you’re new to stenciling, practice the dry-brush technique on a scrap piece of wood or cardboard before applying it to your actual project boards.
- Ventilation is Key: Always work in a well-ventilated area when using spray paint. Consider wearing a mask for added protection.
- Clean Your Stencils: Immediately after use, clean your stencils with warm soapy water to ensure they last for many projects to come.
- Secure Your Stencil: Use low-tack painter’s tape or a temporary spray adhesive to hold your stencil firmly in place, minimizing the risk of paint bleed.
- Layering Paint: For vibrant stencil colors, apply multiple thin layers of acrylic paint rather than one thick coat.
Creative Variations & Personalization
While the Turkish Tulip stencil and Heirloom White base create a beautiful look, don’t hesitate to experiment!
- Stencil Patterns: Explore geometric, abstract, botanical, or even typographic stencils to match different decor styles.
- Color Palettes: Choose bold, contrasting colors for a modern look, or soft pastels for a more whimsical feel. Consider distressing the painted boards with sandpaper after the paint has cured for a true shabby chic or rustic vibe.
- Frame Styles: While inexpensive frames are ideal, you could also upcycle old frames, painting them to match your new creation.
- Size & Scale: Create frames in varying sizes for a dynamic gallery wall, or make a single large statement piece.
The Joy of DIY Home Decor
There’s immense satisfaction in creating something beautiful and functional for your home. These DIY stenciled photo frames are not just a craft project; they’re an expression of your personality and a testament to the fact that stunning decor doesn’t require a hefty price tag. They provide a wonderful way to showcase your most cherished photographs, transforming them into a curated display of memories and artistry. Embrace the process, enjoy the creation, and revel in the unique touch these frames add to your living space.
If you haven’t entered to win a stencil from Cutting Edge Stencils, today is the last day to seize this amazing opportunity! Head on over HERE for a chance to win and start your next stenciling adventure!
Other DIY Photo Projects to Inspire You
If you loved this project, here are some other photo-related DIYs I’ve created around the house that might spark your next creative endeavor:
Photo Wall Hanging
DIY Photo Canvas
Chevron Stocking Hangers
Thank you so much for stopping by and embarking on this creative journey with me! I hope this detailed guide empowers you to create your own beautiful stenciled photo frames and adds a personal touch to your home.
~Ashley