
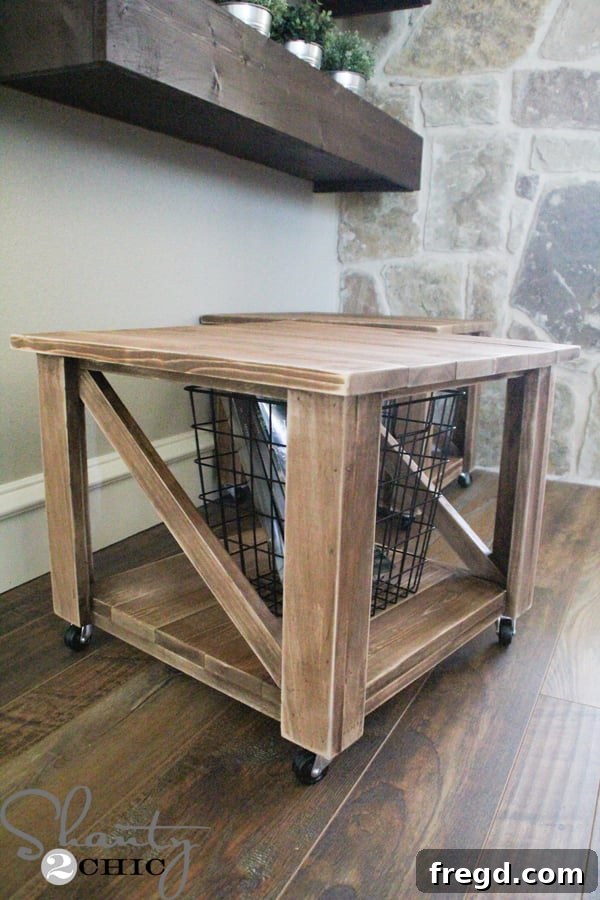
Build Your Own DIY Rolling Storage Ottoman: Style, Function, and Mobility in One Weekend Project!
Welcome, fellow DIY enthusiasts! Prepare to be inspired by what might just be one of my all-time favorite projects: the incredibly versatile DIY Rolling Storage Ottoman. This isn’t just another piece of furniture; it’s a dynamic solution that promises to enhance functionality and add a touch of handcrafted charm to virtually any room in your home. Whether you need extra seating, convenient storage, or a movable accent piece, this ottoman delivers on all fronts.
The Inspiration: Solving Common Home Challenges with Clever Design
The vision for these rolling ottomans came to life alongside my DIY Floating Shelves. With a large family and frequent guests, our living room couches often fill up quickly, leaving little room for everyone to comfortably gather. I needed a flexible seating solution that could be easily deployed when needed and neatly tucked away when not in use. That’s where the idea of ottomans on wheels truly shone. These aren’t just practical; they’re designed to fit perfectly under the floating shelves, maintaining a sleek, organized look when stowed away.
But the benefits don’t stop at seating. Add a stylish basket, and you instantly create a functional storage spot for magazines, blankets, toys, or anything else you need to keep tidy. And here’s the best part for every budget-conscious, time-strapped DIYer: you can build this versatile piece in less than an hour, typically for under $40! If you’re anything like me and have a collection of wood scraps, you might even build it for significantly less. The design utilizes short cuts, making it an ideal project to finally empty out that overflowing scrap bin.
Ready to Build? Grab Your FREE Printable Plans!
I’m thrilled to show you just how straightforward and rewarding this build is. To make it even easier, we’ve teamed up with our incredibly talented friend, Jay, from Jay’s Custom Creations, who masterfully converted our design into FREE Printable Plans. These detailed plans will guide you through every cut and step, ensuring a smooth building experience. Simply click the image below or HERE to download and print your free plans!
Essential Tools and Materials for Your Rolling Ottoman Project
Before we dive into the step-by-step instructions, let’s gather everything you’ll need. Having your tools and materials ready will streamline the building process and make for a more enjoyable DIY experience. This project is beginner-friendly and doesn’t require an extensive workshop, making it perfect for those looking to expand their woodworking skills.
Tools You’ll Need:
- Tape Measure
- Pencil
- Miter Saw or Circular Saw (for accurate cuts)
- Drill (for pre-drilling and screws)
- Kreg Jig (for strong, concealed pocket holes)
- Ryobi 18 gauge Airstrike Nailer (or similar brad nailer)
- Safety Glasses and Hearing Protection (always prioritize safety!)
- Sanding Block or Orbital Sander
- Clean Cloths (for staining)
Materials List:
- Wood Boards:
- 1x2s (for leg structure)
- 1x3s (for leg structure)
- 1x4s (for slats and top planks)
- Wood Glue (e.g., Gorilla Glue Wood Glue)
- 1 1/4″ Pocket Hole Screws
- Brad Nails (for nailer)
- Wood Filler (to conceal nail holes)
- Sandpaper (various grits)
- Stain or Paint of your choice (e.g., Varathane Early American stain)
- 1 1/2″ Casters (4 per ottoman)
- Optional: Wire Baskets or other storage inserts
Step-by-Step Guide: Building Your Rolling Storage Ottoman
Alright, let’s get started on bringing this fantastic rolling ottoman to life! Follow these simple steps for a quick and rewarding build.
Step 1: Constructing the Legs
We’ll begin with the legs, which are surprisingly simple to assemble. Take your 1x2s and 1x3s. Apply a generous bead of Gorilla Glue Wood Glue along one face of the 1×2. Then, align the 1×3 directly on top of the glued 1×2, ensuring the edges are flush. Using your Ryobi 18 gauge Airstrike Nailer, drive about 5 nails through the front of the 1×3 into the 1×2, securing them firmly together. Working on a stable table makes this process much easier; you can slide the boards to the edge for better access. Repeat this for all four legs.
And just like that, your legs are complete! Ensure the glue sets properly before moving on, although the nails provide immediate stability.
Step 2: Assembling the Top and Bottom Frames
Next, we’ll create the rectangular top and bottom frames that will define the ottoman’s structure. Using your Kreg Jig, drill 1 1/4″ pocket holes into the ends of the short frame pieces. Pocket holes create incredibly strong and hidden joints, giving your ottoman a professional finish. Assemble these frame pieces together using 1 1/4″ pocket hole screws, ensuring each frame is square and sturdy.
Step 3: Attaching Slats to the Bottom Frame
Now, flip your *bottom frame* upside down. We will attach the 1×4 slats to what will be the top of this frame (which becomes the interior bottom of your ottoman). Apply wood glue to the edges of the frame where the slats will rest, then secure the 1×4 slats using your nailer. Remember: *only attach slats to the bottom frame!* This creates the sturdy base for your storage baskets. Ensure even spacing between slats for both aesthetic appeal and structural integrity.
Step 4: Connecting the Bottom Frame to the Legs
With the bottom slats in place, it’s time to join the bottom frame to the prepared legs. Apply wood glue to the contact points on the legs and position the bottom frame. Use your nailer to securely attach the frame to each leg. Critical detail: make sure the bottom of the frame is flush with the bottom of the legs. This alignment is crucial for the casters later on and for the overall stability of the ottoman.
Step 5: Attaching the Top Frame
Now, repeat the process for the top frame. Attach the top frame to the legs in the same manner, using wood glue and nails. Just like the bottom, ensure the top of the frame is flush with the very top of the legs. This consistency creates a clean, professional look for your ottoman’s frame.
Step 6: Adding the Angle Pieces for Support and Style
The angle pieces not only add an attractive design element but also provide additional structural support. Measure and cut these pieces to fit precisely within the corners of your ottoman. Apply wood glue and secure them with nails, attaching them to the backs of the 1×3 pieces on the legs. Take your time with the measurements to ensure a snug and visually appealing fit.
You can clearly see how the angle pieces integrate into the leg structure here, providing that extra layer of stability.
Step 7: Adding the Top Planks
We’re nearly there! The main structure of your rolling ottoman is almost complete. Now it’s time to add the top planks. Just like with the bottom slats, measure and cut these 1×4 pieces as you go, ensuring a perfect fit across the top frame. Secure them with wood glue and nails. This forms the solid surface of your ottoman, ready for use as a footrest, extra seat, or side table.
Finishing Touches: Staining and Adding Casters
Step 8: Sanding and Staining
With the construction complete, it’s time to prepare your ottoman for its final finish. Start by filling any visible nail holes with wood filler, allowing it to dry completely. Once dry, sand the entire piece smooth. Begin with a medium-grit sandpaper (e.g., 120-grit) to remove imperfections, then move to a finer grit (e.g., 220-grit) for a silky-smooth surface, ensuring all wood filler is flush and the wood is prepped for staining. Wipe away all sanding dust with a clean, damp cloth.
For this project, I opted for one coat of Varathane Early American stain, which gives a beautiful, rich, and classic wood tone. To apply, simply wipe the stain onto the wood with a clean cloth, ensuring even coverage. Allow it to sit for approximately 5 minutes, letting the wood absorb the pigment. Then, with a separate clean cloth, gently wipe away the excess stain. The goal isn’t to remove all the stain but to blend it and remove any puddles, achieving a consistent color and revealing the wood grain. Allow the stain to dry for about an hour, or as recommended by the product instructions.
Step 9: Attaching the Casters
Once the stain is completely dry, it’s time to add the mobility! Flip your ottoman over and attach the 1 1/2″ casters to the bottom corners of the legs. Pre-drill pilot holes to prevent splitting the wood, then secure each caster with screws. Make sure the casters are firmly attached to ensure smooth rolling and stability. These casters are what give your ottoman its incredible versatility, allowing it to glide effortlessly across your floors.
Style Your Rolling Storage Ottoman
Now for the fun part – styling! I found some adorable black wire baskets at Target that fit perfectly within the storage compartment. I filled them with some of my favorite magazines, but imagine the possibilities: remote controls, small throws, children’s books, or even art supplies. These ottomans aren’t just functional; they’re a canvas for your personal style.
Unleash the Versatility: More Ways to Use Your DIY Ottoman
I am absolutely obsessed with these rolling storage ottomans! Their adaptability makes me want one for every room in the house. Beyond extra seating and magazine storage, consider these creative uses:
- Living Room: As discussed, perfect for guests, but also as a movable footrest for movie nights or a convenient side table for drinks and snacks.
- Kids’ Playroom: A low-profile, sturdy seating option that can be rolled out for playdates and then easily pushed back under a table or shelf to keep the room tidy. The storage is ideal for toys!
- Entryway: A welcoming spot to sit down and put on shoes, with immediate storage for gloves, leashes, or umbrellas.
- Bedroom: A chic end-of-bed bench, providing a spot for clothes or extra blankets, and the ability to move it around as needed.
- Home Office: A comfortable footrest under your desk that can double as extra seating when collaborators visit.
Luckily, my kids haven’t yet discovered the thrill of racing these across our wood floors. So, let’s keep that little secret between us, shall we? This project truly proves that functional pieces can also be incredibly stylish and fun!
Ready to Transform Your Home?
Do you feel inspired to build your own DIY Rolling Storage Ottomans? I’d love to hear where you would envision them in your home! The possibilities are endless, and the satisfaction of building something so useful and beautiful is truly unmatched.
For more home improvement inspiration, don’t forget to check out my DIY Floating Shelves HERE, which perfectly complement these ottomans, and learn all about my laminate floors HERE for more great DIY projects.
Thank you so much for stopping by and embarking on this exciting DIY journey with me!
Happy Building!
~Ashley