
Craft Your Dream Outdoor Dining Table: A Pottery Barn Inspired DIY for Under $100!
Hello fellow DIY enthusiasts! We are absolutely thrilled to share our latest woodworking triumph with you today—a stunning outdoor dining table that brings high-end style to your backyard without the hefty price tag. Get ready to be inspired by a project that proves luxurious outdoor living is within everyone’s reach, especially when you embrace the power of DIY!
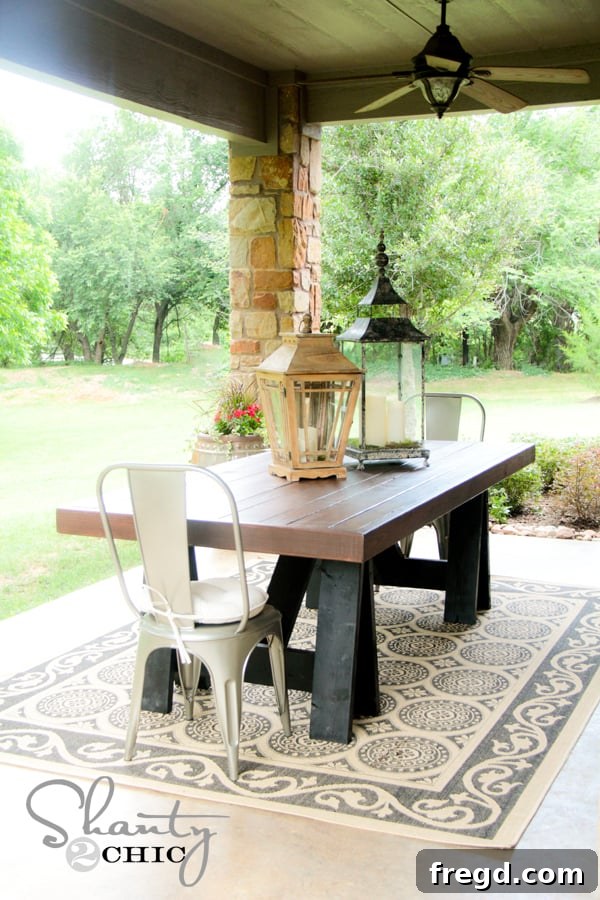
Before we dive into the exciting details, let’s talk about the incredible cost efficiency of this build. The total lumber cost for this beautiful piece? A mere $85, utilizing just 16 boards! You read that correctly—eighty-five dollars for a robust, stylish outdoor dining table that looks like it cost a fortune. Feast your eyes on the stunning result:
From Inspiration to Fabrication: The Story Behind the Sawhorse Table
Our journey began with a browsing session through a popular Pottery Barn catalog, where we stumbled upon a gorgeous sawhorse-style outdoor dining table. The design immediately captured our attention—its rustic charm and sturdy construction were exactly what we envisioned for a perfect outdoor gathering space. However, the enthusiasm quickly waned upon discovering the price tag: a staggering $1000! That’s where the magic of DIY truly shines. We knew we could replicate that sophisticated look, not just for a fraction of the cost, but with personalized touches that would make it even better.
This project was a fantastic collaboration with our wonderful friend, Miss Ana White, a true guru in the world of woodworking plans. Together, we designed this impressive sawhorse outdoor dining table, taking inspiration from the Pottery Barn piece and elevating it with our own robust construction. The beauty of DIY isn’t just in the savings; it’s in the ability to “beef up” the design, ensuring durability and a superior finish that often surpasses factory-made items. We believe our version not only rivals the original but, dare we say, looks even better!
While we’ll share some essential tips and tricks for this build right here, you can find the comprehensive, step-by-step free plans directly on Ana White’s website. These plans provide all the detailed measurements and instructions you’ll need to successfully create your own masterpiece.
The Foundation of Strength: Tools and Materials
Building this table is surprisingly straightforward, making it an excellent project for both seasoned woodworkers and eager beginners. However, there’s one tool that truly makes this build a breeze and is, in our opinion, absolutely indispensable: the Kreg Jig. This pocket-hole joinery system allows for incredibly strong and precise connections, transforming complex joinery into a simple, efficient process. We relied on our Kreg Jig for virtually every joint in this table, and honestly, we wouldn’t have tackled this project without it. It’s a game-changer for woodworking, creating secure joints quickly and without visible fasteners on the finished surface.
For consistent and strong joints throughout the project, we used a 1 1/2-inch setting for our drill bit with the Kreg Jig. This ensures optimal pocket hole depth for the lumber dimensions we were working with, creating robust connections that will stand the test of time and outdoor elements.
Choosing the Right Fasteners for Outdoor Durability
Since this table is destined for outdoor enjoyment, the choice of screws was crucial. We opted for Kreg’s Blue-Kote screws, specifically designed for outdoor applications. These exceptional screws feature a durable, weather-resistant coating that prevents rust and corrosion, ensuring the integrity and longevity of your outdoor furniture. They are truly amazing fasteners, and we often use them for various outdoor projects, even those that don’t specifically require a Kreg Jig, thanks to their superior performance.
For specific angled cuts, particularly the 10-degree angles required for the table legs, the Kreg Jig setup allowed for precise pocket hole placement. We simply aligned our boards within the jig, as shown here, to accurately drill the necessary holes without any guesswork.
To avoid any unnecessary holes and ensure accurate assembly, we pre-marked the exact locations for our pocket holes on the table legs before drilling. This simple step saves time and ensures a clean, professional finish (and prevents those “oops” moments we all experience from time to time!).
Assembly Process: Bringing the Sawhorse Table to Life
Let’s walk through the assembly of the table legs, which form the distinctive sawhorse bases of this design. Proper placement of pocket holes is key for a strong and stable structure.
We strategically placed pocket holes at the top of each leg piece, ready to accept screws that will secure them to the tabletop frame.
Additionally, pocket holes were drilled into the smaller wooden pieces that bridge between the legs, forming the sturdy A-frame structure of the sawhorse design. These hidden joints provide incredible strength and a clean aesthetic.
When assembling the leg components, the Kreg Jig Right Angle Clamp proved to be an invaluable assistant. This clever tool holds pieces perfectly square and secure while you drive in screws, acting like an extra set of hands. It simply slips into one of your pre-drilled pocket holes, holding the boards firmly in place until all additional screws are added. This significantly simplifies the assembly process, ensuring precise angles and strong joints. It’s truly a must-have accessory for any Kreg Jig user!
Once all the leg components are assembled, you’ll have two robust sawhorse bases ready to support your tabletop. The structure is incredibly strong and stable, a testament to the effectiveness of pocket-hole joinery.
Constructing the Tabletop with Practical Design
For the tabletop, a thoughtful detail was incorporated to enhance its outdoor suitability: small gaps between the boards. We achieved this by using shims to separate the planks slightly during assembly. These intentional gaps serve a crucial purpose, allowing rainwater to drain freely, which prevents water from pooling and significantly reduces the risk of wood rot and deterioration over time. This simple design choice greatly extends the lifespan of your outdoor table.
To achieve a perfectly smooth and seamless finish, especially after creating numerous pocket holes, we filled all visible holes with a high-quality, paintable wood filler that is suitable for outdoor use. This step is quick, easy, and effectively conceals the pocket holes, making them virtually disappear. Once filled and sanded, the surface is pristine, ready for finishing.
We began by laying out all the tabletop boards on the ground, carefully separating them with shims to achieve consistent spacing, as demonstrated here.
Next, we securely attached the assembled legs to the tabletop. This was accomplished by drilling the weather-resistant Blue-Kote screws directly through the top of the leg supports and into the tabletop boards. We used three screws through each leg for maximum stability and support.
To further enhance the stability and visual appeal of the sawhorse design, we incorporated diagonal braces. These were also attached using Kreg Jig pocket holes and Blue-Kote screws, drilling from the bottom of the table into the tabletop and into the legs. This “easy peasy” method provides robust structural support and contributes to the classic sawhorse aesthetic.
To give the table an even more substantial and finished look, we decided to add a frame of 2×4 lumber around the perimeter of the tabletop. This required three extra 2x4s but made a significant difference in the table’s overall appearance, providing a “beefier” and more substantial feel. Again, we used the trusty Kreg Jig to attach these boards, drilling pocket holes all the way around the tabletop and securing the trim pieces firmly in place. This added detail truly completes the table’s aesthetic, making it look incredibly polished and robust.
The Finishing Touch: Painting, Staining, and Weatherproofing
Now for the exciting part—the finish! We wanted something a bit unique for this table, opting for a chic two-tone approach that adds depth and visual interest to the design. This contrast truly highlights the sawhorse structure and the beautiful wood grain of the tabletop.
Painting the Legs: Semi-Gloss Black
For the table legs, we chose one of our absolute favorite spray paints: Rust-Oleum Painter’s Choice in Semi-gloss Black. This paint provides excellent coverage and a durable finish, perfect for outdoor furniture. You can easily find this versatile paint at most home improvement stores like Home Depot and Walmart, making it readily accessible for your own projects.
We started by painting the legs first, allowing them to fully dry before proceeding to the tabletop. This methodical approach helps ensure clean lines and a professional-looking finish.
Once the legs were dry, we carefully flipped the table upright, preparing to finish the expansive tabletop surface.
Staining the Tabletop: Rich Dark Walnut
For the tabletop, we selected another personal favorite: Rust-Oleum Ultimate Wood Stain in Dark Walnut. This stain offers a rich, deep color that beautifully enhances the natural wood grain. What makes this particular stain stand out is its incredible efficiency—it dries in under an hour and typically requires only a single coat for full coverage! This significantly speeds up the finishing process, allowing you to enjoy your new table sooner. You can find this excellent stain, available in a wide array of beautiful colors, at Lowe’s.
To apply the stain efficiently across the large tabletop surface, we used a roller, which made the process incredibly fast. For smaller areas and to ensure the stain penetrated into the subtle gaps between boards, we used a foam brush.
Ultimate Weather Protection: Spar Varnish
To ensure our outdoor dining table could withstand the elements and maintain its beauty for years to come, we applied three coats of Rust-Oleum Spar Varnish to the tabletop. This marine-grade varnish offers superior protection against UV rays, moisture, and temperature fluctuations, making it ideal for outdoor furniture. It’s incredibly easy to apply, dries quickly between coats, and, significantly, doesn’t emit strong, lingering odors during application. This spar varnish has quickly become our go-to protective finish for all outdoor woodworking projects—we absolutely love it! You can also find this fantastic product at Lowe’s.
The Grand Reveal: Our Pottery Barn Inspired Outdoor Oasis
That’s it for the build and finish! Are you ready for a few more glamour shots of the finished table? We certainly are! Seeing the completed project, beautifully styled in its outdoor setting, truly brings the vision to life. It’s more than just a table; it’s the centerpiece of countless future outdoor gatherings and cherished memories.
Styling Your Outdoor Dining Space
What do you think of our new outdoor dining table? We are absolutely thrilled with it! And the best part? We already have the matching benches well underway in the garage and can’t wait to share their build with you soon, completing this incredible outdoor dining set.
Let’s talk about those fantastic chairs! We discovered them at World Market and managed to snag them for an absolute steal. Their industrial-chic aesthetic perfectly complements the rustic yet modern feel of the table, creating a cohesive and inviting outdoor dining experience. They truly finish off this table beautifully!
For those of you curious about the rest of our outdoor styling, here are a few details:
-
The outdoor rug that anchors the space was a great find from Garden Ridge.
-
The charming lanterns adding ambient light were sourced from Home Goods, with the tallest one coming from Hobby Lobby.
-
And a special mention for the candles within the lanterns: these are one of our new favorite products! They are indoor/outdoor LED candles that come with a convenient timer option. We found them on Amazon at an excellent price, offering the perfect blend of ambiance, safety, and practicality for any setting.
Share Your DIY Inspiration!
Thank you so much for joining us on this exciting DIY journey! We truly hope this project inspires you to pick up some tools and create something beautiful for your own home. If you loved this build as much as we do, we would be incredibly grateful if you would share and pin this post across all your social platforms. Help us spread the word about affordable, stylish DIY!
Don’t forget to head over to Ana White’s site for the complete, free plans for this amazing sawhorse outdoor dining table. You’ll find everything you need to confidently tackle this project and build your very own statement piece.
Have a truly awesome and productive weekend!
~Whitney