
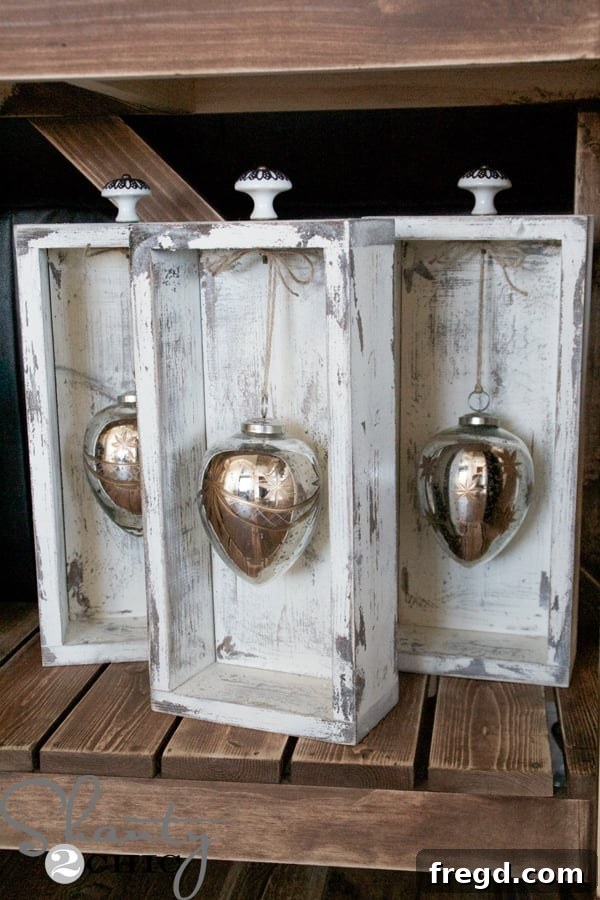
Welcome back, DIY enthusiasts and holiday decorators! As we draw our enchanting 12 Days of Christmas Series to a close, we hope you’ve been thoroughly inspired to adorn your homes with handcrafted charm and discover thoughtful, budget-friendly gift ideas. For our grand finale, we’re thrilled to present another wonderfully simple yet stunning project: a Rustic Distressed Ornament Display Drawer. This unique creation not only offers a beautiful way to showcase your treasured holiday ornaments but also introduces a touch of vintage elegance to your festive decor. Prepare to transform ordinary materials into an extraordinary holiday centerpiece that will captivate your guests and make your ornaments truly shine!
The inspiration for this charming display struck me during a treasure hunt at HomeGoods. I stumbled upon these absolutely adorable ornaments, falling in love with their unique design and festive appeal. However, a common dilemma arose: they were simply too heavy for my Christmas tree branches. Rather than letting these beautiful finds sit unused, a creative solution sparked! Why not craft a dedicated display that highlights their beauty while providing the necessary support? And so, these delightful ornament display drawers were conceived, blending rustic aesthetics with practical functionality. This project is perfect for anyone looking to add a personalized touch to their holiday decorations, creating a focal point that tells a story and celebrates the spirit of the season.
While I thoroughly enjoyed the process of building my own drawers from scratch, providing complete customization and the satisfaction of a handmade piece, this project offers wonderful flexibility. Imagine the character and history that a few salvaged vintage drawers could bring! If you’re fortunate enough to find some old drawers from an antique store, flea market, or even a forgotten piece of furniture, repurposing them would make this project even quicker and infuse it with an authentic, timeworn charm. Whether you choose to build your own or give new life to an old treasure, the outcome will be a stunning, one-of-a-kind ornament display that perfectly complements your festive decor.
Gather Your Toolkit & Materials: Building Your Rustic Ornament Display
Before diving into the creative process, let’s ensure you have all the necessary materials and tools at hand. This project is designed to be accessible, utilizing common woodworking supplies and techniques, making it suitable for both novice and experienced DIYers. Building these beautiful display drawers from scratch not only provides a rewarding experience but also allows for complete customization to fit your specific aesthetic and space requirements.
What You’ll Need: Materials
- Wood:
- Scrap 1×4 lumber: Ideal for the drawer frame, offering a sturdy yet manageable thickness.
- Scrap 1×6 lumber: Perfect for the drawer base, ensuring a solid foundation for your ornaments.
- Fasteners & Adhesives:
- 1 1/4″ Brad Nails: Essential for securely attaching wood pieces, especially when paired with wood glue.
- Wood Glue: Provides a strong, lasting bond, reinforcing the structural integrity of your drawers.
- Finishing Supplies:
- Rust-Oleum Dark Walnut Stain: Creates a rich, deep base coat, crucial for achieving that authentic distressed look.
- Clean Cloths: For applying and blending the stain, ensuring an even finish.
- Vaseline: The secret ingredient for effortless distressing, allowing paint to peel away naturally.
- Rust-Oleum Heirloom White Spray Paint: The top coat that will be distressed, providing a beautiful contrast to the dark stain.
- 80-Grit Sanding Pad or Sandpaper: For distressing the painted surface and revealing the character underneath.
- Hardware & Accessories:
- Decorative Knobs: Chosen to match your personal style, these add a refined and functional touch. (Mine were HomeGoods finds!).
- Jute Twine or Ribbon: For elegantly hanging your ornaments from the knobs.
Essential Tools for the Job
- Measuring & Cutting:
- Measuring Tape: For precise measurements, ensuring all your wood cuts are accurate.
- Pencil or Marker: For marking your cut lines clearly.
- Saw (Miter Saw or Hand Saw): To make clean, accurate cuts in your lumber. A miter saw is recommended for speed and precision, but a hand saw can be used with careful measuring.
- Assembly:
- 18-Volt Airstrike Nailer (or Hammer): A pneumatic or cordless nailer significantly speeds up assembly, but a hammer and finishing nails will work just as well for a sturdy build.
- Finishing:
- Ryobi Job Plus (with 80-grit sanding pad) or Sanding Block: For efficient and controlled distressing.
- Hardware Installation:
- Drill with Pilot Bit: To create small, clean holes for attaching your decorative knobs, preventing wood splitting.
With your materials and tools ready, let’s embark on the exciting journey of crafting your very own rustic distressed ornament display drawers!
Crafting Your Ornament Display Drawers – A Step-by-Step Guide
Step 1: Precision Cuts for the Frame
Begin by carefully measuring and cutting your wood pieces. For each drawer, you will need four pieces of 1×4 lumber to form the frame. Precisely cut two pieces to 13 1/2 inches in length and the remaining two pieces to 7 inches. Accuracy in these initial cuts is paramount, as it ensures your drawer frame will be perfectly square and sturdy. Double-check your measurements before making any cuts to avoid errors and ensure a professional finish. These dimensions are designed to create a compact yet spacious display area for your treasured ornaments, making the most of your scrap wood.
Step 2: Assembling the Sturdy Drawer Box
With your wood pieces cut, it’s time to assemble the drawer frame. Apply a thin, even bead of wood glue along the ends of the two shorter 7-inch pieces. Then, align these ends with the longer 13 1/2-inch pieces to form a rectangular box. Secure the joints using 1 1/4-inch brad nails. If you have an 18-volt Airstrike nailer, this step will be quick and efficient. Simply aim for the center of the joint and fire. For those without a nailer, a hammer and finishing nails will achieve the same strong bond. Drive the nails carefully, ensuring they penetrate both pieces of wood. The combination of wood glue and nails creates an incredibly robust joint, ensuring your display drawers will withstand the test of time and proudly hold your ornaments for many holiday seasons to come. Allow the glue to dry completely for maximum strength before proceeding to the next step, following the manufacturer’s recommendations for drying times.
Once assembled, you’ll have the sturdy, open frame of your drawer, ready for its base and the beautiful finishing touches that will transform it into a rustic masterpiece. This forms the essential structure that will support your cherished ornaments.
Step 3: Integrating the Base for Stability
Now, it’s time to add the base, or “back,” to your drawer. Cut a piece of 1×6 lumber to 13 1/2 inches. This piece is designed to fit snugly inside one end of your assembled drawer frame. Apply wood glue along the edges where the 1×6 will meet the 1×4 frame. Carefully position the 1×6 inside the frame, ensuring it’s flush with the outer edges. Secure it in place with 1 1/4-inch brad nails, driving them through the 1×4 frame into the edges of the 1×6 base. This creates a solid, enclosed box, providing the necessary depth and support for your ornaments to hang beautifully. The tight fit and strong adhesion will ensure your drawer is robust and ready for its artistic transformation.
Transforming Wood into a Rustic Masterpiece – The Finishing Touches
The true magic of this project unfolds in the finishing stages, where simple wood is transformed into a character-rich, distressed display. This layered approach creates an authentic, timeworn look that adds warmth and vintage charm to any holiday setting.
Step 4: Laying the Foundation with Dark Walnut Stain
To begin the distressing process, we’ll apply a base coat of stain. Our go-to for a rich, deep hue is Rust-Oleum Dark Walnut stain. Apply a generous, even coat of this beautiful stain over all surfaces of your newly constructed drawers. Ensure thorough coverage, allowing the wood to absorb the pigment. Let the stain penetrate the wood for approximately 5 minutes. This allows the color to develop fully before blending. After 5 minutes, use a clean, dry cloth to gently wipe away any excess stain, blending it smoothly across the surface. This technique ensures a consistent color and prevents blotchiness, revealing the natural grain of the wood. This dark foundation is crucial, as it will peek through the top coat later, creating the authentic distressed effect we’re aiming for.
Step 5: The Secret to Authentic Distressing: Vaseline Application
Once the dark walnut stain has completely dried (refer to the stain manufacturer’s drying recommendations), it’s time for our secret weapon in achieving a perfectly distressed look: Vaseline. Take a very light amount of Vaseline on your fingertip or a small cloth. Strategically rub it onto the areas of the drawer where natural wear and tear would typically occur. This includes the corners, edges, raised surfaces, and any other points where you want the underlying dark stain to show through the top coat of paint. The Vaseline acts as a barrier, preventing the paint from adhering directly to the wood in these spots. This technique is incredibly effective because it allows for easy removal of the top paint layer later, creating a naturally worn and aged appearance without excessive sanding. Be subtle with the application; a little goes a long way to achieve an authentic effect.
Step 6: Embracing Elegance with Heirloom White Paint
Immediately after applying the Vaseline, without waiting for it to dry (as it won’t really “dry”), proceed to apply your top coat of paint. I opted for Rust-Oleum Heirloom White spray paint, which provides a beautifully soft, antique white finish that perfectly complements the dark walnut base. Apply two light, even coats across all surfaces of your drawers. When spray painting, hold the can about 6-8 inches from the surface and use smooth, sweeping motions to avoid drips and ensure uniform coverage. Allow adequate drying time between coats as recommended by the paint manufacturer. The key here is to apply the paint over the Vaseline-treated areas, setting the stage for the effortless distressing that will follow. This layer of paint will ultimately be strategically removed to reveal the dark, rich stain beneath, creating a captivating contrast and a truly authentic distressed look.
Step 7: Unveiling the Distressed Character
Once the Heirloom White paint has fully dried and cured, it’s time for the truly satisfying part: revealing the distressed character of your drawers. Grab your Ryobi Job Plus with an 80-grit sanding pad, or simply use a piece of 80-grit sandpaper. Gently sand the areas where you applied the Vaseline. You’ll notice that the paint in these specific spots will almost effortlessly peel or rub away, exposing the beautiful dark walnut stain beneath. This is the magic of the Vaseline technique! Vary your pressure and sanding motion to achieve a natural, authentic worn look. Focus on edges, corners, and other points of natural wear to mimic the passage of time. The contrast between the soft white and the rich dark wood creates a stunning, rustic appeal, making each drawer unique and filled with character. This step truly brings the distressed effect to life, transforming your new wood into something that looks like a cherished antique.
Adding the Final Flourishes
With the distressed finish complete, all that’s left is to add the practical yet decorative elements that will make these drawers perfect for displaying your ornaments.
Step 8: Personalizing with a Charming Knob
To complete the drawer’s aesthetic and provide a point for hanging, you’ll need to add a decorative knob. First, decide on the placement of your knob – typically centered on the top edge of the drawer for visual balance. Using a drill with a pilot bit (a bit slightly smaller than the screw of your knob), carefully drill a pilot hole through the wood. This prevents the wood from splitting when you insert the screw. Ensure the hole is straight and clean. Choosing the right knob is an opportunity to further personalize your display; I found some adorable ones at HomeGoods that perfectly complemented the rustic vibe of my drawers. These small details can significantly enhance the overall charm and functionality of your project.
Once the pilot hole is drilled, simply insert the knob’s screw through the hole from the inside of the drawer and twist the knob onto the screw from the outside until it’s securely fastened. And just like that, your rustic distressed ornament display drawer is nearly complete, awaiting its festive adornments!
Step 9: Elegantly Displaying Your Ornaments with Jute
The final step is to adorn your beautiful new display drawers with your favorite ornaments. I chose natural jute twine for hanging, as its rustic texture perfectly complements the distressed wood finish. To secure each ornament, simply loop a piece of jute through the ornament’s hanger, tie a decorative bow around the knob’s screw, and then twist the knob bolt securely into place. This method ensures that your ornaments hang gracefully and remain stable. Feel free to experiment with different lengths of jute or even ribbon to create varying levels and visual interest. Arrange your ornaments artfully within and around the drawers, creating a captivating holiday vignette. These drawers are not just functional but become an integral part of your holiday storytelling, showcasing each ornament as a cherished piece of art.
And that was it! A simple yet incredibly rewarding project that transforms heavy ornaments into a stunning display, adding warmth and personality to your holiday home. The satisfaction of crafting something so beautiful and functional is truly immense.
“/>
I absolutely adore how these turned out! They not only solve the problem of displaying heavier ornaments but also add a unique, rustic touch to our Christmas decor. These DIY ornament display drawers are a testament to how a little creativity and effort can yield truly beautiful results, making your home even more welcoming and festive during the holidays. We hope this final project of our series leaves you feeling inspired to create and decorate with a personal touch!
Thank you so incredibly much for joining us throughout our 12 Days of Christmas Series! We’ve loved sharing these budget-friendly decor ideas and DIY gifts with you, and we sincerely hope they’ve added joy and inspiration to your holiday preparations. Don’t forget to explore the fantastic Day 12 projects from our talented friends – there’s always more creativity to discover! Plus, one of them is even hosting a special giveaway today, so make sure to check out their amazing contributions and maybe win something wonderful to enhance your festive season. Happy holidays and happy crafting!