
Crafting Your Dream DIY Photo Gallery Wall: A Step-by-Step Guide to Personalized Home Decor
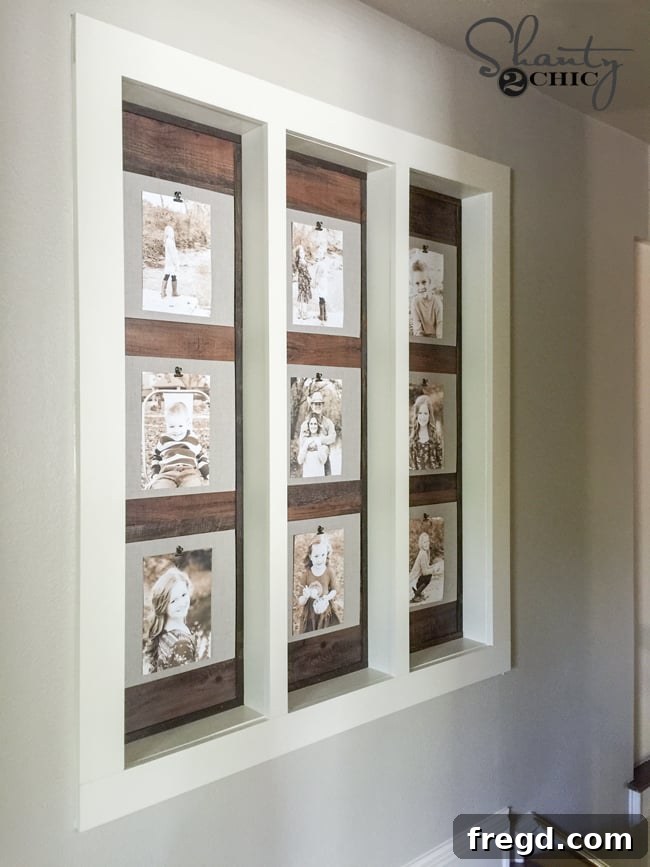
Embarking on a home improvement project can sometimes feel like an endless journey, but the satisfaction of seeing it through to completion is truly unmatched. This particular endeavor, a bespoke DIY Photo Gallery Wall, was one of those long-gestating ideas that finally blossomed into a cherished feature in my home. What started as a vision has become a beautiful reality, transforming a simple wall into a dynamic display of family memories. Last year, we undertook a significant renovation, converting our open loft space into a private bedroom for my daughter. During this transformation, as new walls were erected, I seized an opportunity to add a distinctive architectural element. Instead of conventional flat walls, I opted to leave strategic openings between the studs, creating unique, recessed niches. This design choice not only added visual interest and character but also subtly disguised the fact that it was a new “addition,” making it feel like an inherent part of the home’s original structure. The result was a design I absolutely adore, which naturally led to the creation of this DIY Photo Gallery Wall. While my project leverages these pre-existing wall niches for added depth and dimension, it’s important to note that you don’t need exposed studs or structural changes to replicate this stunning look. This versatile project can be beautifully achieved directly on any flat wall in your home; you simply won’t have the inherent depth that my custom niches offer, but the aesthetic impact remains equally captivating. Get ready to personalize your living space and create a focal point that tells your unique story!
Why a DIY Photo Gallery Wall is the Perfect Home Accent
There’s an undeniable warmth and personality that family photographs bring to a home. They are more than just pictures; they are snapshots of cherished moments, laughter, love, and growth. Integrating these memories into your decor creates a space that truly feels like “yours.” For this project, I envisioned a backdrop that would perfectly highlight black and white photographs, lending a timeless and elegant feel to the display. The choice of wood for the backdrop elevates the entire gallery, adding a touch of rustic charm and sophisticated texture. And let me tell you about that wood – it’s incredibly clever! It’s actually peel and stick vinyl wood planks, which offer the aesthetic appeal of real wood with the unparalleled ease of application. Imagine achieving a custom wood-paneled look that’s almost as simple as putting stickers on your wall! This innovative material makes the project accessible for DIY enthusiasts of all skill levels, ensuring a beautiful, professional-looking result without the complexities often associated with traditional woodworking. This section will walk you through the entire process, from preparing your wall to hanging your treasured memories, ensuring your DIY photo gallery wall becomes a beloved centerpiece in your home.
Foundation First: Preparing Your Wall Space
Let’s dive into the “how-to” of bringing this vision to life! My project began with those open spaces between the studs, transforming them into framed niches. The first step involved meticulously framing out each opening to define the gallery spaces. For the back walls and the interior surfaces of these stud openings, I opted for 1/4″ hardwood plywood. This provided a smooth, stable, and durable surface, ready to receive the subsequent finishes. To trim out the exterior of these new openings and to cover the front of the studs, I used 1×4 primed MDF boards. These boards offer a clean finish and are easy to paint. For the portions covering the front of the studs, I carefully ripped the 1×4 boards down to the precise thickness using my table saw, ensuring a flush and professional look.
If you’re planning to implement this project directly onto a blank, flat wall, the initial preparation will differ slightly but remain straightforward. Instead of working within existing stud openings, you would first define the desired size and shape of your feature wall. You can create a mock-up on the wall with painter’s tape to visualize the layout. Then, you would attach the 1×4 trim boards directly to the wall to create the framework for your gallery, making sure they are perfectly level and plumb. This approach gives you complete freedom to design a feature wall that perfectly fits your space and aesthetic preferences, allowing you to customize the dimensions to your heart’s content.
This image illustrates the crucial initial phase: the 1/4″ plywood firmly in place, forming the interior backing of the niches, and the 1×4 trim boards meticulously added to the exterior edges of each box. For securing the trim, I relied on my trusty Ryobi AirStrike 16-gauge finish nailer. This tool ensures strong, discreet fastenings that are essential for a professional finish. Once all the trim was securely attached, the next vital step was to address any imperfections. I meticulously filled all visible nail holes using 3M patch and primer, a fantastic product that prepares the surface for a smooth, flawless paint application.
The Art of Finishing: Smoothing and Painting Your Framework
After incorporating two additional pieces of trim to the center section, following the same precise installation method, the next critical phase was prepping for paint. This involved a thorough caulking of all seams and joints, followed by a complete painting of the entire framework. Caulking is often underestimated, but it’s paramount for achieving a truly polished and seamless look. My wall, like many in older homes, wasn’t perfectly square, so I had to be generous – a little “caulk happy,” as I like to say – in certain areas to bridge gaps and create smooth transitions. This step ensures that once painted, the framework appears as one cohesive, professionally built unit, rather than several individual pieces. The right paint color was chosen to complement the peel and stick wood planks and the overall room aesthetic, further enhancing the gallery’s visual appeal.
Bringing the Wood Aesthetic: Installing Peel and Stick Planks
Now, for the truly exciting and transformative part of the project – adding the captivating wood element! As mentioned earlier, if you’re working on a flat wall without pre-existing niches or the desire to remove drywall, you can simply add your decorative trim directly to the wall and then move straight to this step of applying the wood planks. This flexibility ensures that anyone can achieve this stunning look.
The star of this section is the incredible peel and stick vinyl wood planks. I discovered these fantastic planks at Lowe’s, and they instantly caught my eye. They come in individual planks, and the application couldn’t be simpler: you just peel off the backing, much like a large sticker, and adhere them to your prepared surface. What made them truly stand out was their authentic appearance; each plank boasted a distinct pattern and texture, creating a rich, varied wood grain effect that perfectly mimicked real wood. An added bonus? They were incredibly affordable! This combination of aesthetic appeal, ease of use, and cost-effectiveness made them an irresistible choice for this DIY project.
When it came to cutting these planks to fit perfectly within the niches, I experimented with a few different methods. To my surprise, the easiest, cleanest, and most precise way to achieve straight cuts was by using a simple paper cutter. This unconventional tool proved to be incredibly effective.
The technique involves using the paper cutter to first score a clean line across the vinyl plank. This initial score acts as a guide and weakens the material precisely where you want it to break.
Once scored, you simply fold the plank along the scored line, and it will snap cleanly and effortlessly, leaving you with a perfectly straight edge. This method eliminates the need for power tools or specialized cutting equipment, making the installation process incredibly user-friendly and efficient.
It’s truly that simple and effective!
To attach them to the wall, I just peeled off the protective backing paper, carefully aligned each plank, and firmly pressed it into place. The adhesive on these planks is surprisingly strong, creating a durable bond with the prepared wall surface.
A key design tip during installation is to deliberately mix and match the planks, ensuring that different tones and patterns are placed next to each other. This creates a natural, organic wood paneling effect, avoiding any repetitive or manufactured look. Here’s a progress shot, showcasing the beautiful transformation as the planks quickly fill the space!
And in a remarkable approximately 15 minutes, the installation of the peel and stick wood planks was complete! This rapid transformation is one of the project’s most appealing aspects, allowing for a dramatic change in a short amount of time.
Refined Edges: Custom Trim for a Polished Look
Although the vinyl planks themselves create a fantastic visual, I found that the edges where they met the painted framework weren’t as perfectly clean-looking as I desired. To achieve a truly polished and finished aesthetic, I decided to add a delicate trim around these edges. While you could purchase a very thin piece of 3/4″ trim specifically designed as edging, I opted for a more cost-effective and custom solution. I took a standard 1×6 wood board and ran it through my table saw, carefully ripping it down into thin 1/4″ strips. This method not only saved money but also allowed me to perfectly customize the thickness of my trim. Once cut, I stained all these thin strips to match the warm, varied tones of the vinyl wood planks, ensuring a cohesive and harmonious look throughout the gallery. This custom edging detail truly makes a significant difference, framing the wood planks beautifully and giving the entire installation a professional, built-in appearance.
These delicate, stained trim pieces were then meticulously nailed to the edges of the vinyl planks using my brad nailer. A brad nailer is ideal for this task as it uses smaller gauge nails, minimizing visible holes and preventing any damage to the thin trim or the vinyl planks. The precision of the brad nailer ensures a secure attachment while maintaining the clean, refined look of the finished edges.
And just like that, the beautiful wood-paneled backdrop was complete! The combination of the peel and stick planks with the custom-stained trim creates a depth and texture that truly elevates the entire wall.
Curating Your Memories: The Photo Display
With the stunning wood backdrop in place, it was time to move on to the most personal aspect of the project: curating and displaying the photographs. For a clean, modern yet artistic presentation, I sought out these thin linen canvases, which I fortunately found at Michael’s. They were a perfect choice, offering a subtle texture that complemented the wood, and even better, they were 50% off, making them an even more appealing find! Selecting photographs, particularly a collection in black and white, creates a cohesive and sophisticated visual narrative that stands out against the rich wood tones.
To allow for easy swapping and updating of photos, I decided to use metal clips to hold the prints. I securely attached one metal clip to the top edge of each canvas using hot glue. Hot glue provides a strong and immediate bond, making this a quick and efficient step. These versatile metal clips can be readily found at craft stores like Michael’s and Hobby Lobby, as well as online retailers such as Amazon, making them easily accessible for your project.
Finally, to mount the canvases to the vinyl wood planks, I opted for Command strips. These adhesive strips are a fantastic choice for their strong hold and, most importantly, their damage-free removal, allowing for future rearrangements without compromising your beautiful new wall. I applied a Command strip to the back of each canvas, ensuring it was centered for optimal balance. Then, I carefully pressed each canvas onto the vinyl surface, holding it firmly in place for approximately 30 seconds to ensure the adhesive formed a secure bond. The arrangement of the canvases within the niches was carefully planned to create a balanced and aesthetically pleasing gallery, allowing each cherished photograph to shine.
The Grand Reveal: Enjoying Your Personalized Photo Gallery
Easy peasy! The entire process, from the initial framing to the final placement of the canvases, was straightforward and immensely rewarding. And the outcome? I absolutely adore it! This DIY Wood Photo Gallery Wall has transformed a simple area into a captivating focal point, brimming with personal stories and warmth. It’s a testament to how creative problem-solving and accessible materials can lead to truly unique and beautiful home decor.
This project is more than just a wall decoration; it’s a living display that can evolve with your family. The use of clips and Command strips makes it incredibly simple to update photos as new memories are made or as seasons change, keeping your gallery fresh and vibrant. Whether you choose to highlight cherished family portraits, stunning landscape shots, or a curated collection of artistic prints, this wood accent wall provides the perfect backdrop.
Embrace the satisfaction of a DIY project that adds both aesthetic value and emotional depth to your home. This custom photo wall is a conversation starter, a daily reminder of the moments that matter most, and a true reflection of your unique style. It proves that with a little creativity and effort, you can transform an ordinary wall into an extraordinary art piece.
From utilizing unconventional wall niches to adapting the design for flat surfaces, this DIY Photo Gallery Wall offers a flexible and rewarding experience. The blend of rich wood texture, crisp black and white photography, and thoughtful design creates a sophisticated yet personal space that you’ll cherish for years to come. Don’t hesitate to embark on your own version of this project and bring your family’s story to life on your walls!