
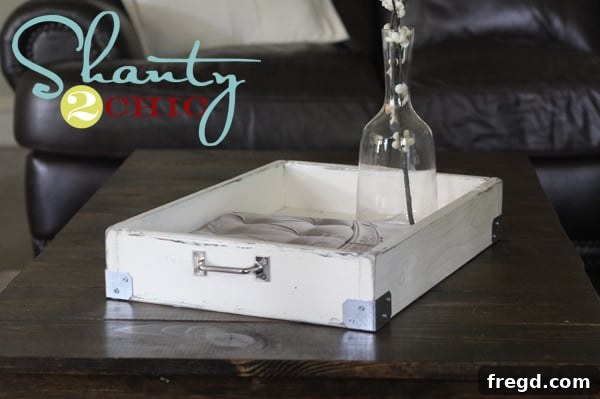
Craft Your Own Rustic Charm: An Easy DIY Coffee Table Magazine Holder & Tray
Welcome back, DIY enthusiasts! I trust you all had a fantastic weekend. For me, with my three oldest enjoying time at their grandparents’, it was the perfect opportunity to dive into a creative little project for my coffee table. If you’re anything like me, you adore magazines – almost as much as you love discovering new inspiration on Pinterest! There’s something undeniably satisfying about flipping through physical pages, but keeping them neatly organized can sometimes be a challenge.
That’s why I decided to create a stylish yet functional piece to hold my favorite reads, and perhaps a cup of coffee or a remote control – a versatile magazine holder that doubles as a rustic serving tray. This project is not only incredibly easy to tackle, but it’s also remarkably budget-friendly. What’s more, its simple design means it can be adapted for use in just about any room of your home, bringing a touch of personalized charm wherever it goes. Get ready to transform a few pieces of inexpensive wood into a beautiful, practical home accessory that looks far more expensive than it is!
Why a DIY Magazine Holder? The Perfect Blend of Function and Style
In an increasingly digital world, there’s still a unique pleasure in holding a physical magazine, poring over beautifully laid-out pages, and finding inspiration within their glossy covers. However, a stack of magazines can quickly become a cluttered mess, turning your elegant coffee table into an eyesore. This DIY project offers the perfect solution: a dedicated, beautiful space for your periodicals that also serves as a decorative element. Beyond magazines, this versatile tray can corral remote controls, house a small plant, or even serve drinks when entertaining. It’s about bringing order and beauty together, all while expressing your personal style through handmade decor.
You can easily follow the detailed photo tutorial provided below, which breaks down each step with clear visuals. For those who prefer a more interactive guide, we’ve also created a comprehensive video tutorial. So, whether you learn best by reading or watching, we’ve got you covered!
Check out our video tutorial to make it HERE!
Gathering Your Supplies: Tools & Materials for Success
One of the most appealing aspects of this project is its simplicity, both in design and in the materials required. You’ll only need a couple of pieces of wood, making it incredibly affordable. We’re talking about basic furring strips – widely available at any home improvement store and known for their cost-effectiveness, making them ideal for beginner projects or when you’re looking to minimize expenses without sacrificing quality.
Materials List:
- 1 – 1×3 inch furring strip
- 1 – 1×4 inch furring strip
- Gorilla Wood Glue (or similar strong wood adhesive)
- Finish nails
- Sandpaper (medium and fine grit)
- Primer (optional, but recommended for paint adhesion)
- Paint for base coat (your choice of color for distressing effect)
- Rust-Oleum Painter’s Touch in Heirloom White (or your preferred top coat color)
- Vaseline (for the distressing technique)
- Optional: Metal corner braces (found in framing/lumber section)
- Optional: Decorative handles (found in hardware section)
- Small wood screws (for optional hardware)
The total cost for the wood alone will be astonishingly low – typically under $4! This makes it an incredibly budget-friendly way to add a custom piece to your home.
Essential Tools:
For those of you who might not yet own a saw, now is the perfect time to invest! You don’t need to break the bank on a large table saw. A compact, versatile saw, like the one pictured below, is more than sufficient for this project and countless other DIY endeavors. These smaller saws are fantastic for beginners, offering ease of use and precision without the intimidation factor or space requirements of larger machines.
You can find excellent options for under $15 at stores like Lowe’s. Even though I own a table saw, I still frequently reach for my smaller saw for quick cuts and less demanding projects. It’s incredibly handy and efficient!
Precise Cuts: Your Woodworking Blueprint
Accuracy in your cuts is key to a clean, professional-looking finish. Take your time to measure twice and cut once. Here’s your precise cut list:
- From the 1×3 inch furring strip:
- 5 pieces at 18 inches long (these will form the bottom slats of your tray)
- From the 1×4 inch furring strip:
- 2 pieces at 12.25 inches long (these will be the shorter end pieces of your tray frame)
- 2 pieces at 19.5 inches long (these will be the longer side pieces of your tray frame)
Once all your pieces are cut, a quick sanding with medium-grit sandpaper, followed by a finer grit, will ensure smooth edges and a better surface for painting or staining. This also helps prevent splinters!
Step-by-Step Assembly: Building Your Tray
Assembling this tray is surprisingly quick and straightforward. I used a combination of Gorilla Wood Glue for a strong, lasting bond and finish nails to secure the pieces while the glue dried and for added structural integrity. This method creates a very durable piece that will stand the test of time.
Step 1: Attach the Bottom Slats to the Shorter End Pieces
Begin by taking one of your 12.25-inch 1×4 furring strips (the shorter end pieces). Apply a thin, even bead of wood glue along one edge of an 18-inch 1×3 piece. Position the 1×3 piece flush against the shorter end piece, ensuring it is square. Secure it with finish nails. Repeat this process for all five 18-inch pieces, spacing them evenly along the length of your first 12.25-inch piece. Then, attach the second 12.25-inch 1×4 furring strip to the other ends of the five 18-inch pieces, completing the base frame and slats. Make sure all connections are tight and square.
Step 2: Attach the Longer Side Pieces
Now, take your two 19.5-inch 1×4 furring strips (the longer side pieces). Apply wood glue along the edges where they will meet the assembled base. Position one longer side piece along the edge of your assembled base, ensuring it lines up perfectly with the short end pieces. Secure it firmly with finish nails. Repeat this for the remaining longer side piece on the opposite side. This will complete the frame of your tray. Allow the glue to cure completely according to the manufacturer’s instructions, typically for at least 24 hours, before moving on to finishing.
That’s it for the construction! It’s incredibly simple and, with a bit of focus, can be completed in as little as 5 minutes, excluding drying time for the glue. The beauty of this design lies in its efficiency and robust outcome.
The Art of Finishing: Distressing with the Vaseline Method
Now for the really fun part – adding personality with paint! I chose to use my favorite Vaseline distressing method for this project, but with a slight twist. This technique is fantastic for creating a charming, aged, and rustic look that instantly adds character to any piece. It gives the illusion of layers of paint wearing away naturally over time, revealing a contrasting color underneath.
To learn more about the Vaseline distressing method in detail, you can click the link below to my dedicated tutorial. It’s a game-changer for achieving that sought-after vintage aesthetic!
Achieving the Distressed Look:
- Base Coat: First, apply your base coat. For this project, I went with a slightly darker, “shanty” looking base coat. This is the color that will peek through in the distressed areas, adding depth and contrast to your final piece. Make sure to cover all surfaces thoroughly and allow it to dry completely.
- Vaseline Application: Once your base coat is dry, apply a thin layer of Vaseline to the areas where you want the base coat to show through. Focus on edges, corners, and areas that would naturally experience wear and tear. The Vaseline acts as a resist, preventing the top coat from adhering.
- Top Coat: For my top coat, I used Rust-Oleum Painter’s Touch in Heirloom White. This color is absolutely beautiful – a soft, creamy off-white that perfectly complements the rustic aesthetic. I applied this top coat with a spray can, ensuring even coverage over the entire tray, including over the Vaseline spots. Allow the top coat to dry thoroughly.
- Distressing: After the top coat is dry, take a damp cloth or a piece of fine-grit sandpaper and gently rub over the areas where you applied the Vaseline. The top coat will easily lift away from these spots, revealing the base coat beneath and creating that wonderful distressed effect. The results are truly delightful, giving the tray a time-worn, cherished appearance.
Adding Character: Optional Hardware Details
Once the distressing was done, I wanted to add a little something extra to elevate the tray’s character and functionality. Small details can make a big difference in custom projects!
My friend Ash and I discovered these fantastic metal corner pieces at Lowe’s, priced at under $1 each. They were located in the framing/lumber section and immediately struck us as the perfect embellishment. While entirely optional, these small additions contribute significantly to the rustic, industrial charm of the piece. I simply used small wood screws to attach one to each corner. It’s a simple step that adds a sophisticated touch without adding much to the overall cost.
And of course, a tray needs handles! Why not make it easier to move and carry? I found these stylish handles in the hardware section of Lowe’s as well, for around $2 a piece. I installed one on each end of the tray. These handles are not just practical for carrying the tray from your coffee table to another spot; they also add another layer of rustic detail that ties the whole look together beautifully.
Final Touches & Cost Breakdown: A Budget-Friendly Beauty
And just like that, it’s all done! Time to recap the incredible affordability of this project. Let’s do the math:
- Wood for the tray: Approximately $4
- Optional hardware (corner braces and handles): Around $8
That totals out to a maximum of about $12 for a custom-made, stylish, and highly functional piece of home decor. Compare that to the price of similar items at a retail store, and you’ll quickly see the immense value in taking the DIY route. It’s truly pretty darn cheap for such a fantastic result!
So, what do you think? Are you ready to add this charming and practical piece to your home?
Bringing It All Together: Your New Coffee Table Companion
This DIY magazine holder and tray is more than just a place to store your favorite publications; it’s a statement piece that adds warmth, texture, and character to your living space. Its versatile design means you can use it in a multitude of ways: as a stylish organization solution in your living room, a charming breakfast-in-bed tray, or even as a decorative accent in a hallway. The distressed finish combined with the simple lines creates a timeless piece that blends seamlessly with various decor styles, from farmhouse rustic to modern industrial.
Conclusion & Call to Action
I sincerely hope you love this project as much as I do! It’s truly rewarding to create something beautiful and functional with your own hands, especially when it costs so little. If this DIY tutorial has inspired you, please consider Pinning it to your Pinterest boards and sharing it with your friends and fellow DIY enthusiasts. Your support helps us continue to bring you more exciting and accessible home decor projects!
Thank you so much for stopping by and taking the time to read through this tutorial. Happy crafting, and have a wonderful day!
~Whitney