
Transform Your Bedroom: DIY Queen Upholstered Headboard Inspired by Pottery Barn
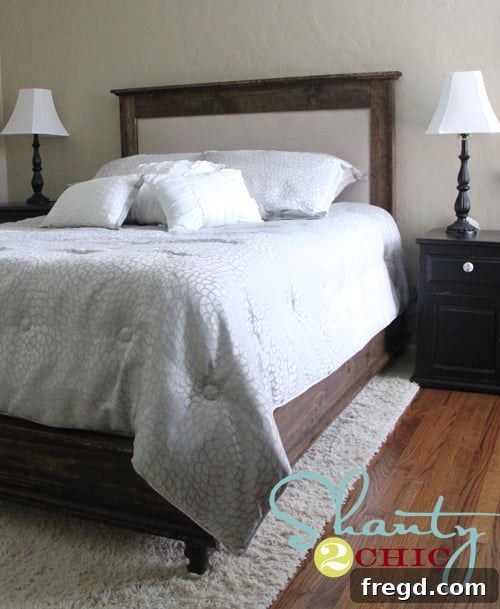
Happy Tuesday, friends! I hope you all had a wonderfully relaxing and inspiring weekend. Today, I am absolutely thrilled to finally unveil the complete bed project I embarked on for my dear sister. You might remember a few days ago when I shared the details of the robust and stylish Queen Platform Bed we constructed. Well, the journey doesn’t end there! Now, I’m ecstatic to present the stunning, custom-built upholstered headboard that perfectly complements the platform bed, completing a truly dream-worthy bedroom setup.
The inspiration for this magnificent piece came from a beautiful upholstered headboard I spotted at Pottery Barn. While their designs are undeniably gorgeous, the price tag can often be a barrier. That’s where the incredible Ana White stepped in! She meticulously crafted a brilliant plan, mirroring the sophisticated aesthetic of the Pottery Barn headboard, making it entirely achievable for DIY enthusiasts like us. Her detailed instructions allowed me to bring this high-end look to life without breaking the bank.
Unlock Your Inner DIYer: Building a Pottery Barn Style Headboard on a Budget
You can discover the comprehensive, easy-to-follow plans for this very headboard right HERE on Ana White’s website. Honestly, this project turned out to be one of the most straightforward and rewarding builds I’ve ever tackled. What makes it even better is how incredibly budget-friendly it is! I’m eager to share some of my top money-saving tips and tricks that allowed me to achieve such a luxurious look for significantly less. Creating a custom upholstered headboard not only adds a touch of elegance and comfort to any bedroom but also allows for unparalleled personalization. Imagine selecting the perfect fabric to match your decor, or staining the wood trim to complement existing furniture – the possibilities are endless when you take the DIY route.
Beyond the financial savings, the satisfaction of building something beautiful with your own hands is truly priceless. This headboard project is perfect for those looking to elevate their bedroom’s style, add a focal point, and enjoy the plush comfort of a custom upholstered piece without the premium retail cost. Let’s dive into the materials and process that made this dream headboard a reality.
Essential Materials and Smart Sourcing for Your Upholstered Headboard
The key to a successful DIY project often lies in smart material sourcing. For this headboard, I focused on finding affordable alternatives that didn’t compromise on quality or appearance. Here’s what I used:
The Foundation: 1/2″ MDF Back Board
For the main back board of the headboard, I opted for 1/2-inch Medium Density Fiberboard (MDF). MDF is an excellent choice for projects like this because it’s relatively inexpensive, smooth, and provides a stable surface for upholstery. One of my favorite time-saving hacks for this project was having the friendly folks at Lowe’s cut the large sheet of MDF down to the precise dimensions specified in Ana White’s plans. This not only saved me the hassle of maneuvering a large sheet of wood but also ensured perfectly straight cuts, which are crucial for a professional-looking finish.
Ingenious Padding: The $10 Mattress Topper Hack
Now, for the luxurious foam backing, here’s where one of my biggest money-saving secrets comes in! Instead of buying expensive upholstery foam, I used a standard mattress topper from Wal-Mart. This brilliant alternative cost me only $10 – can you believe it? “Whoop!” indeed! It provides just the right amount of cushion and bounce, making your headboard incredibly comfortable for leaning back while reading or relaxing in bed. This hack alone can save you a significant amount, allowing you to allocate your budget to other design elements or future DIY projects.
I carefully cut the mattress topper to fit the MDF board, ensuring a slight overhang for wrapping. Attaching it securely is crucial for an even and plush surface. I spread the topper smoothly over the MDF, pulling it taut before stapling it firmly to the back of the board. This step is key to creating that inviting, soft surface that defines an upholstered headboard.
The Smooth Transition: Batting
To ensure an impeccably smooth finish and to further soften the edges, batting is indispensable. I used a standard roll of upholstery batting, wrapping it tightly over the foam and MDF, and securing it with staples. This layer helps to smooth out any potential imperfections from the foam and provides an extra layer of comfort and durability, ensuring the fabric drapes beautifully over the entire surface.
Stylish Fabric on a Dime: Canvas Drop Cloth
Pottery Barn often uses elegant linen for their headboards, which contributes to their high price point. However, I’ve found that you can achieve a very similar sophisticated look for a fraction of the cost by using a canvas drop cloth! I picked up this fantastic $5 drop cloth from Lowe’s, and the result is simply stunning. It offers a wonderful texture, durability, and a neutral tone that works with almost any decor style. Plus, it’s incredibly forgiving to work with, making it ideal for upholstery beginners. The trick is to ensure it’s clean and wrinkle-free before you begin.
With the fabric laid out, I carefully positioned the padded board on top. The process of stapling the fabric is where the magic truly happens. It’s essential to pull the fabric taut and evenly, working your way around the edges and corners to achieve a professional, wrinkle-free finish. Taking your time here will make all the difference in the final look of your upholstered headboard.
Adding the Finishing Touches: Staining and Assembly
The wooden elements of this headboard add a beautiful contrast and frame the upholstered panel perfectly. Before attaching my side pieces, I took the extra step of staining them. This ensures a clean, even finish without the risk of stain bleeding onto the fabric. For this bed, I used our absolute favorite stain, which delivers incredible results every time.
Rust-Oleum Ultimate Wood Stain in Dark Walnut
This particular stain is simply the best! It’s incredibly user-friendly, dries remarkably fast, and typically requires only one coat to achieve a rich, deep color. “Woohoo!” for efficiency and stunning results! You can easily find it at Lowe’s, making it accessible for your next project. For more fantastic project ideas and inspiration, be sure to follow Rust-Oleum on Facebook and Pinterest. Their pages are brimming with creative ways to enhance your home with their products.
After applying the stain, I let the boards dry completely. Proper drying time is crucial to ensure the stain cures properly and prevents any stickiness or smudging during assembly.
Once the side pieces were perfectly dry and attached, I then proceeded to attach the side trim and the top piece. This layered approach creates a beautiful, dimensional look that elevates the entire headboard. After all the wooden components were securely attached, I gave them a final coat of stain to ensure uniformity and a flawless finish across all surfaces. And then, the exciting part: seeing it all come together!
The Grand Reveal: A Masterpiece of Comfort and Style
Are you ready to witness the culmination of our efforts? The finished headboard is truly a sight to behold, a testament to what can be achieved with a little creativity, smart material choices, and the right plans. It seamlessly blends comfort with high-end style, making it the perfect centerpiece for any bedroom.
This headboard transforms the entire room, adding a sophisticated and inviting atmosphere. The deep, rich tone of the Dark Walnut stain beautifully contrasts with the soft, neutral canvas fabric, creating a timeless aesthetic that would fit perfectly into a farmhouse, traditional, or even a contemporary bedroom design. The plush upholstery makes it incredibly comfortable for those late-night reading sessions or simply lounging in bed on a lazy weekend morning.
It’s incredible to think that this high-quality, custom piece was created with such simple, affordable materials. This project truly embodies the spirit of DIY: achieving premium results without the premium price tag. My sister absolutely loves it, and seeing her happy with a piece I crafted makes all the effort incredibly worthwhile.
Final Thoughts & Exciting Announcements!
I sincerely hope you love this upholstered headboard as much as we do! It was such a joy and a fun challenge building it for her, and the outcome speaks for itself. The transformation of her bedroom with both the platform bed and this custom headboard is remarkable.
Once again, I cannot stress enough how invaluable Ana White’s plans were for this project. Her clear instructions and detailed diagrams make complex builds approachable for anyone. So, if you’re feeling inspired, make sure to check out Ana’s site for the full plans on this headboard! It’s an empowering experience to craft a piece of furniture that rivals high-end retail options.
Click here for Ana White’s full upholstered headboard plans!
On another exciting note, many of you frequently ask us about the tools we use in our projects. We are incredibly excited to announce that we will be sharing details about a brand-new tool later in the week! Not only that, but we’ll also be giving one of them away to a lucky reader! So, stay tuned for that amazing opportunity to upgrade your DIY toolkit. You won’t want to miss it!
Thank you so much for stopping by and sharing in our DIY adventures! Your support and enthusiasm mean the world to us. It would truly make my day if you could pin this project to your Pinterest boards and share it with your friends and fellow DIY enthusiasts below. Let’s spread the joy of creative building!
Have a fantastic day, and happy building!
~Whitney