
Fall into Festive: Craft Your Own Free Printable Chalkboard Banner!
As the crisp air begins to whisper promises of autumn, a familiar excitement stirs. Who isn’t ready for the comforting aroma of pumpkin spice, hearty soups simmering on the stove, cooler temperatures perfect for cozy evenings, and perhaps even the thrill of football season? This time of year beckons for a transformation of our living spaces, inviting the warmth and beauty of the season indoors. There’s nothing quite like refreshing your home decor to fully embrace the magic of Fall, and what better way to do so than with a personal, handmade touch?
Embrace Autumn with Easy, Customizable DIY Decor
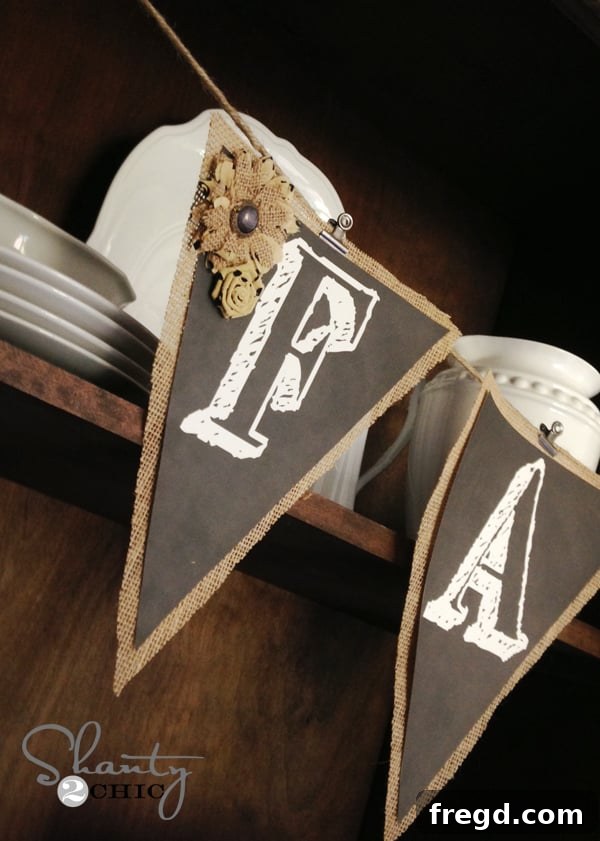
Every year, as autumn approaches, I eagerly anticipate creating a new seasonal banner to adorn my home. Last year, I shared a classic banner design that resonated with many of you, bringing a lovely touch to countless homes. This year, however, I was eager for a fresh aesthetic, something that combined rustic charm with timeless appeal. That desire led to the creation of this absolutely adorable chalkboard banner, and I’m thrilled to share it with you!
The best part about this project? I’ve meticulously designed and prepared each letter of the alphabet as a free printable. This means you have the complete freedom to craft any message you desire – whether it’s “Happy Fall,” “Give Thanks,” “Welcome Autumn,” or a personalized greeting for your home. Yes, you heard that right: these beautiful, versatile chalkboard letters are completely FREE! It’s an effortlessly chic way to add character and warmth to your decor without spending a fortune.
The Enduring Charm of Chalkboard Style for Your Home
Chalkboard elements have become a staple in modern and farmhouse-inspired decor, beloved for their rustic simplicity and timeless appeal. They offer a unique blend of vintage feel and contemporary minimalism, capable of complementing a wide range of interior styles. A chalkboard banner brings this aesthetic to your seasonal decorating in a way that is both impactful and incredibly flexible. Unlike traditional chalkboards that can be messy and require artistic skill, these printables offer the perfect solution: a clean, consistent, and beautiful chalkboard look with zero fuss.
Imagine creating a welcoming entryway with “WELCOME AUTUMN” spelled out, or adding a heartfelt touch to your dining area with “GIVE THANKS” for the holiday season. The versatility of a full alphabet allows you to switch your messages as often as you like, adapting your decor for Halloween, Thanksgiving, or even general seasonal cheer. This project isn’t just about making a banner; it’s about empowering you to personalize your space with elegant, budget-friendly decor that truly reflects the spirit of the season.
Gather Your Supplies: Crafting Your Rustic Burlap & Chalkboard Banner
One of the most appealing aspects of this DIY project is how few materials you need, most of which you might already have on hand. For those items you don’t possess, they are readily available and affordable, ensuring this remains a cost-effective way to enhance your Fall decor. Here’s what you’ll need to create your very own charming chalkboard banner:
- White card stock (8.5″ x 11″ is ideal for sturdy flags)
- Scissors (sharp crafting scissors for clean cuts)
- Small glue dots or craft adhesive
- Burlap fabric (a small amount is sufficient, consider a roll for ease)
- Hot glue gun and glue sticks
- Burlap flowers or other small decorative embellishments
- Thick jute twine or rustic string for hanging
- Vintage bulldog clips, clothespins, or small decorative hooks
- A printer
Your Easy Guide to Assembling a Beautiful DIY Fall Banner
Creating this beautiful chalkboard banner is not only rewarding but also incredibly simple. Follow these straightforward steps to bring your personalized Fall decor to life, adding a touch of rustic elegance to any room.
Step 1: Print Your Free Chalkboard Letters
Begin by printing your chosen chalkboard letters. I highly recommend using white card stock, typically 8.5″ x 11″, as it provides a sturdy base for your banner flags. The heavier weight of card stock ensures your banner hangs beautifully and resists curling, giving it a more polished, professional appearance. Make sure your printer settings are on “best quality” to capture the nuanced chalkboard texture and crisp white lettering. Simply select the letters you need for your desired message, and print them out.
Step 2: Precisely Cut Each Banner Flag
Once printed, carefully use a sharp pair of scissors to cut out each individual banner flag. Take your time to follow the lines precisely, as clean cuts will make a significant difference in the final look of your banner. For those who prefer even sharper edges or have a steady hand, a craft knife and cutting mat can also be used for an ultra-precise finish.
Step 3: Add a Rustic Burlap Backing
To introduce a lovely textural element and enhance the rustic charm, I chose to back each chalkboard flag with burlap. This adds depth, warmth, and a touch of farmhouse style that perfectly complements the chalkboard aesthetic. To do this, place a small glue dot on each corner of the printed banner flag. Carefully center the flag onto a piece of burlap fabric. Once all your flags are adhered, use your scissors again to cut around each banner, leaving approximately a 1/2-inch border of burlap. Don’t worry about being absolutely precise; the “eyeball method” works perfectly here, giving each flag a natural, handcrafted feel. For those seeking exactness, a ruler can be used to mark your border before cutting.
Step 4: Embellish with Burlap Flowers (or Your Own Flair!)
To add an extra touch of seasonal elegance, I found some fantastic burlap flowers at Hobby Lobby, which were half off, making them an incredible bargain at around $2! Sometimes, when the price is right, it’s simply smarter to buy than to DIY. These flowers were the perfect complement to my rustic theme. Using a hot glue gun, I attached a few of these charming burlap flowers to the first and last flags of my banner. This small detail provides a beautiful focal point and completes the cohesive look. Feel free to explore other embellishments that match your personal style, such as dried leaves, small pinecones, ribbons, or even a touch of glitter for a more festive sparkle.
Step 5: String and Display with Vintage Charm
The final step is to string and display your beautiful new banner! I used a piece of thick jute twine to create a sturdy line along my hutch. While clothespins are a popular and charming choice for hanging banners (and what I used last year), this time I opted for these wonderful vintage bulldog clips I discovered at Hobby Lobby. They add an industrial-chic touch and hold the flags securely. These versatile clips can also be found HERE on Amazon if you can’t find them locally. Simply attach each banner flag to the twine using the clips, and your stunning Fall decoration is complete! How incredibly easy is that? And did I mention they are FREE? Just wanted to make sure you didn’t miss that fantastic detail!
Ready to Create? Download Your Free Printable Banner Letters Here!
You’re now equipped with all the inspiration and instructions needed to create your very own customizable chalkboard banner. It’s truly as simple as print, cut, and decorate! These free printables offer an unparalleled opportunity to infuse your home with personalized, seasonal charm without the usual cost associated with bespoke decorations. Each letter is provided in an easy-to-print PDF format, ensuring high quality for your project.
So, you know the drill! Below, you’ll find links to each individual letter of the alphabet. Simply click on the letter you wish to print, and it will open in a new browser window. From there, you can easily select “Print” from your top browser bar. Don’t hesitate to reach out if you have any questions at all about the printing or crafting process!
Chalkboard Banner A
Chalkboard Banner B
Chalkboard Banner C
Chalkboard Banner D
Chalkboard Banner E
Chalkboard Banner F
Chalkboard Banner G
Chalkboard Banner H
Chalkboard Banner I
Chalkboard Banner J
Chalkboard Banner K
Chalkboard Banner L
Chalkboard Banner M
Chalkboard Banner N
Chalkboard Banner O
Chalkboard Banner P
Chalkboard Banner Q
Chalkboard Banner R
Chalkboard Banner S
Chalkboard Banner T
Chalkboard Banner U
Chalkboard Banner V
Chalkboard Banner W
Chalkboard Banner X
Chalkboard Banner Y
Chalkboard Banner Z
Inspirational Gallery: See Your Chalkboard Banner Come to Life!
Need a little extra inspiration? Take a moment to browse through these additional shots of the chalkboard banner in various settings. These images showcase the versatility and charm of this DIY project, offering ideas for how you can integrate it into your own Fall decor. From mantelpieces to hutches, the possibilities are endless!
Join Our Community: Share Your DIY Fall Banner Masterpiece!
Thank you so much for stopping by and exploring this fun and easy DIY Fall decor project! I hope you feel inspired to create your own beautiful chalkboard banner and infuse your home with the cozy spirit of autumn. This project is a wonderful way to express your creativity, personalize your space, and enjoy the satisfaction of handmade decor.
I would absolutely LOVE to see your creations and how you choose to display your unique banners! Please don’t hesitate to share them with your friends and fellow DIY enthusiasts. Pin this project on Pinterest, share it on your favorite social media platforms, and let us know what amazing messages you’ve crafted. Your engagement means the world, and you guys are truly great!