
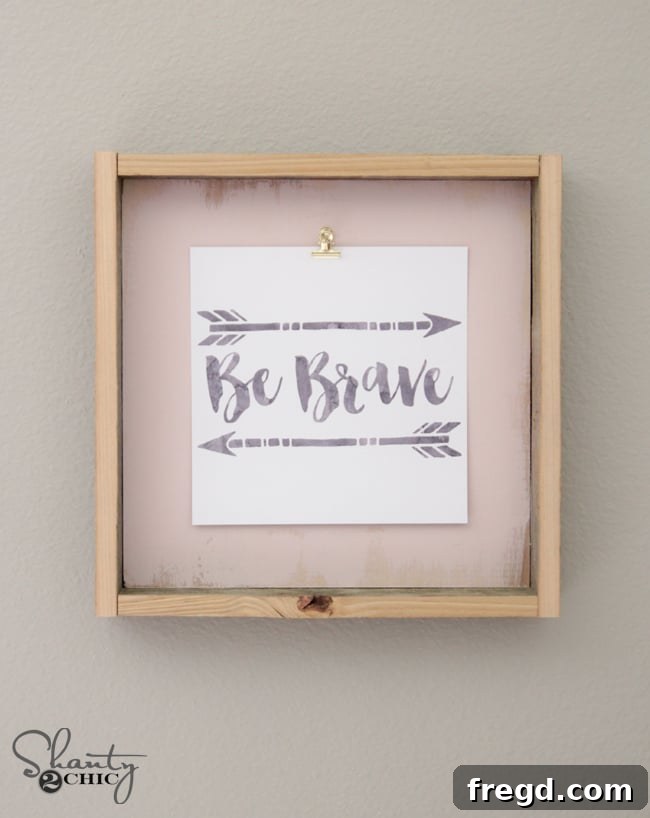
Crafting for a Cause: Your DIY Pink Frame & Free ‘Be Brave’ Printable
Good morning, fellow DIY enthusiasts! We are absolutely thrilled to bring you this special project today. Ash and I have proudly partnered with Rust-Oleum for their incredibly impactful #PaintItPink campaign throughout October, dedicated to raising vital funds and awareness for breast cancer. Rust-Oleum has committed to donating $10 to the Bright Pink organization for every pink project post shared using the #PaintItPink hashtag. We couldn’t be happier to lend our creativity and support to such a meaningful cause!
Today, we’re diving into the step-by-step tutorial for crafting this charming DIY frame, and as an extra treat, we’ve included a FREE ‘Be Brave’ printable that perfectly complements the frame and the spirit of the campaign. This project is not just about creating beautiful home decor; it’s about making a statement and contributing to a cause that touches so many lives.
Inspiration and Versatility: From Headboard to Home Decor
Isn’t this frame simply adorable? What makes these frames even better is their incredible simplicity to construct! The beauty of this design lies in its adaptability. In fact, I recently shared a larger version of this very design a few weeks ago, showcasing it as a custom headboard for my daughter’s new bed. This particular project is a scaled-down rendition, perfectly sized for displaying cherished photos or inspiring messages, but the core construction techniques remain identical, proving the versatility of this design.
Whether you’re looking for a statement piece like a headboard or a charming small frame to add character to a shelf or gallery wall, the foundational principles are the same, making it a fantastic project for DIYers of all skill levels. This project offers a wonderful opportunity to personalize your space with a handmade touch, all while supporting a vital cause. Let’s gather our supplies and get ready to create something beautiful for a brilliant cause!
Essential Materials and Tools for Your DIY Frame Project
Before we begin, ensuring you have all the necessary materials and tools ready will make the crafting process smooth, enjoyable, and efficient. No one likes pausing a creative flow to hunt for a missing item!
Materials You’ll Need:
- 1/2″ Hardwood Plywood: This forms the sturdy base of our frame. For convenience and budget-friendliness, look for 2’x2′ sheets at your local Home Depot. These are incredibly affordable, and one such sheet can yield up to four of these lovely 12×12 inch frames! I personally utilized some scrap 1/2″ PureBond plywood I had on hand, which is an excellent, formaldehyde-free option.
- Rust-Oleum Chalked Paint in Blush Pink: This specific paint is key to achieving that desirable messy, distressed, shabby-chic finish. It’s widely available at Home Depot, incredibly easy to work with, and comes in an impressive array of colors, making it a versatile choice for many DIY projects.
- Reclaimed Wood or 1×2 Boards for Trim: For the frame’s rustic, character-filled trim, I sourced fantastic old, weathered boards from Hobby Lobby’s ‘Woodpile’ section. They typically come in packs of six and are quite affordable, especially when using one of their frequent coupons. If Hobby Lobby isn’t easily accessible, standard 1×2 lumber can be stained to achieve a strikingly similar aged and rustic look. Consider a gray or dark brown wood stain for an authentic weathered appearance.
- Wood Glue: An indispensable adhesive for creating strong, lasting joints between your plywood base and trim pieces.
- 1.25″ Nails: These will be used for securely attaching the trim pieces to the plywood base, working in tandem with the wood glue.
- Mini Bulldog Clip (Gold, Dark Bronze, or Dark Silver): This elegant clip will hold your printable or photo. I found stylish gold clips at Hobby Lobby, but they also offer charming dark bronze and dark silver options, allowing you to match your personal style or existing decor.
- Super Glue Gel: A small amount is needed for a quick and secure attachment of the bulldog clip to the frame. The gel formula provides better control and less mess.
- ‘Be Brave’ Printable (Free Download): Your inspiring message, designed to fit perfectly into your new frame. We’ll provide the link for this!
- 3M Command Strips (Optional): For easy, damage-free wall mounting. These are fantastic for renters or anyone who likes to frequently change their decor without leaving holes.
Tools You’ll Need:
- Saw (Circular Saw, Table Saw, or Jigsaw): Essential for accurately cutting the plywood base and trim pieces. Choose the saw you are most comfortable and proficient with.
- Measuring Tape or Ruler: Precision is paramount for perfect cuts and a symmetrical frame.
- Pencil: For marking your measurements and cut lines clearly on the wood.
- Nailer (Brad Nailer recommended): For efficiently and precisely attaching the trim. A brad nailer provides a clean finish with minimal holes. While a hammer and finishing nails can also work, a nailer is significantly faster and easier.
- Paintbrush: For applying the chalk paint. A natural bristle brush works well for the distressed look.
- Safety Glasses: Always, always wear eye protection when operating any cutting tools or working with adhesives.
Step-by-Step DIY Frame Tutorial: Crafting Your Message of Hope
Now that we have everything meticulously gathered and organized, let’s roll up our sleeves and embark on the rewarding journey of building this beautiful, meaningful frame!
Step 1: Preparing the Plywood Base for Your Frame
The foundation of our charming frame begins with the 1/2-inch hardwood plywood. As mentioned in our materials list, those convenient 2’x2′ sheets readily available at Home Depot are an ideal choice for this project, offering both excellent value and dependable quality. Using a reliable and appropriate saw (whether it’s a circular saw for long, straight cuts, a table saw for precision, or a jigsaw for versatility), carefully measure and cut your plywood sheet down to a precise 12″ x 12″ square. Achieving accuracy at this stage is crucial for ensuring a neat, symmetrical, and professional-looking finished frame. Always remember to prioritize safety when operating any power tools; wear appropriate eye protection, secure your workpiece, and strictly follow the manufacturer’s guidelines for safe operation. If you happen to be using scrap wood, like my PureBond plywood, take a moment to inspect its edges to ensure they are clean and straight before making your cuts.
Step 2: Embracing the Shabby Chic Look with Chalk Paint
With our plywood base now perfectly cut, it’s time to infuse it with character and charm! For this, I reached for Rust-Oleum Chalked paint in a beautiful, soft Blush Pink shade. This particular type of paint is absolutely fantastic for easily achieving a vintage, distressed, or elegantly “messy” finish, which is precisely the aesthetic we’re aiming for with this rustic frame. You’ll find this incredibly versatile paint readily available at Home Depot, and I highly recommend exploring their wide range of colors for future DIY endeavors. For our frame, I applied the paint using a dry brush technique, deliberately leaving some areas unpainted, especially towards the edges. The artistic goal here is a rustic, intentionally partially painted appearance, allowing the natural warmth and grain of the wood to subtly peek through. Don’t strive for absolute perfection; instead, embrace and celebrate the imperfect beauty of a hand-painted, lived-in feel. This approach adds authenticity and unique personality to your piece. Let your creativity flow freely and truly enjoy the process of creating this distinct finish! Allow the paint to dry completely according to the manufacturer’s instructions before proceeding to the next step. This usually takes a few hours, or less if you’ve applied thin, quick coats.
As you can clearly observe in the accompanying image, I intentionally avoided painting all the way to the very edge of the plywood. This deliberate technique creates that desirable distressed, ‘halfway painted’ aesthetic that adds so much unique charm and character to the finished piece. It gives the frame a history, a story, enhancing its rustic appeal. Once applied, it’s crucial to allow the chalk paint to dry thoroughly. Drying times can vary based on humidity and coat thickness, but typically, a few hours should suffice for a good cure before handling the piece extensively.
Step 3: Attaching the Rustic Wood Trim to Complete Your Frame
Once the chalk paint is thoroughly dry and has cured, it’s time to beautifully frame our artwork! For the trim pieces, I absolutely love using the “Woodpile” boards from Hobby Lobby. These pieces are typically made from naturally aged and weathered wood, which adds an incredible amount of authentic character without any extra effort on your part. They come in convenient packs of six and are quite an economical choice, especially when you take advantage of Hobby Lobby’s frequent coupons (you can often snag a pack for around $4). The reclaimed look they offer is truly unparalleled. However, if a Hobby Lobby isn’t accessible in your area, or if you prefer to work with materials you already have, you can achieve a strikingly similar effect by using standard 1×2 lumber and applying a wood stain of your choice to give it an aged appearance. For a convincing weathered look, consider using a gray, dark brown, or even a whitewash stain. Once you have your trim material, cut two of your chosen boards to precisely 12 inches in length. Apply a generous, even bead of wood glue along the corresponding edges of your 12″ x 12″ plywood base where these first two trim pieces will sit. Carefully align and attach these boards, ensuring they are perfectly flush with the edges of the plywood for a seamless look. Secure them firmly with 1.25″ nails using a brad nailer. A brad nailer makes the process much quicker, creates smaller, less noticeable holes, and provides a cleaner finish. While a hammer and finishing nails can also be used, the nailer offers superior efficiency and precision.
With the first two sides securely in place, it’s time to complete the rustic frame. Now, carefully measure the exact length needed for the remaining two trim pieces – these should fit snugly between the first two pieces you just attached, creating perfect corners. Apply a fresh bead of wood glue to the corresponding untreated edges of the plywood base. Carefully place these final trim pieces into position, ensuring a tight, gap-free fit at all corners, and then secure them firmly with your nailer, just as you did with the first two. The combination of strong wood glue and strategically placed nails provides a robust and incredibly durable frame that will hold together beautifully for years to come. Take your time during this crucial step to ensure all corners are square and the trim is perfectly aligned; this attention to detail will elevate the overall quality and appearance of your finished project.
Step 4: The Finishing Touch – Attaching the Mini Bulldog Clip
Our final step in crafting this unique and personal frame is to attach the mini bulldog clip, which will elegantly hold your chosen printable or photograph. I discovered these stylish gold clips at Hobby Lobby, and their metallic gleam perfectly complements the rustic appeal of the frame. However, don’t hesitate to explore their selection of dark bronze or dark silver mini clips, as these also offer a charming, cohesive look depending on your preference. To attach the clip, simply dab a small, controlled amount of super glue gel onto the back flat surface of the clip. The gel formula is ideal here as it prevents drips and allows for precise placement. Carefully position the clip towards the top center of your frame and press firmly for a few seconds to ensure a strong, secure bond. And just like that, your beautiful, custom DIY frame is complete and ready for display! Told you it was simple, didn’t I? This minimalist method for holding your artwork allows for easy swapping of prints or photos, keeping your decor fresh and dynamic.
Your Free ‘Be Brave’ Printable: An Inspiring Message
Now for the moment you’ve all been eagerly awaiting – your FREE printable! Who doesn’t love a good freebie, especially one that carries such a powerful and uplifting message? I personally designed this ‘Be Brave’ printable to perfectly fit into our newly crafted DIY frame. Its meaning resonates deeply with the courageous spirit of the #PaintItPink campaign, offering a poignant message of strength, resilience, and hope to all those affected by breast cancer, directly or indirectly. Beyond the campaign, I believe this message holds universal appeal, serving as a beautiful daily reminder for anyone navigating challenges, pursuing dreams, or simply needing a boost of courage in their life. To easily download and print your high-resolution ‘Be Brave’ printable, simply click HERE or on the image below. It’s designed to print perfectly on standard 8.5″ x 11″ paper and will look absolutely fantastic clipped into your new, handmade frame.
Displaying Your Masterpiece: Tips and Customization Options
To elegantly display my finished frame without any fuss or damage to the walls, I chose the incredibly convenient 3M Command Strips. These adhesive strips are absolutely fantastic for hanging decor without leaving behind unsightly holes, sticky residue, or paint damage, making rearrangement a complete breeze. Simply attach them securely to the back of your frame, press firmly against your chosen spot on the wall, and voilà – your inspiring artwork is beautifully and safely showcased! These versatile strips are a true lifesaver for renters, anyone who loves to frequently change up their home decor, or those who simply prefer a cleaner aesthetic. They offer a secure hold that you can trust.
Do you love your new frame as much as we do? The absolute best part about this DIY project is its truly endless customization potential! While we opted for a lovely pink theme to proudly support the #PaintItPink campaign, you can effortlessly adapt this design to perfectly suit any existing style, color scheme, or decor theme in your home. Imagine it painted in a vibrant teal for a fresh coastal vibe, a classic crisp white for a timeless farmhouse chic look, or a deep sophisticated charcoal for a modern, minimalist touch. Don’t be afraid to experiment with different paint finishes – perhaps a smooth, glossy look for contemporary elegance, a heavily distressed antique style for vintage charm, or even incorporate a delicate stencil design for added detail. You can also easily customize the size of the frame to accommodate larger prints, a smaller intimate photo, or even a creative collage of multiple mini prints. Instead of a digital printable, consider clipping up a cherished family photo, a beloved handwritten recipe, a dried botanical specimen for a natural touch, or a favorite quote you’ve handwritten yourself. The possibilities are truly boundless, allowing you to create a piece that is uniquely and authentically yours, reflecting your personal taste and creativity!
Join the Creative Community: Explore Rust-Oleum’s Creator’s Studio
While you’re here soaking up all this DIY inspiration, I also wanted to share some incredibly exciting news about a fantastic program Rust-Oleum has recently launched, which I believe is absolutely perfect for our wonderfully creative readers: it’s called Creator’s Studio!
Creator’s Studio is a vibrant, engaging, and innovative online platform designed specifically for DIY enthusiasts, crafters, and makers like yourselves. It’s a truly wonderful space where you can seamlessly connect with a thriving community of fellow creatives, freely exchange innovative project ideas, and even provide direct, valuable input on the development of future Rust-Oleum products! They regularly host exciting and inspiring challenges where members can showcase their incredible projects, and the community votes on their favorites, with incredible prizes frequently awarded to the talented winners. Knowing how much our readers cherish hands-on DIY projects and creative expression, Rust-Oleum genuinely wants you to be a significant part of this growing and supportive community. It’s a fantastic, no-cost opportunity to showcase your unique skills, get inspired by others’ work, learn new techniques, and perhaps even win some fantastic rewards for your creativity. Don’t miss out on the chance to be part of this dynamic creative hub – you can easily check it out and sign up to become a member HERE!
Support the Cause: #PaintItPink and Share Your Beautiful Creations!
Thank you so much for joining us today on this creative journey, and for taking the time to explore this meaningful DIY project! We truly hope this detailed tutorial inspires you to pick up some paint, grab your tools, and get crafting for a cause. Remember, every single pink project shared with the hashtag #PaintItPink contributes directly to a greater cause, with Rust-Oleum proudly donating $10 to the Bright Pink organization for each qualifying post. It’s a wonderful, impactful opportunity to express your creativity, add a beautiful, handcrafted piece to your home decor, and most importantly, contribute to vital breast cancer awareness and support initiatives. We would absolutely love to see your unique #PaintItPink projects! Please share your beautiful creations widely on social media, tag us, and use the hashtag so we can celebrate your incredible efforts, share your inspiration, and spread even more awareness for this important campaign. It’s for a truly fantastic cause, and it gives you the perfect, guilt-free excuse to embrace the power of pink paint and make a real difference!
Thanks so much for your incredible support, inspiring creativity, and dedication to meaningful causes!
Whitney