
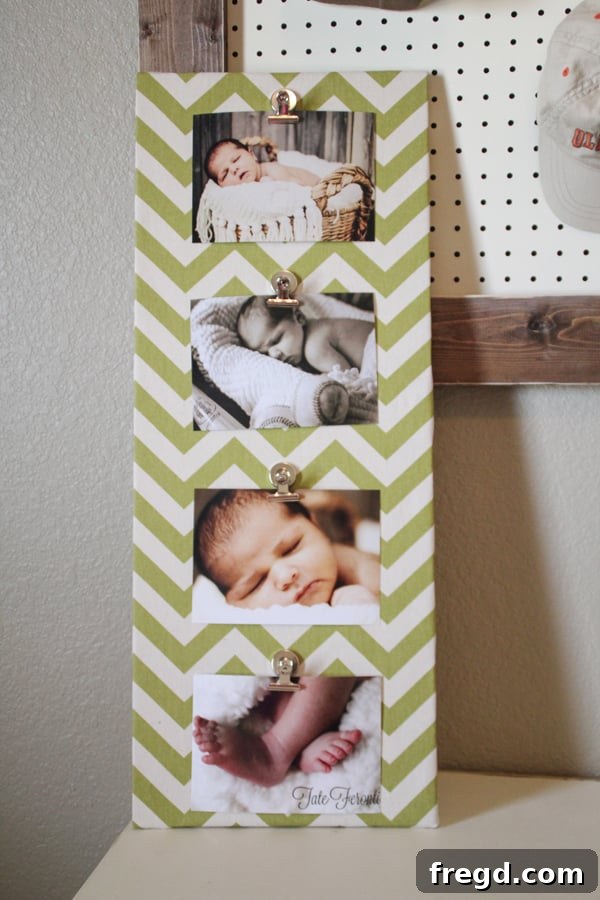
Hey there, fellow DIY enthusiasts and home decor lovers! Are you searching for a creative, inexpensive, and utterly charming way to display your cherished memories? Look no further! Today, I’m thrilled to share a project that’s not only incredibly quick and easy to make but also astonishingly budget-friendly. Imagine transforming a few simple materials into a beautiful, personalized photo display for just about $5. Yes, you read that right – five dollars!
This project is a game-changer for anyone wanting to add a custom touch to their home without breaking the bank. It’s versatile enough to complement any room, whether it’s an accent piece for a cozy nursery, a vibrant addition to a living room, or a functional display for a home office. And the best part? It allows you to effortlessly change your photos to match seasons, moods, or new memories as they unfold.
Create Your Own Stunning DIY Picture Frame & Photo Display for Under $5!
We all love our photographs – they’re snapshots of precious moments, faces we adore, and places we’ve explored. But finding the perfect way to display them can often be a challenge, especially when juggling budget constraints with a desire for unique style. This DIY picture frame and magnetic photo display project offers the ultimate solution. It combines affordability with endless customization, ensuring your wall decor is as unique as your memories.
I recently crafted one of these for a friend’s nursery, and it turned out absolutely adorable! It perfectly complemented the room’s theme and provided a lovely way to showcase baby photos. If you’re currently decking out a nursery or looking for more inspiring DIY projects, you might also want to check out my posts on the DIY Dresser and the incredibly practical DIY Pegboard for more creative ideas. Now, let’s dive into how you can make this fantastic photo display for approximately five dollars!
Why Choose a DIY Photo Display? The Benefits of Crafting Your Own
In a world full of mass-produced decor, there’s something incredibly satisfying about creating something with your own hands. A DIY photo display offers a plethora of benefits that store-bought options simply can’t match:
- Unmatched Customization: From the size of the board to the pattern of the fabric and the style of the clips, every element can be tailored to your specific taste and existing decor. This ensures your display perfectly integrates with your home’s aesthetic.
- Incredible Affordability: As demonstrated by this project, beautiful decor doesn’t have to be expensive. By utilizing readily available, inexpensive materials, you can achieve a high-end look without the high-end price tag.
- Personal Touch: There’s a unique warmth and character that comes from handmade items. Your DIY photo board will reflect your personality and effort, making it a truly special addition to any room.
- Easy to Update: Unlike traditional frames where changing photos can be a hassle, this magnetic clip system makes swapping out pictures a breeze. You can refresh your display in minutes to reflect new memories, holidays, or seasonal themes.
- Eco-Friendly Potential: This project is perfect for using up scrap fabric remnants, repurposing materials, and contributing to a more sustainable approach to home decor.
- Great for Gifting: A handmade photo display makes for a thoughtful and personalized gift for friends, family, or even as a baby shower present.
Materials You’ll Need: Gathering Your Budget-Friendly Supplies
One of the most appealing aspects of this DIY photo display is the simplicity and affordability of the materials. You likely have some of these lying around already! Here’s what you’ll need to gather:
The Core Components:
- MDF Board (Medium-Density Fiberboard): I used a 1×12 MDF board, 4 feet long, which I purchased for just $3.24 at Lowe’s. MDF is an excellent choice for this project due to its smooth surface, stability, and affordability. It’s easy to cut and provides a perfect base for your fabric.
- Alternatives: You could also use plywood, a sturdy piece of reclaimed wood, or even a thick foam core board for a lighter alternative, though MDF offers the best durability for the price.
- Sizing: The beauty of this project is its flexibility. You can choose any size depending on your available space, the amount of fabric you have, and the number of pictures you wish to display. For my friend’s nursery, I cut the 4-foot board in half to create a 2-foot display.
- Scrap Fabric: This is where you can truly personalize your display. I used a leftover piece of fabric from the nursery curtains, ensuring a perfectly coordinated look. Dig through your fabric stash, check out remnant bins at craft stores, or even upcycle an old tablecloth or sturdy scarf.
- Fabric Choice Tips: Opt for a fabric that isn’t too thin or stretchy. Cotton, canvas, or even a durable linen blend works wonderfully. Consider patterns, textures, and colors that complement your room’s decor. You’ll need enough fabric to wrap around the board with an overlap for stapling.
- Magnetic Clips: I found a package of cute little magnetic clips at Wal-Mart. These are perfect because they are strong enough to hold photos securely but are also easy to open and close.
- Alternatives: Small wooden clothespins or decorative bulldog clips can also work beautifully, offering a different aesthetic. Ensure they are lightweight enough not to sag the fabric once attached.
Tools You’ll Need:
- Staple Gun and Staples: Essential for securely attaching the fabric to the board.
- Hot Glue Gun and Glue Sticks: For affixing the magnetic clips to the fabric-covered board.
- Saw (Optional): If you need to cut your MDF board. If you don’t own a saw, don’t worry! Most local hardware stores like Lowe’s or Home Depot offer cutting services for a minimal fee, or sometimes even for free with your purchase.
- Scissors: For cutting your fabric to size.
- Measuring Tape or Ruler: For accurate measuring.
Step-by-Step Guide: Crafting Your Custom Photo Board
Now that you have all your materials ready, let’s get down to the fun part – assembling your beautiful DIY photo display. Follow these simple steps, and you’ll have a stunning piece of personalized decor in no time!
-
Prepare Your MDF Board: Cut to Desired Size
If you purchased a longer board, like my 4-foot piece, you’ll need to cut it to your desired length. As I mentioned, I cut mine in half to create a 2-foot section for the nursery. Consider the space where you plan to hang your display and the number of photos you wish to feature when deciding on the length.
- Cutting Tip: Always measure twice before making your cut. Use appropriate safety gear if you’re using a saw. If you’re uncomfortable cutting wood yourself, take advantage of the cutting services offered at most hardware stores. They’ll precisely cut your board to size, saving you time and effort. Remember, you can create a display of any size – a long, narrow one for a hallway, a square one for a gallery wall, or even multiple smaller ones.
-
Wrap Your Board with Fabric: The Aesthetic Foundation
This step is much like wrapping a present, but with a staple gun instead of tape! Lay your chosen fabric face down on a clean, flat surface. Center your MDF board on top of the fabric. Ensure you have enough fabric overlapping on all sides to neatly wrap around to the back of the board, with about 1-2 inches of excess for stapling.
Starting with one long side, pull the fabric taut over the edge of the board and secure it to the back using your staple gun. Place staples every 2-3 inches, ensuring a firm hold. Repeat this process on the opposite long side, pulling the fabric very tight as you go to avoid any wrinkles or sagging on the front. A smooth, taut surface is key for a professional finish.
Once the long sides are secure, tackle the short ends. Fold the corners neatly, just as you would when wrapping a gift. Pull the fabric tightly over the edges and staple it firmly to the back. Trim any excessive fabric to prevent bulkiness. Run your hand over the front of the board to check for any loose spots or wrinkles; add more staples to the back if needed.
-
Attach Your Magnetic Clips: Position for Perfection
With your board beautifully covered in fabric, it’s time to add the magnetic clips that will hold your precious photos. Before you start gluing, lay out your clips on the fabric-covered board to visualize their placement. Consider the size of the photos you’ll be displaying and how many clips you want to use.
- Placement Ideas: You can space them evenly across the board for a uniform look, create clusters for an eclectic vibe, or arrange them in rows. Once you’re happy with the arrangement, heat up your hot glue gun.
- Gluing Technique: Apply a generous dab of hot glue to the back of each magnetic clip and firmly press it onto the fabric in its desired position. Hold each clip in place for a few seconds until the glue sets. Be careful not to use too much glue that it seeps through the fabric, but enough to ensure a secure bond. Allow the glue to fully cure before hanging any photos.
-
Personalize and Display Your Cherished Memories
And there you have it – your very own custom DIY photo display! The final step is to clip on your favorite pictures. I absolutely adore how easily you can swap out photos whenever you like. This flexibility means your display can always reflect your current favorites, recent adventures, or seasonal themes. Want a different look entirely? Simply un-staple the current fabric and replace it with another cute print or a new texture to instantly transform your wall art!
- Hanging Options: For lightweight boards, Command strips can work wonders for damage-free hanging. For heavier boards, use D-ring hangers or picture wire attached to the back, ensuring you hang it securely with appropriate wall anchors. Alternatively, a smaller board can simply be leaned against a wall on a shelf or dresser.
Creative Variations & Customization Ideas
The beauty of this project lies in its adaptability. Here are some ideas to inspire you to make your photo display even more uniquely yours:
- Fabric Fantastic: Experiment with different fabric textures like faux fur for a cozy feel, burlap for a rustic touch, or vibrant African prints for a bold statement. Seasonal fabrics (e.g., holiday themes) can quickly refresh your decor.
- Clip Creativity: Instead of magnetic clips, try painted wooden clothespins for a farmhouse chic look, or use decorative metal binder clips for an industrial edge. You can even paint the clips themselves to match your fabric.
- Add Embellishments: Enhance your display with ribbons, lace trim, decorative buttons, stenciled patterns, or even small artificial flowers glued directly onto the fabric. Battery-operated fairy lights woven around the clips can create a magical glow.
- Themed Displays: Create specific themes – a “Travel Memories” board with maps and postcards, a “Baby’s First Year” display, a “Family Tree” with generational photos, or a “Vision Board” with inspirational images and quotes.
- Different Board Shapes: While rectangular is standard, consider asking your hardware store to cut a circular, hexagonal, or even a cloud-shaped board for a truly unique piece, especially for a child’s room.
- Multi-Panel Art: Create a series of smaller, coordinating boards and arrange them together on a wall for a gallery-style display.
Beyond Photos: What Else Can You Display?
While perfect for photos, this versatile display isn’t limited to just pictures. Think outside the frame!
- Children’s Artwork: Give your kids’ masterpieces the spotlight they deserve.
- Inspirational Quotes & Notes: Clip up motivational messages, reminders, or important to-do lists.
- Postcards & Travel Mementos: Showcase snippets from your adventures.
- Event Tickets & Invitations: Keep special occasions fresh in your memory.
- Recipe Cards: A handy display for your kitchen.
Tips for a Flawless DIY Photo Display
To ensure your project goes smoothly and results in a professional-looking finish, keep these tips in mind:
- Measure and Plan: Before cutting or gluing, measure your fabric and plan the exact placement of your clips. A little foresight goes a long way.
- Tension is Key: When stapling the fabric, pull it very taut. This prevents sagging and gives your display a crisp, finished appearance.
- Test Your Glue: If using a new type of fabric, test a small dab of hot glue on a hidden spot to ensure it doesn’t leave a mark or seep through.
- Safety First: Always exercise caution when using tools like staple guns or saws. Wear safety glasses and ensure a clear workspace.
- Embrace Imperfection: Remember, it’s handmade! Small imperfections add character and charm. Don’t strive for absolute perfection, but for a piece you love.
Your Next Favorite DIY Project Awaits!
This DIY picture frame and magnetic photo display embodies everything great about handmade decor: it’s inexpensive, endlessly customizable, and brings a unique, personal touch to any space. It’s a rewarding project that allows you to celebrate your memories in a dynamic and stylish way. Plus, the sheer satisfaction of creating something so beautiful and functional for under $5 is truly unbeatable!
Whether you’re decorating a new nursery, revitalizing a living room wall, or looking for that perfect handmade gift, this project is sure to inspire. Get creative with your fabric choices, experiment with different clips, and let your personality shine through every detail. Your walls will thank you!
If you love this DIY Picture Frame idea as much as I do, please consider sharing it with your friends or pinning it to your favorite decor boards. Your support means the world!
Thanks so much for stopping by and happy crafting!
~Ashley