
Hello fellow DIY enthusiasts and home decor lovers!
Every now and then, a piece of furniture catches your eye, a design that speaks to your soul, transforming a simple item into an aspirational statement for your living space. For me, that moment arrived when I stumbled upon a stunning coffee table featured in the coveted Pottery Barn catalog. Its robust build, classic lines, and timeless appeal immediately captivated me. It was love at first sight, the kind of love that sparks an immediate desire to bring that elegance into my own home. However, as is often the case with such high-end pieces, the price tag told a different story – a hefty $699. While my heart was set on that distinctive design, my budget, unfortunately, was not quite as generous.
But despair quickly turned into determination! As a passionate DIYer, I know that inspiration can often lead to innovation, especially when you’re equipped with a desire to create and a resourceful spirit. So, like many savvy builders before me, I turned to the ultimate guru of cost-effective, stylish woodworking: Ana White. Ana is renowned in the DIY community for her incredible ability to deconstruct expensive furniture designs and provide accessible, step-by-step plans that empower anyone to build their dream pieces without breaking the bank. Her website is a treasure trove of woodworking magic, and I knew she would have the perfect solution for my Pottery Barn dilemma.
And just as I hoped, Ana delivered! She had masterfully crafted plans for a remarkably similar Benchwright-style coffee table, designed to capture the essence of that Pottery Barn beauty, but at a fraction of the cost. The best part? This ambitious project, which might seem daunting to some, came with an estimated material cost of just $100! That’s an astonishing saving of $599! This immediately transformed my dream from an unreachable luxury into an exciting, achievable woodworking adventure. The thought of creating a custom, high-quality coffee table for my living room, perfectly tailored to my style and built with my own hands, was incredibly motivating. It truly was a score!
If you’re eager to embark on your own journey to build this stunning piece, you can find Ana White’s detailed plans for the Benchwright Coffee Table right HERE. Her instructions are clear, comprehensive, and perfect for anyone looking to add a touch of handcrafted elegance to their home.
Embarking on the Build: My DIY Coffee Table Journey
The anticipation of starting a new project is always exhilarating, and this Pottery Barn inspired coffee table was no exception. It was more than just building furniture; it was about bringing a vision to life, proving that style doesn’t have to come with an exorbitant price tag, and honing my woodworking skills along the way. Below, I’m sharing some snapshots and insights from my building process, offering a glimpse into the steps and challenges that unfolded as this beautiful piece took shape.
The Indispensable Tool: My Kreg Jig
For any serious DIY furniture builder, or even aspiring beginners, I cannot emphasize enough the value of a Kreg Jig. This innovative tool proved itself incredibly handy for this particular build, just as it has for countless other projects. The Kreg Jig system excels at creating strong, clean, and incredibly durable pocket hole joints. These joints are not only robust but also incredibly easy to create, making complex joinery accessible to builders of all skill levels. Its precision allows for flush, seamless connections between boards, which is absolutely essential for creating furniture that feels professionally made and stands the test of time.
What truly sets Kreg apart is its ability to create exceptionally solid pieces of furniture. Unlike traditional screws driven directly through wood, pocket holes draw the pieces together with immense clamping force, resulting in joints that resist racking and movement. This translates directly into a sturdy, long-lasting coffee table that can withstand daily use for years to come. My building partner, Whit, and I wholeheartedly recommend that if you are considering building your own furniture – whether it’s a simple shelf or an elaborate coffee table like this one – investing in a Kreg Jig will be one of the best decisions you make. It simplifies the construction process, enhances the strength of your projects, and ultimately contributes to a more satisfying building experience.
Constructing the Bottom Shelf: A Solid Foundation
One of the appealing features of the Benchwright design is its robust bottom shelf, which offers practical storage and contributes significantly to the table’s overall stability and aesthetic. For this crucial component, I used two 1×12 boards. The choice of 1x12s provides ample surface area and thickness, ensuring the shelf is strong enough to hold books, baskets, or decorative items without sagging over time. Securing these two wide boards together to form a seamless, expansive shelf was made incredibly simple and strong thanks to my trusty Kreg Jig. I created a series of pocket holes along the edges where the two boards met, effectively “stitching” them together from the underside. This method not only results in an incredibly strong joint but also keeps the fasteners completely hidden from view on the top surface, maintaining a clean and professional look.
The beauty of using pocket hole joinery for elements like the bottom shelf is its discreet nature. All the securing screws are cleverly hidden beneath the shelf, ensuring that the finished product boasts smooth, uninterrupted surfaces, just like a high-end store-bought piece. This attention to detail is what elevates a DIY project from homemade to handcrafted masterpiece. It’s these small but significant techniques that contribute to the overall quality and finished appearance of your furniture.
Conquering the Drawers: The DIYer’s Ultimate Test
While the main frame and shelf of the coffee table came together with relative ease, the drawers presented the most significant challenge I’ve encountered in my building endeavors to date. It’s a common sentiment among woodworkers that drawers, while incredibly functional and aesthetically pleasing, require a level of precision and patience that can test even seasoned builders. However, let me assure you, despite the initial hurdles, they were absolutely “doable,” and the sense of accomplishment upon their successful completion was immensely rewarding. The integrated storage truly elevates this coffee table from a simple surface to a highly practical and sophisticated piece of living room furniture, making the extra effort well worth it.
The complexity primarily stems from the need for perfect alignment and smooth operation. The Benchwright coffee table design incorporates drawer slides and custom-built drawer frames. What makes this a bit tricky is that the two frames you construct, which the drawers will slide in and out of, have to be almost perfectly identical. Any slight discrepancy in measurements or squareness can lead to drawers that stick, wobble, or simply don’t close properly. This demands meticulous attention to detail during cutting and assembly, often requiring repeated checks and minor adjustments to achieve that buttery-smooth drawer action we all desire.
Essential Tips for Building Flawless Drawers:
- Avoid Furring Strips: This is a crucial piece of advice. Furring strips, while seemingly economical, are often made from lower-grade lumber and are prone to warping, twisting, and inconsistent dimensions. For something as precise as drawer construction, where straightness and stability are paramount, always opt for good quality, straight boards. This will save you endless frustration and ensure a much better outcome for your drawers.
- Ensure Your Boards are Perfectly Straight: Following on the previous point, the straightness of your lumber cannot be overstated. Even a slight bow or curve in a board can throw off the entire drawer mechanism. Before making any cuts, meticulously inspect each board. Use a reliable straight edge to check for any imperfections. Taking the time to select and prepare truly straight lumber will be a game-changer for your drawer assembly.
- Build the First Drawer Frame Based on Your Table’s Actual Measurements: While plans provide excellent guidance, always take precise measurements of the actual opening within your coffee table frame where the drawers will sit. Wood can behave unpredictably, and slight variations can occur during the main table assembly. By basing your first drawer frame’s dimensions on these real-world measurements, you ensure a perfect fit rather than relying solely on theoretical plan measurements. This adaptability is key to successful custom furniture building.
- Use the First Frame as a Template for the Second: Once you’ve successfully built your first drawer frame to fit perfectly, use it as a tangible template for the second. As you assemble the second frame, place it directly on top of the first, constantly checking for alignment and identical dimensions. This “stack and check” method is invaluable for ensuring that both frames are as exact as possible, which is critical for smooth, parallel drawer action.
- Embrace Imperfection and Trust the Drawer Face: It’s important to remember that no build is ever truly “perfect.” Woodworking involves working with natural materials, and slight human errors are inevitable. If your drawer slides feel a little crooked, or you notice a minor discrepancy, take heart! Often, once the decorative drawer face is attached, it can cleverly conceal a multitude of minor imperfections in the underlying mechanism. The drawer face acts as a forgiving facade, making your finished piece look flawless to anyone but the builder. Don’t let minor issues deter you; embrace the learning process and appreciate the handcrafted charm.
The Finishing Touch: Staining for Beauty and Durability
Once the construction was complete, including the challenging but rewarding drawers, it was time for the magical transformation – the finishing phase. This is where the raw wood truly comes to life, revealing its natural beauty and gaining protection against daily wear and tear. I’m excited to share that I finished this coffee table with my new absolute favorite stain!
The product I chose, and now enthusiastically recommend, is Rust-Oleum Dark Walnut Wood Stain. This stain offered everything I look for in a high-quality finish and more. First and foremost, its quick-drying formula is a huge advantage, allowing for faster project completion and less waiting time between coats or before applying a protective topcoat. This is invaluable when you’re eager to see your creation come to life.
Beyond its speed, I was particularly impressed by the significantly reduced odor compared to many other wood stains on the market. Working in a home environment, minimizing strong fumes is always a priority, and this Rust-Oleum stain delivered on that front. But perhaps the most outstanding characteristic is the final finish itself – it’s incredibly even and rich. The Dark Walnut shade brings out the natural grain of the wood beautifully, imparting a deep, luxurious hue that perfectly complements the rustic yet refined aesthetic of the Pottery Barn Benchwright style. The even application ensures a professional, streak-free appearance that truly elevates the entire piece.
The Unveiling: My Pottery Barn Inspired Coffee Table
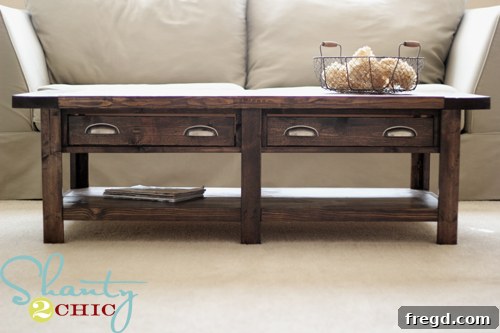
Are you ready to witness the culmination of hard work, careful planning, and a touch of DIY magic? After all the cutting, joining, sanding, and staining, the moment arrived to reveal the finished product. I am absolutely thrilled with how my DIY Pottery Barn inspired Benchwright coffee table turned out. It stands as a testament to what can be achieved with dedication and the right resources, proving that luxury aesthetics don’t have to carry a luxury price tag.
The deep, rich tones of the Dark Walnut stain, combined with the sturdy structure and functional drawers, create a piece that looks incredibly high-end and perfectly suited for any stylish living room. It’s more than just a coffee table; it’s a conversation starter, a focal point, and a proud example of handcrafted quality.
Personalizing Your Creation with Hardware:
The final touch that truly ties a piece of furniture together and allows for a touch of personal flair is the hardware. For my coffee table, I found the perfect drawer pulls at Home Depot, priced at approximately $5 each. These subtle details, while often overlooked, can significantly enhance the character and functionality of your DIY project. Choosing hardware that complements the overall aesthetic of your piece is key – whether you opt for rustic, modern, or classic styles, the right pulls can elevate the design and make it truly yours.
I absolutely LOVE, LOVE, LOVE this finished coffee table! The satisfaction of seeing it completed and knowing I built it myself is unparalleled. And the best part? I saved an incredible $600 by opting for the DIY route with Ana’s brilliant plans. This project is a shining example of how accessible and rewarding woodworking can be, allowing you to create stunning, high-quality furniture that perfectly fits your home and budget.
If you’re as inspired as I am by this transformation and are considering tackling a similar project, I encourage you to give it a try. The journey is incredibly fulfilling, and the result is a custom piece you’ll cherish for years. If you love this DIY Benchwright coffee table, please consider sharing it or pinning it below to inspire others in their own home improvement endeavors! Thank you so much for following along! ~Ashley