
Build Your Own Rustic DIY Wooden Ice Cooler: Free Plans for Perfect Outdoor Entertaining
Welcome, fellow DIY enthusiasts! We’re thrilled you’ve joined us on this exciting project. To stay updated with all our latest DIY creations and home improvement tips, make sure to FOLLOW us on Instagram and Pinterest!
The arrival of summer instantly sparks thoughts of outdoor gatherings, delicious cookouts, refreshing swims, and cherished moments with friends and family. It’s a season defined by joyful entertaining, and what better way to elevate your patio or backyard space than with a stunning, custom-built wooden ice cooler? For years, I dreamt of having a rustic yet functional cooler for our patio, a centerpiece that would not only keep beverages perfectly chilled but also add a touch of handcrafted charm to our outdoor oasis. Last week, that dream solidified into a project, and I realized: I can absolutely build one myself!
Why a DIY Wooden Cooler? The Charm of Custom Outdoor Entertaining
While store-bought coolers are functional, they often lack character and the ability to seamlessly blend with your outdoor decor. A DIY wooden ice cooler, on the other hand, offers a unique blend of practicality and aesthetic appeal. Imagine a beautiful, distressed wood piece that serves as a conversation starter, a testament to your craftsmanship, and a reliable companion for all your summer events. Beyond the visual appeal, building your own allows for customization to perfectly fit your space and needs. Plus, the satisfaction of creating something so useful and beautiful with your own hands is truly unparalleled. It’s an affordable project that yields a high-impact result, transforming any patio into an inviting haven for relaxation and celebration.
Your Project Revealed: Introducing the Country Cooler
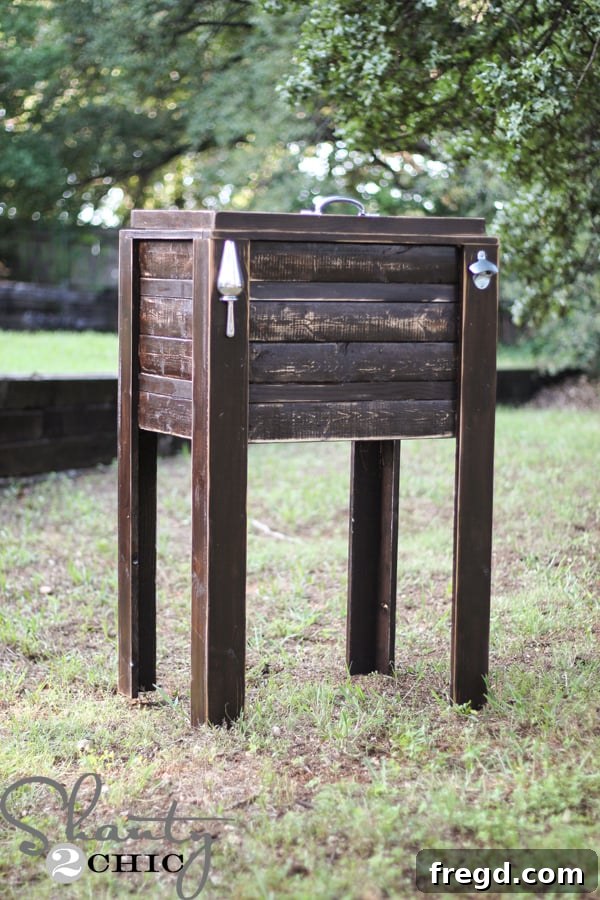
Allow me to introduce you to my pride and joy: the Country Cooler! I’m incredibly excited about this build, not just because it fulfills a long-standing desire for a custom outdoor cooler, but because I meticulously designed and constructed it from scratch. This project represents my first attempt at building a piece of furniture of this scale, and I’m delighted to report that it’s an incredibly beginner-friendly endeavor. Best of all, the entire project cost me only about $50 for materials! To help you replicate this charming and functional cooler, I’m providing a detailed, step-by-step tutorial right here, along with FREE printable plans. These plans are designed to guide you through every cut and assembly step, making the process smooth and enjoyable.
Ready to start building? Click HERE to download or print your FREE plans for this DIY Wooden Ice Cooler!
Essential Materials: What You’ll Need to Build Your Custom Cooler
Gathering your materials is the first crucial step. Having everything on hand before you begin will ensure a smooth and efficient building process. Here’s a comprehensive shopping list for your DIY Country Cooler:
- 6 – 1×4 boards @ 8 ft.
- 5 – 1×2 boards @ 8 ft.
- 3 – 1×3 boards @ 8 ft.
- 1 – 2×3 board @ 4 ft. (Tip: Try to source a scrap piece, or purchase an 8 ft. board and cut it down. This piece is for bottom bracing.)
- 1 set of 2 1/2″ Zinc narrow hinges (for the lid)
- 1 – Rubber stopper with chain (for the drain)
- 1 – 6 1/2″ Zinc utility pull (for a handle)
- Silicone sealant (for waterproofing the drain and cooler lid)
- 1 – Sink flange (the core component of your drain)
- 1 – 1/2″ U Bolt (to attach the ice scoop)
- 1 – Ice scoop (for serving beverages)
- 1 – Zinc bottle opener (a handy addition for guests)
- 3 – Hooks (for hanging towels or accessories)
Wood Selection Insight: For optimal outdoor performance and beautiful aesthetics, I highly recommend using cedar boards for most of the construction. Cedar is naturally resistant to rot, decay, and insect damage, making it an excellent choice for outdoor furniture that will endure various weather conditions. While I utilized some scrap 1×4 furring strips for the main cooler surround in my build, if I were purchasing all new lumber, I would undoubtedly construct the entire piece with cedar. Its gorgeous grain and inherent durability are perfect for a patio cooler.
Tools for Success: Equipping Your Workshop
Even for a beginner-friendly project, having the right tools makes all the difference. Here are the tools I used and recommend, along with some alternatives for those just starting their woodworking journey:
- Miter Saw: This power tool (like my Ryobi Compound Miter Saw) is fantastic for making precise, accurate cuts quickly, which is essential for a clean finish.
- Hand Saw: If you don’t yet own a miter saw, a good quality handsaw is a perfectly viable alternative for this project. It requires a bit more effort but gets the job done.
- Kreg Jig: A Kreg Jig is a game-changer for creating strong, hidden pocket hole joints. It allows for professional-looking assemblies without visible screws.
- Brad Nailer: My Ryobi AirStrike Cordless Brad Nailer speeds up assembly by quickly securing pieces with brad nails, especially useful for trim work and initial alignments.
- Drill: Essential for pre-drilling holes and driving screws.
- Measuring Tape & Pencil: For accurate measurements and marking cuts.
- Safety Gear: Always wear safety glasses and hearing protection when operating power tools.
- Corner Cat (Optional): This handy tool is excellent for distressing edges and corners, giving your project a beautifully aged and rustic look.
Before diving into the construction, let’s talk about the heart of this cooler: the styrofoam insert. I sourced a fantastic styrofoam cooler from Wal-Mart. The convenience of ordering it online for site-to-store pick-up was unbeatable – it was ready in just about four hours! This specific cooler dictates the internal dimensions of your wooden frame, so ensure yours is readily available.
Having your cutting tool ready, whether it’s a powerful miter saw or a reliable hand saw, is paramount for efficient and accurate work. Precision in your cuts will lead to a much cleaner and stronger final product.
Step-by-Step Construction Guide: Crafting Your Outdoor Ice Chest
This comprehensive guide will walk you through each phase of building your wooden ice cooler. Remember to always measure twice and cut once, and to adjust measurements slightly as needed, as board dimensions can vary and wood can be affected by climate.
Preparing the Cooler Surround
The first step is to construct the main frame, or surround, that will house your styrofoam cooler. While I’ll provide the measurements I used for my specific cooler, it’s crucial to measure your own styrofoam cooler and adjust these dimensions accordingly to ensure a perfect fit. Always measure and cut as you go for the best results.
- 8 – 1×4 boards @ 25 1/4″
- 4 – 1×4 boards @ 16 1/2″
- 8 – 1×2 boards @ 25 1/4″
- 4 – 1×2 boards @ 16 1/2″
I utilized my Kreg Jig to create strong, secure pocket holes for attaching the boards. This method creates incredibly sturdy joints while keeping screws hidden for a clean aesthetic. Refer to the image for precise locations where I drilled the pocket holes. Note that some 1×4 boards will have pocket holes drilled towards both ends to connect with the 1x2s. Apply a generous amount of Gorilla Glue wood glue to each joint before securing with pocket hole screws. This combination ensures maximum durability for your outdoor piece.
Once all the pocket holes are drilled and glue is applied, assemble the frame. Ensure all corners are square and the frame is stable. The resulting structure should be a robust surround ready to cradle your styrofoam cooler.
Assembling the Sturdy Legs
Next, it’s time to craft the legs that will elevate your cooler to a comfortable height. Again, use pocket holes for strong, invisible connections.
- 4 – 1×3 boards @ 38 1/4″
- 4 – 1×4 boards @ 38 1/4″
Drill pocket holes into the 1x3s as indicated in the plans. Attach the 1x3s and 1x4s together using pocket hole screws and a generous line of wood glue. This creates robust leg assemblies for your cooler.
Once the leg assemblies are complete, attach them securely to the cooler surround. I found my new Brad Nailer to be incredibly efficient for this step, quickly securing the legs in place. Reinforce these connections with plenty of wood glue for long-lasting stability. I used several nails on the inside of the frame and a few on the outside for extra holding power.
Integrating the Styrofoam Cooler and Base Support
With the main structure complete, it’s time to integrate the core component: the styrofoam cooler. Carefully drop the cooler into the wooden surround. It should fit snugly. Don’t worry if there’s a slight gap; we’ll add bracing at the bottom to provide additional support.
The top edge of the styrofoam cooler should be flush with the top of the wooden surround. You’ll notice a small space remaining below the cooler. This is where the 2×3 boards come in to create a sturdy base.
Cut 3 – 2×3 boards to 16 1/2″ each. Drill pocket holes into both ends of each of these boards. Then, attach them to the inside of the cooler frame, beneath the styrofoam cooler, using pocket hole screws and wood glue. These boards provide essential support for the cooler and its contents, ensuring it can hold plenty of ice and beverages without issue.
Adding Decorative Trim and Crafting the Lid
Now for the details that make your cooler truly shine! Trim work adds a polished, finished look.
Use 1×2 boards to trim the top edge of the cooler surround. Ensure the edges of the trim are flush with the surround for a seamless appearance. You’ll notice a slight overhang created by the trim between the legs; this is intentional and adds to the rustic aesthetic. Carefully measure each piece for an exact fit, then attach them using brad nails and wood glue. This trim not only enhances the visual appeal but also provides a neat edge for the lid to rest upon.
Next, we’ll build the lid. Begin by creating the lid’s frame using 1×2 boards.
- 2 – 1×2 boards @ 25 1/4″
- 2 – 1×2 boards @ 16 1/2″
Drill pocket holes into the ends of the 16 1/2″ boards. Assemble the frame using pocket hole screws and wood glue, ensuring the corners are square and strong.
Now, create the panel for the top of the lid. These boards will fit within the frame you just built.
- 4 – 1×3 boards @ 23 3/4″
- 4 – 1×2 boards @ 23 3/4″
Attach these boards together using pocket hole screws, as indicated in the plans. This creates the solid surface of your lid.
Finally, attach the assembled panel to the lid frame using pocket hole screws and wood glue. Ensure the top surface of the panel boards is flush with the top of the trim, creating a smooth and even lid.
Installing the Essential Drainage System
A crucial feature of any ice cooler is a functional drain. This allows you to easily empty melted ice water without having to tip the entire cooler. My ingenious solution involved using a common sink drain setup, and it proved to be incredibly simple and effective!
I purchased a basic sink flange and a rubber stopper with a chain. These are readily available at any hardware store.
To create the drain hole in the styrofoam cooler, simply twist the sink flange into the desired spot on the bottom of the cooler. Make sure to position it where it won’t interfere with the 2×3 support boards you installed earlier. The twisting action of the flange will neatly cut through the styrofoam, creating a perfectly sized opening. I had to clean up the edges a bit with a knife, but this technique ensures an exact fit for your flange, crucial for a watertight seal.
Once the hole is cut, apply a generous bead of silicone sealant around the flange and carefully drop it back into the newly created hole. Push it in snugly to create a tight seal. Wipe away any excess sealant that seeps out with a wet paper towel for a clean finish. This silicone barrier is vital for preventing leaks and ensuring your cooler remains efficient.
Finalizing the Lid and Applying the Finish
To secure the styrofoam cooler’s lid to your newly built wooden lid, apply a liberal amount of silicone sealant to the top of the styrofoam lid. Then, carefully press the wooden lid onto it, ensuring a firm bond. This creates a unified, insulated lid for your cooler.
Now for the exciting part – bringing out the wood’s natural beauty and protecting it for outdoor use! I opted for a rich, rustic finish that perfectly complements the “Country Cooler” aesthetic. First, I applied one coat of Rust-Oleum Dark Walnut stain. Apply the stain evenly with a brush, wiping off any excess to achieve your desired depth of color. This stain instantly deepens the wood tone and highlights its grain.
After the stain had fully dried (refer to the product instructions for specific drying times), I followed up with three coats of Rust-Oleum Spar Varnish in satin finish. Spar varnish is an exceptional choice for outdoor projects because it provides superior protection against UV rays, moisture, and temperature fluctuations, preventing the wood from weathering prematurely. Be sure to allow the suggested drying time between each coat for optimal adhesion and durability. This multi-coat application creates a robust barrier, ensuring your cooler stands up to the elements for years to come.
To achieve those lovely distressed edges, I used my Corner Cat tool. This lightweight and easy-to-handle tool makes it incredibly simple to create a gently worn, aged look on all the corners and edges of your cooler. Just run it along the wood to reveal hints of the natural wood beneath the stain, adding to its rustic character.
Adding the Finishing Touches: Hardware and Accessories
The final step is to install all the hardware and accessories that make this cooler both functional and stylish. While I was too excited to capture a photo of the hinge installation, rest assured it’s a straightforward process. I simply attached two narrow hinges to the back of the lid, connecting it securely to the cooler body. Ensure they are aligned for smooth opening and closing.
I absolutely adore the zinc bottle opener! It adds a fantastic touch of vintage charm and undeniable utility. I purchased mine from Amazon, and it’s easily one of my favorite features. Mount it securely on the side of your cooler for easy access to cold beverages.
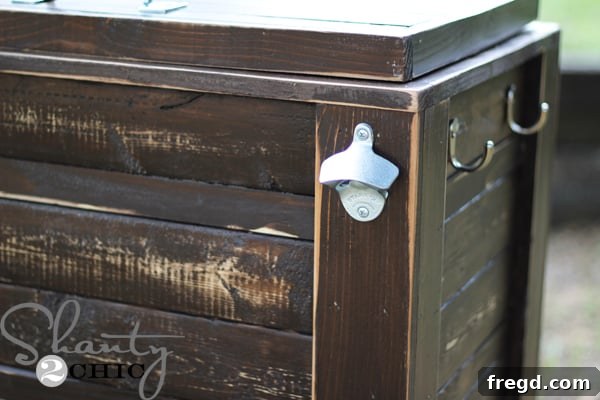
An ice scoop is indispensable for serving drinks. I found this excellent ice scoop on Amazon as well, and paired it with a U-bolt for a unique and secure attachment. To install the U-bolt, pre-drill two holes using a drill bit that matches the thickness of the bolt. Then, gently hammer the U-bolt into the holes. If the fit isn’t perfectly snug, a dab of Gorilla Super Glue Gel will ensure it stays firmly in place.
Finally, attach your chosen utility pull as a handle for easy movement of the cooler, and add a few hooks on the side for hanging bottle openers, towels, or other accessories. With everything in place, it’s time to fill it with ice and your favorite beverages and let the party begin!
Your New Outdoor Entertainment Hub Awaits!
I am absolutely smitten with this charming Country Cooler! It has already been a fantastic addition to our outdoor entertaining this season. One of the key design considerations was ensuring practicality and longevity. I specifically designed this cooler so that the styrofoam insert can be easily replaced whenever necessary – it simply slides in and out. The entire wooden lid is also effortlessly removable, making cleaning and maintenance a breeze. And for those curious about my stylish accents, the adorable kitchen towels are from the Threshold brand at Target!
This DIY wooden ice cooler is more than just a place to keep drinks cold; it’s a statement piece, a functional work of art, and a hub for creating unforgettable summer memories. Its rustic appeal and thoughtful design make it perfect for any patio, deck, or backyard gathering.
Ready to Build? Download Your Free Plans!
If you’re as enchanted by my Country Cooler as I am, I would absolutely LOVE for you to share it! Please feel free to pin it to your Pinterest boards and inspire others to create their own.
Don’t forget, all the detailed measurements and steps are laid out in our comprehensive, FREE printable plans. These plans are designed to make your building experience as straightforward and enjoyable as possible. Simply click HERE to download and/or print your FREE plans for this fantastic wooden cooler!
Thank you so much for stopping by, and we wish you a very Happy Summer filled with fantastic DIY projects and memorable gatherings!
~Ashley