
Craft Beautiful & Budget-Friendly DIY Coasters: A No-Power-Tool Project!
Hello, fellow DIY enthusiasts and craft lovers! I hope you all had a wonderfully restful and inspiring weekend. I’m absolutely thrilled to kick off this week by sharing one of my latest creative endeavors – a project that checks all the right boxes: it’s incredibly affordable, astonishingly easy to complete, and best of all, requires absolutely no power tools! Yes, you heard that right – no saws, no drills, just pure crafting fun. Get ready to transform simple materials into stylish home decor!
For quite some time, I’ve been on the lookout for new coasters to replace my worn-out set, craving something fresh and personalized that truly reflected my style. After some brainstorming and hands-on experimentation, I finally finished these beauties, and I couldn’t be happier with the result! My goal was to make this project as accessible as possible, ensuring anyone could recreate these stunning coasters. To make it even easier for you, I’m thrilled to provide another set of free printables, allowing you to achieve a professional, custom look without the hassle of designing your own artwork. Let’s get crafting and add a touch of handmade charm to your home!
Why Craft Your Own Coasters? More Than Just a Drink Saver!
While store-bought coasters certainly serve their purpose, there’s an undeniable magic that comes with creating your own. DIY coasters offer a unique blend of personalization, affordability, and creative satisfaction that mass-produced items simply can’t match. Imagine designing a set that perfectly complements your living room aesthetic, or crafting heartfelt gifts for friends and family that truly stand out. Beyond just protecting your furniture from unsightly water rings, these handmade treasures become conversation starters, reflecting your personal style and ingenuity. Plus, the sheer joy of transforming basic materials into something beautiful and functional is an incredibly rewarding experience. This project, in particular, empowers you to create custom pieces on a shoestring budget, proving that stylish home decor doesn’t have to come with a hefty price tag.
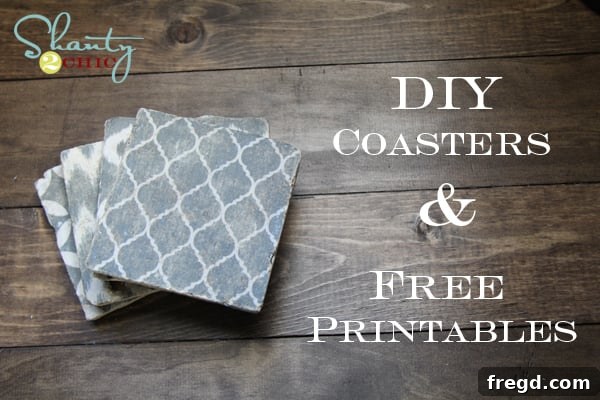
Here’s a sneak peek at my finished set, ready to elevate any coffee table or bedside stand:
Gather Your Supplies: What You’ll Need for Your Custom Coasters
One of the best aspects of this DIY project is how minimal and inexpensive the supply list is. You won’t need to break the bank or scour specialty stores to gather what you need. Most of these items can be found at your local hardware store or craft shop, making it a perfect spontaneous weekend project. With just a few key components, you’ll be well on your way to creating a beautiful, personalized set of coasters.
Here are the essential items for these adorable, custom coasters:
- 4×4 Tumbled Marble Tiles: These are the foundation of our coasters. I discovered mine at Lowe’s for an incredible price – around $4 for a box of 10! This makes them unbelievably cheap and perfect for crafting multiple sets or other small projects. The tumbled finish gives them a rustic, aged look that’s ideal for this project.
- Mod Podge: This versatile craft essential acts as both an adhesive and a sealant. I personally opted for the Matte finish to give my coasters a softer, more subtle look, but you can absolutely use Glossy Mod Podge if you prefer a shinier, more vibrant result. Either way, Mod Podge is key to transferring your design smoothly.
- Sealer for Coasters: To ensure your beautiful new coasters withstand daily use and moisture, a durable sealer is a must. For this project, I turned to a new favorite product of mine, which I’ll elaborate on below.
- Artwork for Coasters: This is where your personalization comes in! You can either source and print your own designs from your computer or, even easier, download my free coaster printables.
- Additional Tools: While no power tools are needed, a credit card (or even an old insurance card) will come in handy, as will some wax paper to protect your workspace.
The Magic of Rust-Oleum Ultimate Polyurethane with Soft Touch
When it comes to protecting my DIY projects, I’m always on the lookout for products that deliver exceptional results, and this one truly blew me away! The sealer I used, and have since become utterly obsessed with, is the Rust-Oleum Ultimate Polyurethane with Soft Touch. This isn’t just any sealer; it offers a fantastic combination of protection and a lovely tactile finish. I absolutely adore this product! It has quickly become my go-to finish for everything from furniture makeovers to various crafting projects. What makes it so great? It dries incredibly fast, which is a huge plus when you’re eager to see your project complete, and it provides robust protection, ensuring all my hard work lasts. Its “soft touch” quality adds a subtle, pleasant feel that elevates the final piece. You can explore more details about this amazing product and its uses by clicking HERE. The best part? You can pick up a small can for a super affordable price at Lowe’s, making it an accessible option for any crafter.
Your Artwork, Your Style: Choosing or Creating Your Designs
The design element is where your coasters truly come to life and reflect your unique taste. You have a couple of fantastic options for the artwork. If you’re feeling creatively inspired, you can easily search for and print your own designs directly from your home computer. Think about what themes, patterns, or quotes would best suit your decor or the recipient if these are a gift. Alternatively, to make things even simpler and ensure beautiful results, you can download my exclusive free coaster printables by clicking on the picture below! These designs are ready to go, saving you time and effort while guaranteeing a stylish outcome.
If you opt to use your own artwork, simply print it out from your computer at home. Make sure your designs are sized appropriately for your 4×4-inch tiles. Once printed, you’re all set to move on to the next exciting step!
Step-by-Step Guide: Crafting Your Personalized Marble Coasters
Now for the fun part – assembling your coasters! This process is surprisingly straightforward, and with these detailed steps, you’ll be creating stunning, professional-looking coasters in no time. Remember to allow adequate drying time between each Mod Podge application for the best results.
Step 1: Prep Your Tiles with Mod Podge
The first crucial step involves preparing your marble tiles. I recommend applying two generous coats of Mod Podge to the **back** of your tile. While you could technically use the front, I’ve found through experience that the transfer process works more effectively and yields a smoother finish when applied to the slightly rougher, unfinished back of the tile. This creates a better surface for the design to adhere to. Apply an even layer, let it dry completely, and then apply a second coat. Ensure each coat is fully dry to the touch before proceeding.
Step 2: Apply Mod Podge to Your Artwork
Once the Mod Podge on your tiles is completely dry, it’s time to prepare your chosen artwork. Carefully apply a thin, even coat of Mod Podge directly onto the printed side of your artwork. This layer will act as the adhesive that bonds your design to the tile. Work quickly but precisely to ensure full coverage without over-saturating the paper.
Step 3: Transfer Your Design to the Tile
This step requires a little care and precision. Place your Mod Podge-coated tile directly onto your design. Crucially, the side of the tile where you applied the two coats of Mod Podge should be facing **down** onto your artwork. The goal is for the Mod Podge on the tile to meet the Mod Podge on the artwork. To prevent any mess on your countertop, I highly recommend laying down a sheet of wax paper beforehand. This makes cleanup a breeze! After placing the tile, gently press down to ensure good contact. Then, grab an old credit card (or even an insurance card!) and use it to firmly push out any trapped air bubbles from beneath the tile. Work from the center outwards, carefully smoothing the paper against the tile until it’s perfectly flat and adhered. This ensures a clean, bubble-free transfer.
Step 4: Bake for Durability (The “Cooking” Process)
Yes, it’s “cooking” time for your coasters! This step helps to cure the Mod Podge and fully transfer the design onto the tile, creating a more durable and integrated finish. Preheat your oven to a low temperature – 170 degrees Fahrenheit (approximately 77 degrees Celsius). Once heated, place your tiles in the oven and let them “bake” for about 20 minutes. This low heat treatment helps to bond the Mod Podge and design firmly to the tile. Keep an eye on them, but generally, this process is very forgiving.
Step 5: Reveal Your Design: The Rubbing Technique
After the tiles have finished their oven treatment, allow them to cool completely. This is the moment of truth where your design will be revealed! To do this, you will gently rub off the paper. Take your finger and a small amount of water, and delicately begin to rub the paper away. The design itself has now been transferred and is embedded within the layers of Mod Podge you applied in Step 1. A few crucial tips for this stage:
- Rubbing vs. Soaking: It’s important to *rub* the paper off, not soak it. If you submerge the tile in water, the design will likely come off completely, undoing all your hard work.
- Control the Distress: The more you continue to rub, the lighter and more “distressed” your design will become. This is where you can truly customize the look. If you want a perfectly crisp image, rub very gently. For a vintage, aged, or “shabby chic” appearance, you can rub a bit more vigorously.
- Dry and Re-evaluate: I found it helpful to rub for a bit, then let the tiles dry for a few minutes. Once dry, you can more clearly see any remaining paper residue or areas that need a little more rubbing to achieve your desired level of distress. This iterative process allows you to fine-tune the final aesthetic. Think of it like distressing furniture – you decide how worn and weathered you want it to look.
Step 6: Seal for Long-Lasting Protection
Once your designs are revealed and completely dry after the rubbing process, it’s time to seal them for long-lasting protection. This is where the Rust-Oleum Ultimate Polyurethane with Soft Touch comes into play. I applied two coats of this fantastic sealer because we use our coasters frequently, and I wanted to ensure maximum durability against spills, moisture, and general wear and tear. Apply thin, even coats, allowing each coat to dry thoroughly according to the product instructions before applying the next. This sealant will protect your beautiful artwork and make your coasters truly functional and robust.
Step 7: Add Furniture Protection with Felt Pads
To prevent your new, stylish coasters from scratching your precious furniture, adding felt circles or small rubber pads to the bottom of each tile is a simple yet essential final touch. You can find self-adhesive felt pads at any hardware or craft store. Simply peel and stick one to each corner or a larger one in the center of the underside of your tile. This small step ensures your furniture remains pristine while your custom coasters do their job.
Admire Your Handiwork: The Finished Coaster Collection!
Are you ready to see the magnificent transformation? The final result is simply captivating! These coasters possess a unique charm, looking almost stamped and beautifully aged, as if they were antique finds from a quaint European market. They exude a super cute, custom vibe that store-bought items simply can’t replicate. What’s even better is that I created my entire set for less than $5 – talk about a budget-friendly home upgrade! The distressed look adds character and depth, making each coaster feel like a treasured piece of art. They are not just functional; they are a stylish statement.
More Than Just Coasters: Perfect for Personalized Gifts!
Beyond adorning your own home, these DIY marble tile coasters make truly exceptional and thoughtful gifts. Their customizability means you can tailor them to anyone’s taste, making them perfect for a wide array of occasions. Imagine gifting a set of these charming coasters to your favorite teacher at the end of the school year – a practical and personal token of appreciation. They’re also ideal for birthday gifts, housewarming presents, bridal showers, or even as unique holiday stocking stuffers. Because they cost so little to make (remember, I made my set for under $5!), you can create multiple sets without straining your budget, making personalized gifting more accessible than ever. The handmade touch conveys extra care and effort, making them cherished keepsakes for anyone lucky enough to receive them.
Final Thoughts & Your Next DIY Adventure!
I truly hope you’re as smitten with these DIY marble tile coasters as I am! They really are incredibly simple to create, yet they boast such a high-end, boutique look – honestly, they could easily pass for something you’d find at a trendy store like Anthropologie. The combination of ease, affordability, and custom appeal makes this project my absolute favorite kind of DIY! It’s deeply satisfying to create something so beautiful and functional with your own hands, especially when it costs so little. This project is a fantastic reminder that you don’t need expert skills or expensive tools to add personalized style to your living space. Dive in, get creative, and enjoy the process of making something truly unique.
If you’ve enjoyed this tutorial and are inspired to try it yourself, I would absolutely LOVE for you to share the joy! Please consider pinning this project like crazy to your Pinterest boards or sharing it with friends and family who love a good DIY. Your support means the world and helps spread the crafting inspiration!
Have a fantastic and creative week!
~Whitney